The Comcast guy should have known this would happen and fixed things for you.
If I understood correctly, the Photosmart C-4780 is not currently connected by USB to any computer. Is that correct?
I'll assume that the ENVY 7855 also is not connected to any computer by USB or Ethernet cable.
If I understood correctly, there is an icon for the ENVY 7855 in Devices and Printers on your Windows 7 computer but no icon for the Photosmart C-4780. Is that correct?
********************************************************
By default, wireless printers are configured to obtain an IP address automatically from your router. The problem is that the Windows printing system very rarely is capable of determining if a printer's IP address has changed after installation. This
results in print jobs continuing to be sent to the old IP address and because there is no longer a printer at that address, the print jobs just disappear. I haven't see the error message you reported in this situation, so there might be something else amiss,
but please do the following to help diagnose the problem.
A. Determine the IP address that is configured in Windows
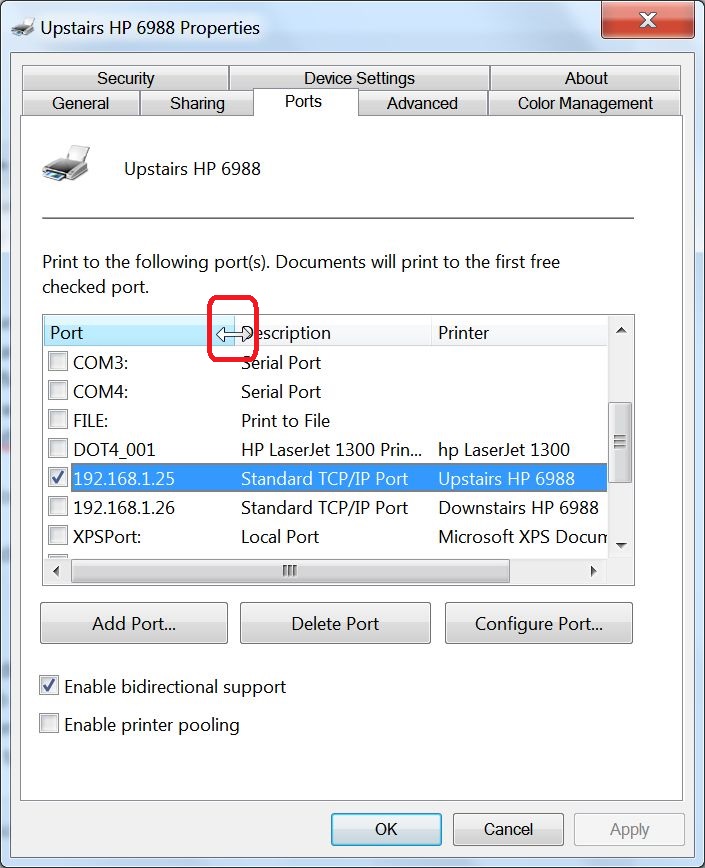
- Go to Devices and Printers, right-click on the icon for ENVY 7855 and select "Printer properties" (NOT "Properties" or "Printing preferences").
- On the "Ports" tab, look at the line that is checked and highlighted for the IP address; you probably will have to click and drag on the faint vertical line in the header row between "Port" and "Description" in order to see the entire IP address.
(See screenshot below).
- Cancel out of Printer properties at this point
B. Determine the IP address that is configured on the printer
- Do this using the printer's front panel controls. The ENVY 7855 can print both a "Wireless Test Report" and a "Network Configuration Page." Because I'm not certain of what information is on either of these reports, I'm giving instructions for both
of them. These are from pages 117-119 of your printer's User Guide: http://h10032.www1.hp.com/ctg/Manual/c05634824
- Wireless Test Report
- From the printer control panel, touch or swipe down the tab at the top of the screen to open the
Dashboard, touch the Wireless button (antenna), and then touch
the Settings icon (gear).
- Touch Print Reports
- Touch Wireless Test Report
- Network Configuration Page
- From the printer control panel, touch or swipe down the tab at the top of the screen to open the
Dashboard, touch
Setup (gear), touch
Reports, and then touch
Network Configuration Page.
C. Determine the network configuration of the Windows 7 computer
- Open a Command Prompt (click Start, type Command Prompt in the Search box, and press Enter)
- Type the following in the black Command Prompt window and press Enter after each line
ipconfig /all > "%userprofile%\Desktop\ipinfo.txt"
notepad "%userprofile%\Desktop\ipinfo.txt"

exit
- In the open Notepad window, click Edit > Select All (or press CTRL+A) then click Edit > Copy (or press Ctrl+C)
- In the body of your Question, Right-click > Paste (or press CTRL+V) the data from the Notepad window
- Close Notepad and delete ipinfo.txt from your Desktop
In summary, please include the following data in your reply:
- The IP address (or other information) from the "Port" column of the line that is checked and highlighted in the "Printer properties" applet
- From either the "Wireless Test Report" or "Network Configuration Page," the printer's IP address, Default Gateway, and "IP Setting" (from the User Guide, this should either be "Automatic" or "Manual")
- The output from the ipconfig /all command
' cx='32' cy='32' r='32' /%3E%3Ctext x='50%25' y='55%25' dominant-baseline='middle' text-anchor='middle' fill='%23FFF' %3EA%3C/text%3E%3C/svg%3E)
' cx='32' cy='32' r='32' /%3E%3Ctext x='50%25' y='55%25' dominant-baseline='middle' text-anchor='middle' fill='%23FFF' %3EL%3C/text%3E%3C/svg%3E)