Dynamic DNS Error 9005 and event id 20032 & 200319

Tonito Dux 976 Reputation points
2021-10-18T12:58:57.427+00:00

Hi,

I am battling an issue with DNS dynamic updates and DHCP server for some time. My company has 4 DCs, all are also DHCP servers. Two DC in our main HQ have a failover configured.

The errors in DHCP-Server event log that we are receiving are:

  1. Forward record registration for IPv4 address [[192.168.0.69]] and FQDN machinename.domain.local failed with error 9005 (DNS operation refused.).
  2. PTR record registration for IPv4 address [[192.168.0.69]] and FQDN machinename.domain.local failed with error 9005 (DNS operation refused.).

I managed to change the following:

  1. I added the dns dynamic update credentials in IPV4 part of the DHCP console, i checked the password multiple times to make sure everything is ok.
  2. Ran the BPA on DHCP where it showed me that dhcp did not have the registry permissions, added full access for computer.
  3. 006 Option is set to our two main DCs, first is our first DC and he is the main man.
  4. Scope options:

141414-scope-options.jpg

DNS Settings:

  1. Dynamics updates are set to secure only
  2. Scavenging 1 day. Non-refresh and refresh 1 day.
  3. Reverse zones are setup:

141297-dns-reverse.jpg

After all this I am seeing that Host A entries after I deleted them manually today are being stamped by the service account, but some are still being stamped by their own computer account. Why is this happening?

Cheers

Windows for business | Windows Client for IT Pros | Networking | Network connectivity and file sharing
{count} votes

Accepted answer
  1. Tonito Dux 976 Reputation points
    2021-10-22T07:59:40.003+00:00

    Hi,

    I would like to confirm that the steps I have taken in this case have worked, at least in my case. After being unable to find a suitable solution on various forums and sites, I've spend 3 days troubleshooting only to accidentally find the solution.

    Error:

    1. Forward record registration for IPv4 address [[192.168.0.69]] and FQDN machinename.domain.local failed with error 9005 (DNS operation refused.).
    2. PTR record registration for IPv4 address [[192.168.0.69]] and FQDN machinename.domain.local failed with error 9005 (DNS operation refused.).

    Solution:

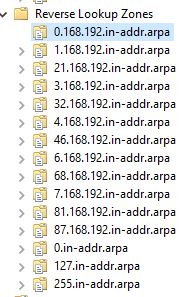
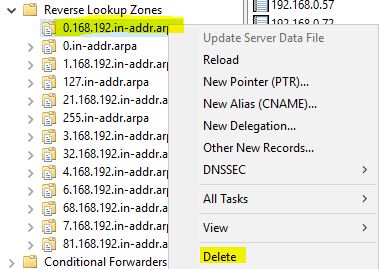
    1. In DNS Manager, got to properties of the zone you are going to delete, note all settings for the zone, delete the zone in Reverse Lookup Zones which shows errors:

    142902-reverse-lookup-zone.jpg

    1. Depending on the size of your infrastructure/how many DCs you have, let this change propagate to all DCs.
    2. Recreate the deleted zone with the values you noted before deletion.
    3. Check event viewer log under Application and services->Microsoft->Windows->DHCP-Server->Microsoft-Windows-DHCP Server Events/Admin There should be no more errors.

    If you want to know more:

    Upon further investigation, I simply compared the "security" Tab of the zone which didn't had any problems with the problematic one, and the difference was that the problematic zone did not have "DnsAdmins" Group. In my DnsAdmins Group there is currently only a service account which is used for dns dynamic updates (https://www.serverbrain.org/network-infrastructure-2003/using-dns-dynamic-update-credentials.html). At first, I tried to solve the problem without deleting a zone, and this also worked (not 100% sure). I added ALL the rights and "subrights" to the "DnsAdmins" group:

    142853-security-rights.jpg

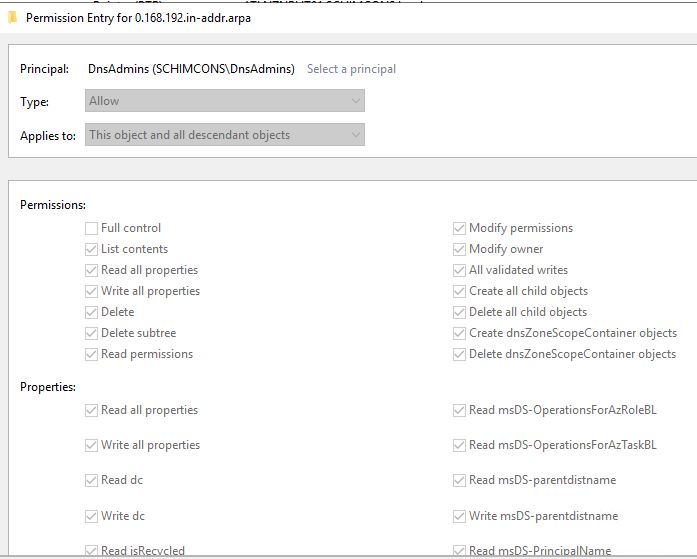
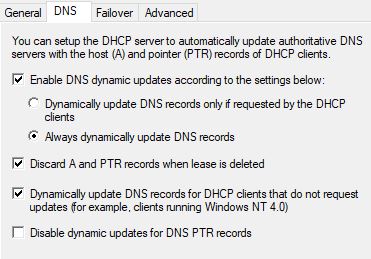
    So everything must be enabled except "full control".

    Cheers

    1 person found this answer helpful.

4 additional answers

Sort by: Most helpful
  1. Gary Reynolds 9,621 Reputation points
    2021-10-18T22:47:42.717+00:00

    Hi @Tonito Dux

    If you have both the DHCP server and the clients updating DNS records then you could see both attempting to update the record. Normally the first one that creates the DNS record is the owner, The default permissions that are assigned to the zone, will not allow the ownership to be take by another client.

    The order of the DNS servers in the DHCP scope option shouldn't make much difference, as the issue is likely to be which process registers the DNS record first.

    If you turn on the DHCP auditing\logging, you should be able to see more details on the reason for failure. Also if you enable DNS logging you might be able to see more details on why the DNS updates are failing.

    141534-dns-debug.png

    Gary.

    1 person found this answer helpful.

  2. Gary Reynolds 9,621 Reputation points
    2021-10-19T20:37:32.32+00:00

    Hi @Tonito Dux

    The logs don't contain the actual DNS update request, they might have been sent to a different DNS server.

    Have a read of the this post, as it contains a the details and step by step guide on how to setup DHCP updates based on your scenario, at least this should get you to a known good configuration.

    https://blogs.msmvps.com/acefekay/2016/08/13/dynamic-dns-updates-how-to-get-it-to-work-with-dhcp-scavenging-static-entries-their-timestamps-the-dnsupdateproxy-group-and-dhcp-name-protection/

    Gary.


  3. Deleted

    This answer has been deleted due to a violation of our Code of Conduct. The answer was manually reported or identified through automated detection before action was taken. Please refer to our Code of Conduct for more information.


    Comments have been turned off. Learn more

  4. Dahle, Joshua (MNIT) 0 Reputation points
    2025-06-05T16:46:30.9333333+00:00

    you need to create a service account and have that create the dns records. If dhcp server A create a DNS record, and then that person logs off and moves to a different subnet. If he asks for an IP and DHCP server B responds, DHCP server B will not have access to remove the DNS record created by DHCPServer A. So it will either create a duplicate which will not be used by DNS as it will use the first record over the most recent.

    Using a service account, all dhcp server who are using it, will be able to remove dns records created by any of the other dhcp servers as they will mutually be the owner of each dns record.

    service accounts should be created via powershell, not a shared AD account in which all the servers share a password.

    https://learn.microsoft.com/en-us/windows-server/identity/ad-ds/manage/understand-service-accounts

    Heres an effective guide.

    Setting Up Managed Service Accounts on Windows Server 2012 or Newer

    Step 1: Initialize the Key Distribution Service (KDS)

    If you are running Windows Server 2012 or newer, start by running the following command to initialize the KDS:

    Add-KdsRootKey -EffectiveTime ((Get-Date).AddHours(-10))
    

    This step is necessary because the Managed Service Account feature was introduced in Windows Server 2008, and the KDS, which is required for creating and using Group Managed Service Accounts, was introduced in Windows Server 2012.

    Step 2: Create a New AD Service Account

    To create a new Active Directory Service Account, use the following command:

    New-ADServiceAccount -DNSHostName "yourserver" -Name "service_account_name" -PrincipalsAllowedToRetrieveManagedPassword "server1$, server2$"
    

    Replace "yourserver" with the DNS hostname of your server, "service_account_name" with the desired name for the service account, and "server1$, server2$" with the list of servers allowed to retrieve the managed password, separated by commas.

    Step 3: Install the Service Account

    Install the newly created service account using the following command:

    Install-ADServiceAccount "service_account_name"
    

    Replace "service_account_name" with the name of the service account created in Step 2.

    Step 4: Assign the Service Account to a Group

    In the Server Manager dashboard, click on Tools and select Active Directory Users and Computers. Navigate to Users, right-click on the group to which you want to add the Managed Service Account (e.g., DNSAdmins or DHCP Admins), and add the service account.

    Step 5: Configure the Service Account on DNS/DHCP Server Controllers

    Go to Services, locate the controllers, right-click on them, and select Properties. In the Properties window, click on the Log On tab, choose This Account, and enter the name of the service account created in Step 2 (formatted as DOMAIN\ServiceAccountName$). Click OK and restart the DNS/DHCP Server Controller.

    Step 6: Remove the Managed Service Account

    To remove the Managed Service Account from DNS/DHCP Server Controllers, open the command prompt and run the following command:

    Remove-ADServiceAccount "service_account_name"
    

    Replace "service_account_name" with the name of the service account you wish to remove.

    the builtin group this service account would want to be part of would be DNSUpdateProxy - or create your own.

    0 comments No comments

Your answer

Answers can be marked as Accepted Answers by the question author, which helps users to know the answer solved the author's problem.