Developer technologies | VB
An object-oriented programming language developed by Microsoft that can be used in .NET.
This browser is no longer supported.
Upgrade to Microsoft Edge to take advantage of the latest features, security updates, and technical support.
' cx='32' cy='32' r='32' /%3E%3Ctext x='50%25' y='55%25' dominant-baseline='middle' text-anchor='middle' fill='%23FFF' %3EA%3C/text%3E%3C/svg%3E)
Hi, i have created a grid and want to save data from textboxes to grid on a Modal.
The update only happens after postback event. I have added an update panel with Asynchronous trigger on button click.
Now grid updates without refreshing the page but it only updates every second click event.
see example vb code:
Private sub Default_Load()
if Not Me.IsPostBack Then
build()
end if
end sub
private sub build()
LoadGrid()
end sub
private sub LoadGrid()
with grid
...
...
...
end with
end sub
private sub addBtn_Click()handles.addBtn_Click
if not Me.Postback then
grid.DataBind()
end if
end sub
HTML:
<asp:button id="add_Btn" runat="server" />
<asp:UpdatePanel UpdateMode="Conditional" id="UP" runat="server" >
<Triggers>
<asp:AsyncPostBackTrigger ControlID="add_Btn"/>
</Triggers>
<ContentTemplate>
<uc1:grid runat="server" ID="grid"/>
</ContentTemplate>
</asp:UpdatePanel>
' cx='32' cy='32' r='32' /%3E%3Ctext x='50%25' y='55%25' dominant-baseline='middle' text-anchor='middle' fill='%23FFF' %3EA%3C/text%3E%3C/svg%3E)
Hi @AJKruger ,
i have created a grid and want to save data from textboxes to grid on a Modal.
You mentioned that you want to save the data of the textbox, but I didn't find any textbox control or input element in the code you provided. What is the triggering event to save the data? Is it the button click event mentioned below? If possible, please describe your needs in more detail.
<uc1:grid runat="server" ID="grid"/>
What is this control, I didn't find it in the toolbox, is it a third-party control?
' cx='32' cy='32' r='32' /%3E%3Ctext x='50%25' y='55%25' dominant-baseline='middle' text-anchor='middle' fill='%23FFF' %3EAK%3C/text%3E%3C/svg%3E)
Ok, lets break this down a bit.
First up, your button click will never have to test/check postback flag - the button click will ALWAYS be a postback!
Next up, lets leave the update panel out of this - get it working without the UP, and then add that later. (surround the content you want with the update panel.
do keep in mind that a UP does not actually prevent a post back. What occurs is called a "partial" post-back.
In fact, the "regular" page cycle, including that of page on-load WILL STILL trigger each time!
So, while it "looks" like a post-back is not occuring when you use a UP, it actauly DOES post-back, it just a partical one, and thus only the content in the UP is posted back to the server. but, make no mistake here, the UP does in fact cause a post-back, and DOES cause the page life cycle to trigger, including that of the page load event firing each time.
Next:
You look to have put the "whole" grid view inside of a user control. That is ok, and fine, but then the question becomes did you make the pop up dialog to add that new row ALSO part of that user control (UC)?
Again, it should not really matter.
Also, since you going to all that trouble to build some "editor" that pops up as a dialog, then why not make that code do BOTH jobs to edit a row, and add a row? After all, the given code will be near 100% idential in both cases, so you might as well use all that work to provide both edit and adding.
And this is a good idea not only from a code saving point of view, but ALSO from a UI point of view. It will mean that uses have the SAME UI for editing as they do for adding - and thus a lower learning curve, a consistant UI, and they not have 2 different ways and 2 different UI to edit a reocrd vs adding a record. So, it is a win win with less code for you, and a consitatnct UI experiance for the end users.
So, do keep in mind:
the page load event STILL does trigger. And with a UC, then that page load event WILL ALSO trigger each time.
However, (even as your code shows), in this case, you are able to (and should) test/check the IsPostBack flag in the on-load event (for both UC and the web page you dropped that UC into).
And as noted, you should not (in fact near never) have to test for isPostBack flag for a button, since in ALL cases, IsPostBack = true, and it always will be.
So, use of UC does not get you off the hook to test/check/do things in the UC page load event - it will trigger each button click, and MORE imporant adopting a UP will NOT change this operation at all.
The page load event of BOTH the page and the UC events will trigger each time on ANY button click on the page (and again, use of UP does not change this). (the 2 page load events will trigger each time).
And if you using a master page? Then all 3 page load events trigger, and ALWAYS will, even if using a UP.
You find this sequence of events for ANY button click:
current page load event will trigger.
Master page load event will trigger
UC page load event will trigger.
So, do keep in mind that your "design" has to make the above assumptions. That assumption is page load events trigger, will always trigger, and that includes the UC, and that includes when using a UP panel.
However, if you in page load event adopt the habit of testing/checking the IsPostBack flag, then as a general rule, all of the above will not matter - since we assume you start to code by habit with all of the above in mind, and this issue thus becomes a "non issue".
Ok, so now that we buttoned up all of the issues so to speak, lets assume we have a grid control, and on that grid control we have a edit button. The edit button will pop up the dialog to edit that one row.
And of course, once we have that working, then it is a simple matter to create a "add new row" button. 'That button can thus create the new record, and call the popup dialog - the SAME code and dialog we use for editing that one row!!
So, the pop dialog does double duty. it will allow us to have both edit code, and add code, but the "one" row edit pop dialog can handle both, since it only ever going to edit a row anyway!
Ok, the only other issue we not determined here, is the UC going to display the grid (gv), and provide edit ability, or is that "pop edit/add row" feature going to be part of the UC, or is it going to be part of the existing working page?
You can have this work either way, but it seems to me if the UC is to display that gv, then it stands to reason the pop edit a row feature should be part of that UC also. (I don't think it really matters much anyway, but we should at least have made this design decision).
So, lets wire this up on a plain jane page.
Once done, it is a "simple" matter to create a UC and move the markup + code into that UC.
So, say our gv like this:
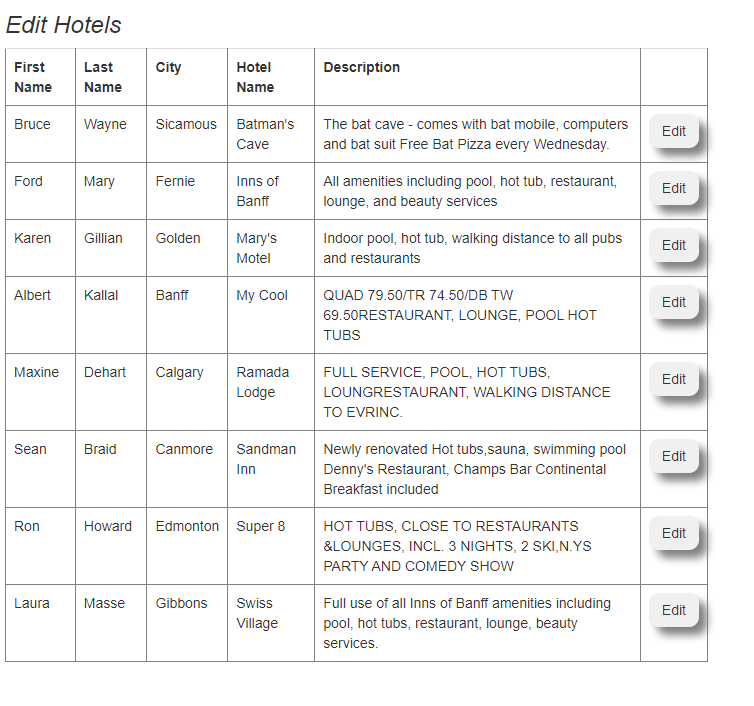
<h3><i>Edit Hotels</i></h3>
<div id="MyGridArea" runat="server" clientidmode="static">
    <asp:GridView ID="GridView1" runat="server" AutoGenerateColumns="False"
        DataKeyNames="ID" Width="38%" CssClass="table table-hover"  >
        <Columns>
            <asp:BoundField DataField="FirstName" HeaderText="First Name" />
            <asp:BoundField DataField="LastName" HeaderText="Last Name" />
            <asp:BoundField DataField="City" HeaderText="City" />
            <asp:BoundField DataField="HotelName" HeaderText="Hotel Name" />
            <asp:BoundField DataField="Description" HeaderText="Description" />
            <asp:TemplateField>
                <ItemTemplate>
                    <asp:Button ID="cmdEdit" runat="server" Text="Edit" CssClass="btn myshadow"
                        OnClick="cmdEdit_Click" />
                </ItemTemplate>
            </asp:TemplateField>
        </Columns>
    </asp:GridView>
</div>
We have some rows, and our Edit button.
and our code to load up the GV is this:
Protected Sub Page_Load(ByVal sender As Object, ByVal e As System.EventArgs) Handles Me.Load

    If Not IsPostBack Then
        LoadGrid()
    End If

End Sub

Sub LoadGrid()

    Dim cmdSQL = New SqlCommand
    cmdSQL.CommandText = "SELECT * FROM tblHotels ORDER BY HotelName"

    GridView1.DataSource = MyrstP(cmdSQL)
    GridView1.DataBind()

End Sub
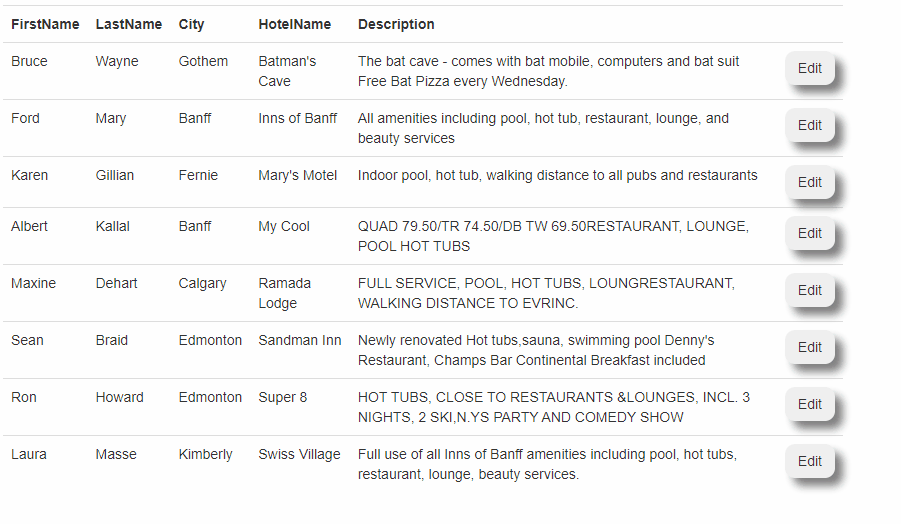
And now we see/have this:
Ok, so now, lets build the edit button.
The simple way is to drop a "div" on the page, and inside of that div, we place the plane jane text boxes and markup to edit ONE hotel. We will use a div, since then:
We can hide the GV, display the edit "div" area, fill the div area with the one row of data for edit.
And then if we wish, we can convert the "div" into a cool popup (modal) dialog, but as always, breaking this down into smaller bite sized steps helps this process.
So, right below the gv, lets drop in some markup (inside of a div) to edit one row.
So, the markup not all that important, but it will look say like this:
<div id="EditRecord" runat="server"
    style="float: left; display: none;border:solid 2px;padding:15px;border-radius:20px" clientidmode="Static" >
<br />
<div style="float: left" class="iForm">

    <label>HotelName</label>
    <asp:TextBox ID="txtHotel" runat="server"  Width="280">
    </asp:TextBox>
    <br />
    <label>First Name</label>
    <asp:TextBox ID="tFN" runat="server"  Width="140"></asp:TextBox>
    <br />
    <label>Last Name</label>
    <asp:TextBox ID="tLN" runat="server"  Width="140"></asp:TextBox>
    <br />
    <label>City</label>
    <asp:TextBox ID="tCity" runat="server" Width="140"></asp:TextBox>
    <br />
    <label>Province</label><asp:TextBox ID="tProvince" runat="server"  Width="75"></asp:TextBox>
</div>

<div style="float: left; margin-left: 20px" class="iForm">
    <div style="float: left">
        <label>Description</label>
        <br />
        <asp:TextBox ID="txtNotes" runat="server" Width="260px" TextMode="MultiLine"
            Height="100px" ></asp:TextBox>
    </div>

    <div style="float: left; margin-left: 14px">
        <label>Hotel Options</label>
        <br />
        <asp:CheckBox ID="chkBalcony" runat="server" Text="Balcony" />
        <br />
        <asp:CheckBox ID="chkBags" runat="server" Text="Has Baggage" />
        <br />
    </div>
And on the bottom above, I'm going to use some html buttons, since they allow those cute icons
(but, such buttons work the same as asp.net buttons).
So, we now see/have this:
so, the above is quite much the layout and approach we require.
I actually don't "hand code" the loading up of controls on a web form, but built a few helper routines that does hits automatic.
(it makes ZERO sense to write the same code over and over to fill out controls on a web page - so I have a routine that you feed the data row, and it does the work to set/load up the controls. but, the above layout so far is how you can and should apporach this.
I'll try later today add the code to pop the dialog, but, as above so far, we simple hide the gv div, show the edit area div.
so, here is the edit button code:
Protected Sub cmdEdit_Click(sender As Object, e As EventArgs)

    Dim btn As Button = sender
    Dim gRow As GridViewRow = btn.NamingContainer

    EditRow(gRow.RowIndex)

End Sub

Sub EditRow(rowNum As Integer)

    Dim intPK As Integer = GridView1.DataKeys(rowNum).Item("ID")
    Dim cmdSQL As New SqlCommand()
    cmdSQL.CommandText = "SELECT * FROM tblHotels WHERE ID = @ID"
    cmdSQL.Parameters.Add("@ID", SqlDbType.Int).Value = intPK

    Dim rstData As DataTable = MyrstP(cmdSQL)

    ' load up our edit div
    With rstData.Rows(0)
        tFN.Text = .Item("FirstName")
        tLN.Text = .Item("lastName")
        txtHotel.Text = .Item("HotelName")
        txtNotes.Text = .Item("Description")
        chkActive.Checked = .Item("Active")
        chkBags.Checked = .Item("HasBags")
    End With
    ViewState("PK") = intPK

    ' now hide gv, show edit area
    MyGridArea.Style.Add("display", "none")
    EditRecord.Style.Add("display", "normal")

End Sub
Note VERY close in above how we just use a plain jane button click, and do not use the built in gv events. They are not required, but the "rosetta" stone code in above is the use of naming container - that's how you with great ease get the current gv row click.
So, now we need some code for the buttons in this edit one record.
The cancel button, simple - we do nothing but hide hte edit area, and un-hide the gv.
Hence, cancel button code:
Protected Sub cmdCancel_ServerClick(sender As Object, e As EventArgs)

    MyGridArea.Style.Add("display", "normal")
    EditRecord.Style.Add("display", "none")


End Sub
And our save button code, a bit more work:
Protected Sub cmdSave_ServerClick(sender As Object, e As EventArgs)

    Dim cmdSQL As New SqlCommand("SELECT * FROM tblHotelsA WHERE ID = @ID")
    cmdSQL.Parameters.Add("@ID", SqlDbType.Int).Value = ViewState("PK")

    Dim rstData As DataTable = Myrst(cmdSQL))

    With rstData.Rows(0)
        .Item("FirstName") = tFN.Text
        .Item("lastName") = tLN.Text
        .Item("HotelName") = txtHotel.Text
        .Item("Description") = txtNotes.Text
        .Item("Active") = chkActive.Checked
        .Item("HasBags") = chkBags.Checked
    End With

    MyRstSave(rstData, "tblHotelsA")

    ' re-fresh grid
    LoadGrid()

End Sub
And I used two helper routines, and I use these thoughout most of my applicaitons
this one simple returns a data table for a given sql command.
Public Function MyrstP(cmdSQL As SqlCommand) As DataTable

    Dim rstData As New DataTable
    Using mycon As New SqlConnection(My.Settings.TEST4)

        Using (cmdSQL)
            cmdSQL.Connection = mycon
            mycon.Open()
            rstData.Load(cmdSQL.ExecuteReader)
        End Using

    End Using

    Return rstData

End Function
And this one saves data back to the database
Public Sub MyRstSave(rstData As DataTable, strTable As String)

    Dim strSQL = "SELECT * FROM " & strTable
    Using conn As New SqlConnection(GetConstr)
        Using cmdSQL As New SqlCommand(strSQL, conn)
            conn.Open()
            Dim da As New SqlDataAdapter(cmdSQL)
            Dim daU As New SqlCommandBuilder(da)
            da.Update(rstData)
        End Using
    End Using

End Sub