' cx='32' cy='32' r='32' /%3E%3Ctext x='50%25' y='55%25' dominant-baseline='middle' text-anchor='middle' fill='%23FFF' %3EMS%3C/text%3E%3C/svg%3E)
 > Manage team. Then, select Settings > Team Expiration. From there, you can select Renew now, or just check for the team's expiration date."When we try to follow, we can go to "Settings" of a team, but there we cannot select "Renew now" or check the team's expiration date and we even cannot find the "Team expiration" section. And the section at the bottom (which we can see) is the "Tags" section. Please check out the attached screenshot (
10,994 questions
' cx='32' cy='32' r='32' /%3E%3Ctext x='50%25' y='55%25' dominant-baseline='middle' text-anchor='middle' fill='%23FFF' %3EA%3C/text%3E%3C/svg%3E)
To curb the number of unused teams, as an admin, you can use Microsoft 365 group expiration policy to automatically clean up unused teams. Because teams are backed by groups, group expiration policies automatically apply to teams as well.
**It's important to know that expiration is turned off by default. Administrators have to enable it for their organization if they want to use it.
**
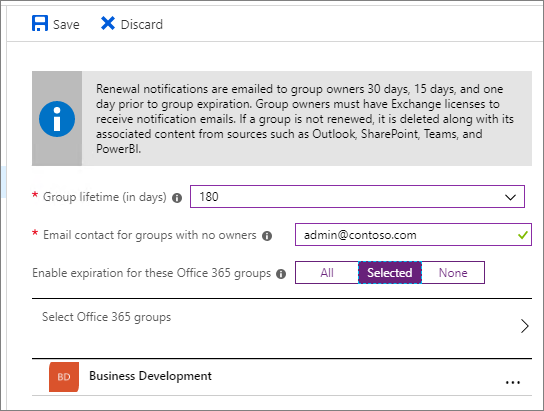
As noted above, expiry is turned off by default. An administrator will have to enable the expiration policy and set the properties for it to take effect. To enable it, go to Microsoft Entra ID > Groups > Expiration. Here you can set the default group lifetime.
The group lifetime is specified in days and can be set to 180, 365 or to a custom value that you specify. The custom value has to be at least 30 days.
If the group doesn't have an owner, the expiration emails will go to the specified email.
You can set the policy for all of your groups, only selected groups (up to 500), or turn it off completely by selecting None. When You select None all groups which are active and pending for verification will have no expiration date. However, the groups that are already expired aren't impacted.
Note that currently you can't have different policies for different groups.
If the answer is helpful, please click "Accept Answer" and kindly upvote it. If you have extra questions about this answer, please click "Comment". Note: Please follow the steps in our documentation to enable e-mail notifications if you want to receive the related email notification for this thread.