How to share a directory over a LAN. Windows cannot access \\PCNAME You do not have permission to access \\PCNAME. Contact your network administrator to request access.

Anonymous
2024-03-27T14:22:53+00:00

My setup is quite simple. Two dell PCs connected over a private home network. They both use a network connected printer. PC2 shows up under "Network" in Explorer under PC1. PC2 has a shared directory, shared with "everyone". From PC1 in explorer, clicking on PC2 brings up this error message:

Windows cannot access \PC2

You do not have permission to access \PC2. Contact your network administrator to request access.

I think I have gone through all the suggestions in : File sharing over a network in Windows - Microsoft Support

Any suggestions?

***moved from Windows / Windows 11 / Internet and connectivity***

Windows for business | Windows Client for IT Pros | Networking | Network connectivity and file sharing

Locked Question. This question was migrated from the Microsoft Support Community. You can vote on whether it's helpful, but you can't add comments or replies or follow the question. To protect privacy, user profiles for migrated questions are anonymized.

0 comments No comments
{count} votes

4 answers

Sort by: Most helpful
  1. Anonymous
    2024-04-01T03:01:09+00:00

    Hello,

    It's probably due to the credentials located on your local machine. If you've set up a PIN for logging into Windows 11 and have never logged into the computer using a password, the PASSWORD is not located on the local machine. Since the PIN only works for the local device, and not across the network, you'll need to sign into the computer 1-time using the full password. It should then work after that...at least until an update wipes it out.

    Go to Settings

    Accounts

    Sign-In Options

    Under Additional Settings --> TURN OFF "For improved security, only allow Windows Hello sign-in for Microsoft accounts on this device

    Click into some settings (e.g. Apps) and then click back on "Accounts"

    Go back into Sign-in Options

    You should not see "Password" located underneath "Security Key"

    If after clicking on it you see "You're all set up"

    Press "Windows Key + L" to lock your computer

    Log into the machine using your full Windows 11 password

    You should be all set!

    Go to your other computer and try out your credentials.

    Hope this helps!

    P.S. You can then turn on the "Improved security, only allow Windows Hello" again and resume only using a PIN. The PASSWORD will now be stored.

    Hope this helps.

    Best regards

    Zunhui

    2 people found this answer helpful.
    0 comments No comments
  2. Anonymous
    2024-04-02T14:38:41+00:00

    Thanks for the reply.

    I performed the steps given and still get the same error message when I try to access \PC2.

    Does the user/password used on PC1 need to be added on PC2?

    I thought perhaps it did. So, I then tried adding the Microsoft account used on PC1 as a family member on PC2. This seems to have been successful but I still get the same "Windows cannot access \PC2" when trying to access it over the LAN from PC1.

    0 comments No comments
  3. Anonymous
    2024-04-05T08:31:33+00:00

    Hi Richard,

    You can refer to the following steps to set up shared folders to try to troubleshoot:

    Steps to Set Up File Sharing on a Windows PC

    Note: These steps needs to be done on each Windows PC you want to be able to share files and folders between.

    1. Make sure each computer you want to share between are all connected to the same network. For example, all connected to the same router via Ethernet and/or wireless.
    2. Make sure each computer on the network has a different computer name.
    3. Make sure each computer you want to share between are on the same workgroup. (see screenshot below) Image
    4. Enable SMB Direct on each computer you want to share between. If you are connecting to a previous version of Windows (ex: Windows 7/8/8.1) than Windows 10, then you will need to enable SMB1. (see screenshot below) SMB Direct will not be available in the Windows 10 Home edition. You will need to enable SMB1 instead.
      If you enable SMB1, be sure to uncheck Automatic Removal. Image
    5. Make sure Use Sharing Wizard is checked in Folder Options > View tab on each computer you want to share between. (see screenshot below) Image
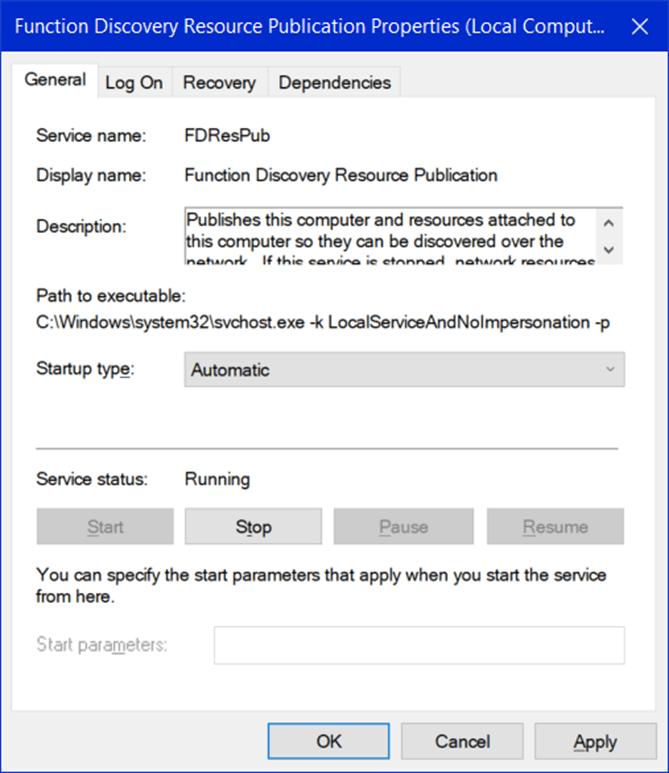
    6. Make sure the below mentioned services are started (running) and their startup type is set to automatic on each computer you want to share between. (see screenshots below)
      • DNS Client
      • Function Discovery Provider Host
      • Function Discovery Resource Publication
      • Server
      • SSDP Discovery
      • UPnP Device Host
      Image
    7. Set the network location on each computer you want to share between to private (recommended) or public. (Go to Settings > Network and Internet > Network Properties) Image
    8. Customize Network Sharing Settings:- (Go to Control Panel > Network and Internet > Network and Sharing Center > Advanced sharing settings)
      1. Turn on network discovery for your private or public network on each computer you want to share between.
      2. Turn on File and Printer Sharing for your private or public network on each computer you want to share between.
      3. Turn on Public folder sharing on each computer you want to share between if you want to share items in the C:\Users\Public folder on a computer.
      4. Turn off password protected sharing on each computer you want to share between.
      5. Select the file sharing connections encryption level you want to use on each computer you want to share between.
      Image Image
    9. You can now use any of the options below to share files and folders with another computer on the same network. i) Share File or Folder using "Give access to" or Sharing option:
      1. Open File Explorer.
      2. Navigate to and select one or more file, folder, and/or library you want to share, right click on the selected item(s), click on Give access to, and click on Specific people.
      Image
      1. You will now see the people that you are currently sharing this with and their permission level.
      2. Select a name of a user account on your PC or everyone you want to share with.
      Image
      1. Click on Add.
      2. Select (check) the permission level you want for this user or everyone.
      3. When finished adding people to share with, click on the Share button at the bottom.
      4. Click on Done.
      ii) Share Folder or Drive using Advanced Sharing:
      1. Open File Explorer.
      2. Navigate to and right click on the folder or drive you want to share, and click on Properties.
      3. Click on the Sharing tab, and click on the Advanced Sharing button.
      Image
      1. Perform the following actions:
        A) Check Share this folder.
        B) If you want a different share name, then you can change it.
        C) Limit the number of simultaneous users to the number you want. The default is 20.
        D) Add any comments you want for this share.
        E) Click on the Permissions button.
      Image
      1. Select a group or user, select (check or uncheck) the permissions (allow or deny) you want for this group or user, and click on OK when finished.
      2. Click on OK.
      3. Click on Close.

    Best regards

    Zunhui

    0 comments No comments
  4. Anonymous
    2024-11-22T19:12:59+00:00

    Thank you Zunhui! This worked perfectly.

    There is one typo, however. This:

    You should not see "Password" located underneath "Security Key"

    Should be changed to this:

    You should now see "Password" located underneath "Security Key"

    0 comments No comments