Hi KanishkaVP,
Welcome to Microsoft Community.
Here are a few additional steps you can try to resolve the issue:
Verify the Microsoft account
It turns out that a situation where the Microsoft account you’re currently using is unverified is one typical reason you might anticipate having to deal with this issue. If this situation applies to you, you can address the problem by confirming your Microsoft account.
A lot of affected users that we’re dealing with the same kind of issue have confirmed that once they did this, the ‘Sign in with Your Microsoft Account to Continue App Experience’ stopped occurring.
Note: This method will only be effective in scenarios where your Microsoft account is not yet verified. If the Verify button is not visible in your particular scenario, it means your Microsoft account is already verified.
To check if your Microsoft account is verified or not, follow the instructions below:
- Press Windows key + R to open up a Run dialog box. Next, type ‘ms-settings:’ inside the Run dialog box, then press Ctrl + Shift + Enter to open up the Settings menu on Windows 11 with admin access.
- Once you are prompted by the User Account Control, click Yes to grant admin access.
- Once you’re inside the Settings menu, use the side menu on the left to click on Accounts.
- From the accounts menu, move over to the right-hand side menu and see if the Verify hyperlink is visible.
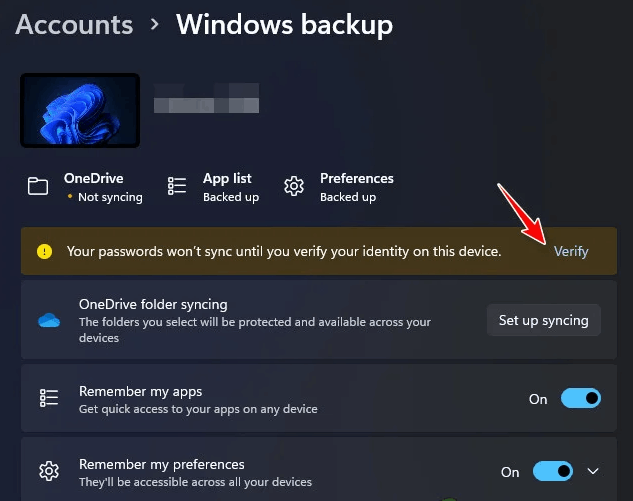 Note: If you don’t see the ‘Your password won’t sync until you verify your identity on this device’ message, your account is already verified.
- Click on Verify, then follow the instructions below to complete the verification process.
- Reboot your PC and wait until the next startup is complete, then see if you’re still seeing the ‘Sign in with Your Microsoft Account to Continue App Experience’ error.
Update the Windows version to the latest
You should begin your troubleshooting process with this if you haven’t updated your Windows 11 PC in a while. Since Microsoft has already released an update to address this issue, all you need to do in this situation is enter the Windows Update menu and install all the pending Windows 11 updates.
Microsoft has resolved a problem that some Windows 11-powered devices had as a result of a faulty Windows update that caused some Settings dependencies to become corrupted. You must install every pending Windows Update in order to ensure that the hotfix is installed, as Microsoft has previously released a few hotfixes for this issue.
Make sure you have the most recent Windows infrastructure updates installed if you have a high-end PC. You should take this action if you frequently experience this issue when using your PC for resource-intensive tasks.
If your Windows system is lacking any essential infrastructure upgrades, updating Windows 11 may eventually allow you to prevent the ‘Sign in with Your Microsoft Account to Continue App Experience’ from appearing again.
For thorough directions on how to achieve this on Windows 11, continue reading:
- One way to launch Windows Update is using the Run dialog box.
- Press the Windows key and R on your keyboard to do this. As a result, the Run dialog box will show up.
- After that, enter “ms-settings:windowsupdate” into the text box. This will take you to the Windows Update area of the Settings app. Note: If you haven’t changed the UAC Settings, you can receive a prompt asking for your permission to continue. Clicking Yes indicates that you are in agreement with this.
- Select Check for Updates from the menu on the right after accessing the Windows Update pane.
- Select Install Now to start a local installation after the update has finished downloading.
- Check to see if the problem has been fixed by restarting your computer.
Continue to the next step if you’re still seeing the ‘Sign in with Your Microsoft Account to Continue App Experience’ when opening the Settings menu.
Reset Windows Store via Settings
- To bring up the Run dialog box, press the Windows key + R. Then, enter “cmd” into the text box and click Ctrl + Shift + Enter to launch an administrator Command Prompt. Click Yes to grant admin access when the UAC (User Account Control) prompt appears.
- To reset the Windows Store and all dependencies, execute the following command and press Enter once you’ve managed to open the elevated Command Prompt:
wsreset.exe
- Restart your computer after the command has been successfully executed to check if the problem has been fixed when the system starts up again.
Create a new Windows Account
The problem can be due to some sort of corruption that surfaced during the upgrading process if you recently switched from Windows 10 to Windows 11 and experienced it right away. Other customers who also experienced this issue have reported that switching to a different Windows account resolved the issue.
According to numerous affected users, this issue may also occur because your currently logged-in Windows account is corrupt, according to many people who have encountered it. It has been reported by a number of worried people who were having the same type of problem that they were able to fix it by either opening a new account or switching to a local account.
It has been reported by a number of worried people who were having the same type of problem that they were able to fix it by either opening a new account or switching to a local account.
Create a new Windows account (it can be local) and restart the remote desktop service to make sure the problem isn’t your present account.
It’s critical to remember that performing this procedure will delete all corrupted dependencies connected to your current user profile.
By utilizing the steps listed below to create a new user account, you can completely prevent the ‘Sign in with Your Microsoft Account to Continue App Experience’ error:
- To launch the Run dialog box, press the Windows key + R.
- Next, enter “ms-settings:otherusers” in the text area and press Enter to launch theFamily & Other People tab in the Settings app.
- From the Family & other users menu, choose to Add someone else to this PC on the Other Users page.
- You can determine if the remote service can be started normally by finishing the remaining steps to create a new Windows account, rebooting your computer, and login in with the new account.
If the “Sign in with Your Microsoft Account to Continue App Experience” issue still exists, proceed to the next method below.
Clean boot your PC
This error message may be indirectly brought on by software you previously installed on your Windows 11 PC, depending on which 3rd-party apps and services are set up to execute at every startup. Reach a clean boot state and check to see if the error notice stops appearing to verify whether this theory is accurate.
If you only experience this issue sometimes, it’s possible that a third party is interfering with your computer and causing this type of BSOD.
It’s impossible to build a thorough list of all probable culprits, therefore the best thing you can do is perform a clean boot, and then gradually activate each service, beginning item, or process until you find the offender.
In this case, beginning in clean boot mode and following a set of instructions to check for a software conflict and identify the troublesome service or process should be able to fix the issue.
In order to provide a clean boot state and maybe prevent the emergence of this problem, your computer will boot without any third-party services, processes, or startup items.How to perform a clean boot in Windows - Microsoft Support
Disclaimer: A “clean boot” starts Windows with a minimal set of drivers and startup programs. It helps to determine whether a background service is interfering with your game or program and to isolate the cause of a problem.
These steps of "clean boot" might look complicated at first glance. However, to avoid any trouble for you, please follow them in order and step-by step so that it will help you get back on track.
Thank you for your patience and understanding, if you have any questions, please feel free to leave us a message.
Best regards
Brandon | Microsoft Community Support Specialist
' cx='32' cy='32' r='32' /%3E%3Ctext x='50%25' y='55%25' dominant-baseline='middle' text-anchor='middle' fill='%23FFF' %3EA%3C/text%3E%3C/svg%3E)