Removing Extra Space When Using layout_weight

Nathan Sokalski 4,116 Reputation points
2021-07-26T00:12:23.83+00:00

My current code gives the following output:
117741-screenshot-1627257293.png
Each row is a LinearLayout that contains a TextView, Button, and RadioGroup. The TextView has android:layout_weight="1", which is what causes the text to wrap (which is what I want) and use the amount of horizontal space that it does. However, you will also notice that there is extra space between the TextView & Button (the Button is the blue circle). I want to remove this space so that the TextView & Button are next to each other. However, removing the layout_weight causes the TextView to not wrap and other parts of the LinearLayout to appear in undesired ways. How can I remove this extra space?

Xamarin
Xamarin
A Microsoft open-source app platform for building Android and iOS apps with .NET and C#.
5,294 questions
0 comments No comments
{count} votes

3 answers

Sort by: Most helpful
  1. Leon Lu (Shanghai Wicresoft Co,.Ltd.) 68,571 Reputation points Microsoft Vendor
    2021-07-26T05:57:40.29+00:00

    Hello,​

    Welcome to our Microsoft Q&A platform!

    You can try to use TableLayout to wrap the TextView & Button. then make the TextView & Button side by side.

       <LinearLayout  
               android:orientation="horizontal"  
               android:layout_width="match_parent"  
               android:layout_height="wrap_content">  
         
            
               <TableLayout  
                     
                     android:layout_width="0"  
                     android:layout_weight="1"  
                     android:layout_height="wrap_content">  
                    <TableRow  
                       android:id="@+id/tableRow1"  
                       android:layout_width="wrap_content"  
                       android:layout_height="wrap_content" >  
         
                       <TextView  
                         
                        android:layout_width="0dp"  
                        android:layout_height="wrap_content"  
                        android:layout_weight="1"  
                        android:id="@+id/textView1"  
                        android:paddingBottom="13"  
                        android:inputType="textMultiLine"  
                        android:text="Is zero222 a valid space1444 Is zero   valid space23333 Is zero a valid spac"  
                        />  
         
                    
                   <Button  
                             
                       android:layout_width="50"  
                       android:layout_height="50"  
                       android:text="?"/>  
               </TableRow>  
               </TableLayout>  
         
         
               <RadioButton  
                   android:layout_weight="1"  
                   android:layout_width="0"  
                   android:layout_height="wrap_content"  
                   android:text="Yes"/>  
               <RadioButton  
                   android:layout_weight="1"  
                   android:layout_width="0"  
                   android:layout_height="wrap_content"  
                   android:text="No(Default)"/>  
             
           </LinearLayout>  
    

    Here is running screenshot.

    117778-image.png

    Best Regards,

    Leon Lu


    If the response is helpful, please click "Accept Answer" and upvote it.

    Note: Please follow the steps in our documentation to enable e-mail notifications if you want to receive the related email notification for this thread.


  2. Graham McKechnie 316 Reputation points
    2021-07-30T08:27:46.577+00:00

    @Nathan Sokalski .You should try ConstraintLayout. You'd do what you want very easily.

    Use Android Studio's designer to design your layouts, as the Xamarin designer is just about useless. Once done, create a new layout in Visual Studio 2019 and then just copy/paste the xml from AS into a new Xamarin xml file in your project. I've been it that way for at least the last 2 years. Of course, if you are creating string resources as you go, just remember you'll also have to copy them from the AS strings.xml to your VS strings.xml as well.

    Also, remember to include the namespace xmlns:tools="http://schemas.android.com/tools" in your layout, so that you have entries like tools:text="@ hide /purchase_amount" for instance on a TextView that will get its actual value TextView.Text value from your code.

    That way you have real examples of your data while you are designing your layout, which gives you an example of the exact appearance you will get at runtime. That app:tool values don't show at runtime, so they just go along for the ride. The other great feature is the Layout Validation tab on the far right of the AS designer window. Once you are done with your layout click that tab and you see your results for a heap of different sized devices.

    When you create your project in AS, just pick a simple template. Enter the same name as your VS project and the same package name. And then create each of your layouts in AS. You, therefore, end up with an AS project containing identical layouts to your VS project, except that they all started in AS. The AS project will build and compile etc but there is no need to make it run. Just as long as it builds.

    I did read about some guy who automated the process by making his VS project default to the AS project Resource\layout folder. However, I never followed up on it as copy/pasting seems a pretty simple efficient way of doing it.

    The guy who was responsible for the Xamarin designer left Microsoft sometime back and it appears no one has done any work on it since. I, therefore, doubt it will ever get any better as no one on the xamarin.android team has taken much interest, as they claim it's the MS's designer team that is responsible for it. They suggest using VS's Send Feedback - Report a problem. However, If they can't be bothered doing it after you report a problem to them and supply a project example, why should I, when I already have a better solution.

    Even if the MS designer team started now, it would take them forever to catch up with what Android Studio's designer offers.

    Put the time in on learning ConstraintLayout as it is probably the only layout you'll ever need to know. It certainly replaces LinearLayout, RelativeLayout etc. Notice how AS even defaults to ConstraintLayout each time you create a new layout. That tells you something!!!


  3. Graham McKechnie 316 Reputation points
    2021-07-31T06:15:42.587+00:00

    @Nathan Sokalski

    The following xml should do what you want using an androidx.constraintlayout.widget.ConstraintLayoutConstraintLayout.

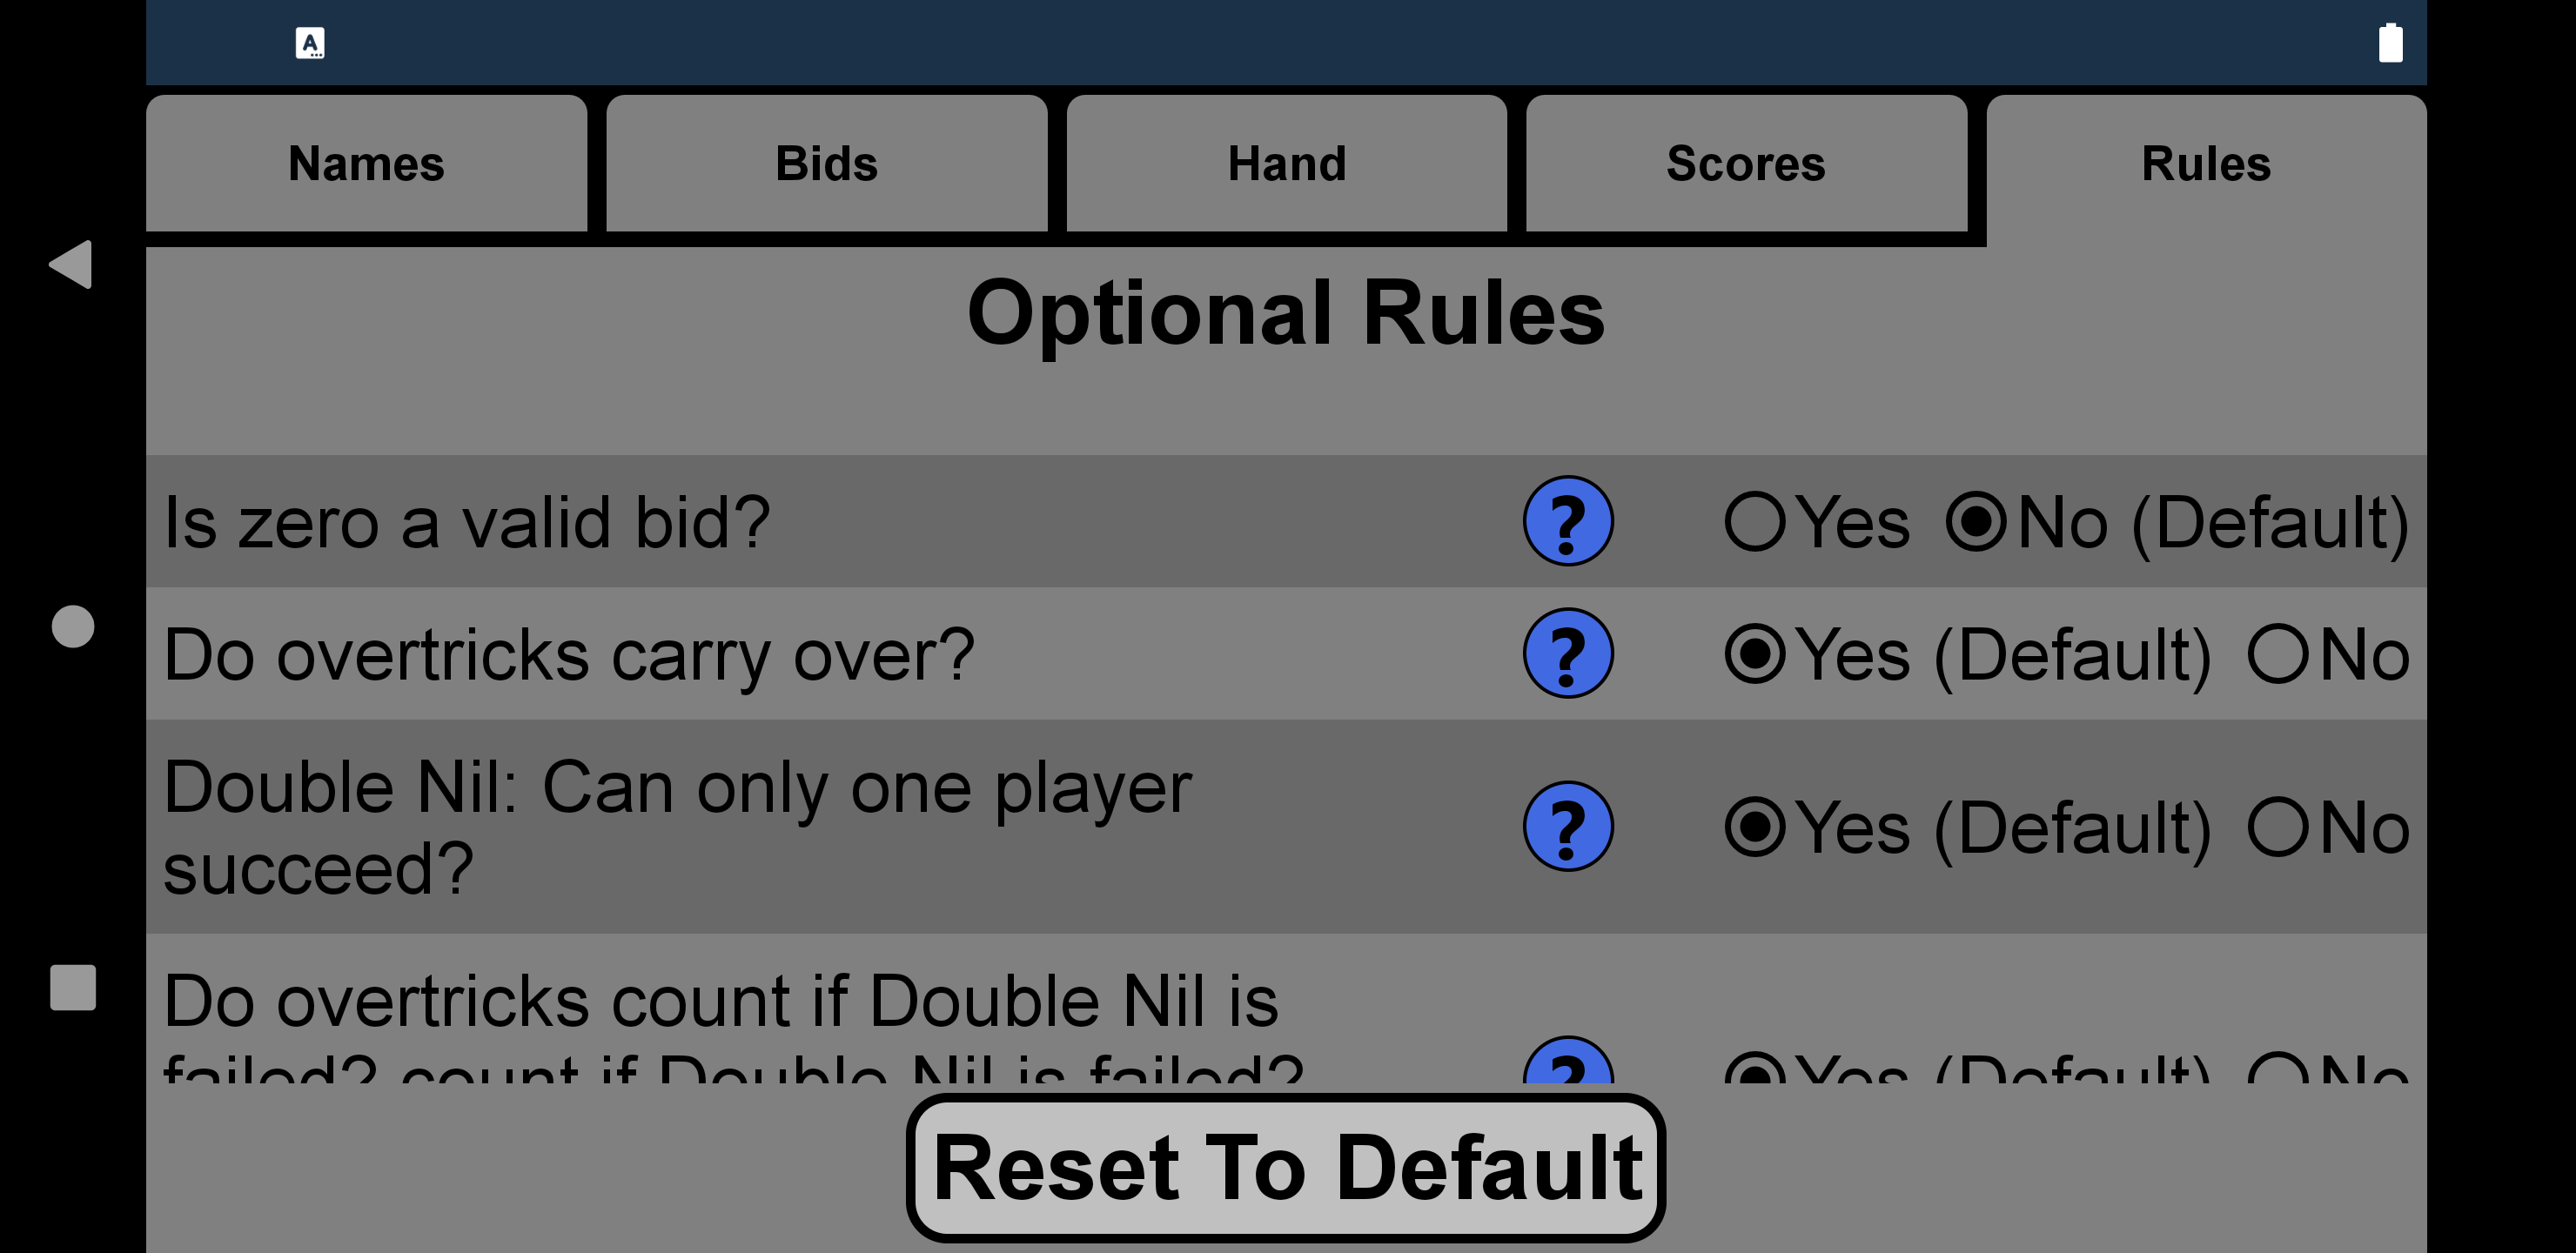
    Ideally, you would use this layout in your RecyclerView adapter as the Resource.Layout of the adapter’s OnCreateViewHolder and get your TextView, Button and Radio Buttons from the view when you instantiate the ViewHolder. That way in the calling code you only have one button event handler and one radiobutton event handler. That means the logic of what text you display in the textview and the radiobutton textviews will depend on which recyclerview item you are on. I can’t tell from your screenshot how many items you have to deal with, but obviously, it is more than one, hence I’m assuming you are using a RecyclerView.

    Re the Constraintlayout and text wrapping. Most views inside a Constraintlayout can usually get by with 3 constraints as long as each view is constrained to its neighbour. However, in the case of a layout for example like yours where you want a TextView to wrap its content if the string is longer than the available space then you need to constrain all views on all sides. In the case of a horizontal layout that means selecting match constraint for the layout_width of each view which will then result in a layout_width=0dp and leave the layout_height as wrap_content. The opposite applies if you are trying to constrain views vertically. Then it is the layout_height’s turn to be constrained or layout_height=0dp and wrap_content for layout_width.

    If you left it like that, you probably would not end up with what you want.

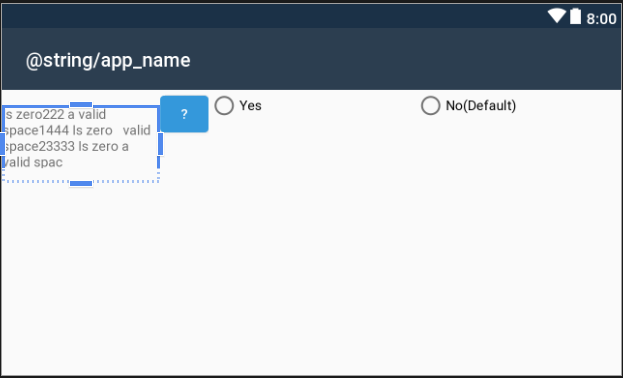
    Therefore you need to introduce app:layout_constraintHorizontal_weight or app:layout_constraintVertical_weight (if constraining vertically) for each view. All you need to do is play with the percentages until you get the look you want. Try removing the values I set or set them all to 0.0. It still looks fine in Landscape but your button is now too big. And perhaps your radio button text needs work. Just play with the values and make sure they add up to 1.0. As you further constrain the TextView you will see it wrap the text. If you want a new line, add a \n in front of the letter where you want it to break. The same applies to paragraphs using \n\n.

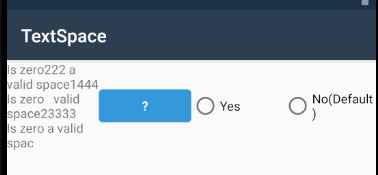
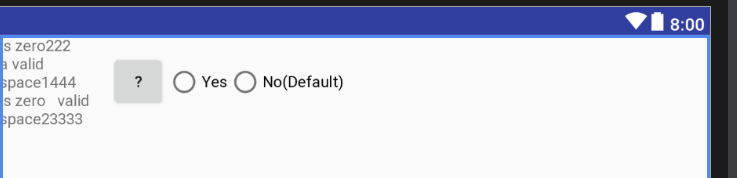
    If you change this layout to Portrait in Android Studio, it doesn’t look good at all.

    If you need a portrait version, you’ll probably need a new layout. If you need to do that then you will need to create a new folder under the Resources folder called values-land. Into that add a refs.xml file and include the following as content. The example below has single_line_item as the portrait version and singleline_item_wide as the landscape version.

    <resources>   
      <item  
    name="singleline_item" type="layout">@layout/singleline_item_wide  
      </item>  
    </resources>  
    

    Your app will then automatically use the appropriate layout when you rotate the screen.

    One last value you may want to experiment with is the common value android:minHeight.

    Try either of these

    android:minHeight="?attr/listPreferredItemHeight"  
    android:minHeight="?attr/listPreferredItemHeightSmall"  
    

    If you search on ConstraintLayout you will find heaps of videos and articles, which are great for learning about all the features of ConstraintLayout. There is a lot to learn, but the best way is just to dive in and use it, replacing all your existing layouts as you go. With your existing layouts, you already know what the final design is, so all you need to do is learn how to do it with ConstraintLayout. The benefits are faster layout inflation for every screen, especially for those old layouts with heaps of nested LinearLayouts etc.

    By the way, what does your button do as it is not obvious?

    Just copy/paste the following XML into a new layout in Android Studio.

    <androidx.constraintlayout.widget.ConstraintLayout xmlns:android="http://schemas.android.com/apk/res/android"  
        xmlns:app="http://schemas.android.com/apk/res-auto"  
        xmlns:tools="http://schemas.android.com/tools"  
        android:layout_width="match_parent"  
        android:layout_height="wrap_content"  
        android:minHeight="?attr/listPreferredItemHeight"  
        android:paddingLeft="@dimen/activity_horizontal_margin"  
        android:paddingRight="@dimen/activity_horizontal_margin">  
      
        <TextView  
            android:id="@+id/textView"  
            android:layout_width="0dp"  
            android:layout_height="wrap_content"  
            android:paddingEnd="4dp"  
            android:textAppearance="@android:style/TextAppearance.Material"  
            app:layout_constraintBottom_toBottomOf="parent"  
            app:layout_constraintEnd_toStartOf="@+id/button"  
            app:layout_constraintHorizontal_weight="0.35"  
            app:layout_constraintStart_toStartOf="parent"  
            app:layout_constraintTop_toTopOf="parent"  
            tools:text="@string/textview" />  
      
        <Button  
            android:id="@+id/button"  
            android:layout_width="0dp"  
            android:layout_height="wrap_content"  
            android:text="@string/button"  
            app:layout_constraintBottom_toBottomOf="parent"  
            app:layout_constraintEnd_toStartOf="@+id/radio_group"  
            app:layout_constraintHorizontal_weight="0.10"  
            app:layout_constraintStart_toEndOf="@+id/textView"  
            app:layout_constraintTop_toTopOf="parent" />  
      
        <RadioGroup  
            android:id="@+id/radio_group"  
            android:layout_width="0dp"  
            android:layout_height="wrap_content"  
            android:orientation="horizontal"  
            app:layout_constraintHorizontal_weight="0.55"  
            app:layout_constraintBottom_toBottomOf="parent"  
            app:layout_constraintEnd_toEndOf="parent"  
            app:layout_constraintStart_toEndOf="@+id/button"  
            app:layout_constraintTop_toTopOf="parent">  
      
            <RadioButton  
                android:id="@+id/radio1"  
                android:layout_width="0dp"  
                android:layout_height="wrap_content"  
                android:layout_weight="1"  
                android:checked="true"  
                tools:text="@string/radio_yes" />  
      
            <RadioButton  
                android:id="@+id/radio2"  
                android:layout_width="0dp"  
                android:layout_height="wrap_content"  
                android:layout_weight="1"  
                tools:text="@string/radio_no" />  
        </RadioGroup>  
      
    </androidx.constraintlayout.widget.ConstraintLayout>  
    

    And a couple of strings

    <string name="textview">Do overtricks count if Double Nil? Count if Double Nil is failed?</string>  
    <string name="button">\?</string>  
    <string name="radio_yes">Yes (Default)</string>  
    <string name="radio_no">No</string>