Developer technologies | XAML
A language based on Extensible Markup Language (XML) that enables developers to specify a hierarchy of objects with a set of properties and logic.
This browser is no longer supported.
Upgrade to Microsoft Edge to take advantage of the latest features, security updates, and technical support.
' cx='32' cy='32' r='32' /%3E%3Ctext x='50%25' y='55%25' dominant-baseline='middle' text-anchor='middle' fill='%23FFF' %3EXW%3C/text%3E%3C/svg%3E)
Hi To All,
How to create DataGrid Style in WPF/XAML with Trigger(Change Color Row Selected & Mousehover). Please find below attached image.
Thanks
' cx='32' cy='32' r='32' /%3E%3Ctext x='50%25' y='55%25' dominant-baseline='middle' text-anchor='middle' fill='%23FFF' %3EHL%3C/text%3E%3C/svg%3E)
For changing the color of the selected row and hovering with trigger, you could refer to the following code.
The code of xaml:
<Grid>
        <DataGrid Name="dg" ItemsSource="{Binding}" AutoGenerateColumns="False">
            <DataGrid.Resources>
                <SolidColorBrush x:Key="{x:Static SystemColors.HighlightBrushKey}" Color="Transparent"/>
            </DataGrid.Resources>
            <DataGrid.RowStyle>
                <Style TargetType="DataGridRow" >
                    <Style.Triggers>
                        <Trigger Property="IsMouseOver" Value="True">
                            <Setter Property="Background" Value="Orange"/>
                            <Setter Property="Foreground" Value="Purple"/>
                        </Trigger>
                        <MultiTrigger>
                            <MultiTrigger.Conditions>
                                <Condition Property="IsSelected" Value="true" />
                                <Condition Property="Selector.IsSelectionActive" Value="true" />
                            </MultiTrigger.Conditions>
                            <Setter Property="Foreground" Value="White" />
                            <Setter Property="Background" Value="OrangeRed"/>
                        </MultiTrigger>
                    </Style.Triggers>
                </Style>
            </DataGrid.RowStyle>
            <DataGrid.Columns>
                <DataGridTextColumn Header="Name"  Binding="{Binding Name}"/>
                <DataGridTextColumn Header="EmployeeNumber"  Binding="{Binding EmployeeNumber}"/>
            </DataGrid.Columns>
        </DataGrid>
    </Grid>
The code of xaml.cs:
using System.Collections.ObjectModel;
using System.ComponentModel;
using System.Windows;

namespace StyleforDataGridwithTrigger
{
  public partial class MainWindow : Window
  {
    private ObservableCollection<Employee> EmployeeInfoDataSource { get; set; }
    public MainWindow()
    {
      InitializeComponent();
      Init();
      DataContext = this;
      dg.ItemsSource = EmployeeInfoDataSource;
    }
    private void Init()
    {
      EmployeeInfoDataSource = new ObservableCollection<Employee>();
      for (int i = 0; i < 5; i++)
      {
        EmployeeInfoDataSource.Add(new Employee { Name = "name" + i, EmployeeNumber = i });
      }
    }
    public event PropertyChangedEventHandler PropertyChanged;
    protected void OnPropertyChanged(string propertyName)
    {
      PropertyChanged?.Invoke(this, new PropertyChangedEventArgs(propertyName));
    }
  }
  public class Employee
  {
    public string Name { get; set; }
    public int EmployeeNumber { get; set; }
  }
}
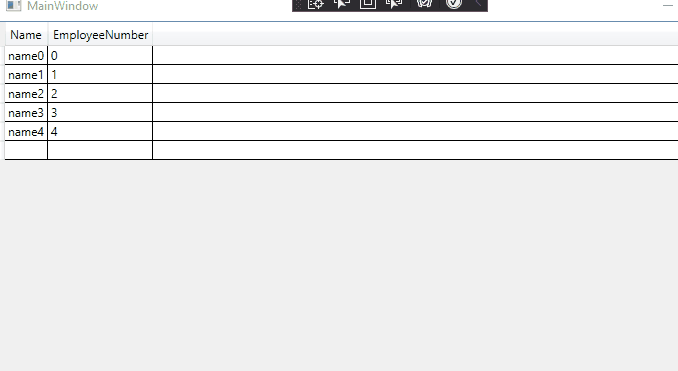
The picture of result:
If the response is helpful, please click "Accept Answer" and upvote it.
Note: Please follow the steps in our [documentation][5] to enable e-mail notifications if you want to receive the related email notification for this thread.
[5]: https://learn.microsoft.com/en-us/answers/articles/67444/email-notifications.html
Hi,@XAML WPF Developer . May I know if you have a chance to check my answer? I am glad to help if you have any others questions.