Microsoft 365 and Office | Word | For home | Other
A family of Microsoft word processing software products for creating web, email, and print documents.
This browser is no longer supported.
Upgrade to Microsoft Edge to take advantage of the latest features, security updates, and technical support.
' cx='32' cy='32' r='32' /%3E%3Ctext x='50%25' y='55%25' dominant-baseline='middle' text-anchor='middle' fill='%23FFF' %3ECK%3C/text%3E%3C/svg%3E)
I am unable to single space my document in MS Word. It just is not working.
A family of Microsoft word processing software products for creating web, email, and print documents.
I am unable to single space my document in MS Word on my iPad. It just is not working.

EDIT: I just realized that you have Word for iPad.
Generally, you need to set the Line Spacing to "Single" and change the Spacing Before / Spacing After to zero, if you want no spacing at all between text lines and paragraphs.
' cx='32' cy='32' r='32' /%3E%3Ctext x='50%25' y='55%25' dominant-baseline='middle' text-anchor='middle' fill='%23FFF' %3ESD%3C/text%3E%3C/svg%3E)
Hi,
 On your iPhone, tap the Edit icon
  at the top of your screen, then in the Home menu, choose Line Spacing.
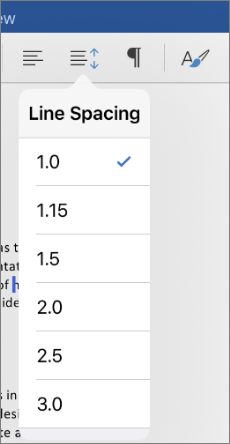
Aside from changing the line spacing, there are no special options for changing the spacing before or after paragraphs in Word for iPad or Word for iPhone.
I hope this information helps. If you have any more questions, don't hesitate to reach out.
Otherwise, if your problem is resolved, please take a moment to rate the answer. Wishing you good luck!
AI answer
To get true single spacing in Word, adjust both line spacing and any extra space before/after paragraphs, using the steps that match the version in use.
Windows – make the whole document single-spaced
Windows – fix specific paragraphs that won’t single-space
Set single spacing as the default for new documents (Windows)
Word for the web – single-space the document
If these steps are followed and spacing still appears off, the usual cause is remaining non-zero Before/After paragraph spacing or not having applied No Paragraph Space at the document level.
References: