Azure Automation
An Azure service that is used to automate, configure, and install updates across hybrid environments.
1,368 questions
This browser is no longer supported.
Upgrade to Microsoft Edge to take advantage of the latest features, security updates, and technical support.
' cx='32' cy='32' r='32' /%3E%3Ctext x='50%25' y='55%25' dominant-baseline='middle' text-anchor='middle' fill='%23FFF' %3EMP%3C/text%3E%3C/svg%3E)
Hi all,
I created certificate using power shell commands and saved that certificate in some folder
I took help from these blogs to create certificate
fix-the-iis-7-no-private-key-error-message
howto-create-service-principal-portal
After certificate creation when i am uploading that certificate in Azure "Automation Accounts" to execute Runbooks,I am facing following error
"Failed to add certificate. Error detail: Upload a certificate (public key) with one of the following file types: .cer, .pem, .crt"
I saved certificate with .cer only,I am not able to understand where i am going wrong ,please help me with this
Let me know if any additional information required
Thank you in advance
' cx='32' cy='32' r='32' /%3E%3Ctext x='50%25' y='55%25' dominant-baseline='middle' text-anchor='middle' fill='%23FFF' %3EKD%3C/text%3E%3C/svg%3E)
was seeing the same error, did you try to upload that file with value only?
' cx='32' cy='32' r='32' /%3E%3Ctext x='50%25' y='55%25' dominant-baseline='middle' text-anchor='middle' fill='%23FFF' %3EAM%3C/text%3E%3C/svg%3E)
Hi @Mounika Ponnam ,
Welcome to Microsoft Q&A! Apologies for the delayed response.
Automation requires the certificate to have the provider Microsoft Enhanced RSA and AES Cryptographic Provider. I went through the links shared in the question but I could not find the exact command used to create the certificate to verify it. The link here has a detailed description of the steps involved. I even tested a test certificate created based on the PowerShell script available in this link and was able to upload the certificate successfully to the Azure Automation Account.
The snippet below when run in PowerShell will
1. Create a Certificate with the required provider
2. Import it to the Computer's MY store.
3. Exports the certificate with Public Key with a .cer extension to the provided directory. This certificate can be uploaded to the Automation account.
Source: Create an Azure Automation account on using Portal PowerShell and AzureCLI
$automationAccount = 'AutomationAccountName'
$certExpiryMonths = 24
$certPfxPassword = '123456'
$certExportPath = 'D:\Data\certificate'
$resourceGroup = 'azAutomation-rg'
$location = "East Us"

$certPassword = ConvertTo-SecureString $certPfxPassword -AsPlainText -Force


#Generate SSL certificate
Write-Host "Generate self signed certificate for - $automationAccount"
$selfSignedCertSplat = @{
    DnsName = $automationAccount
    Subject = $automationAccount
    CertStoreLocation = 'cert:\CurrentUser\My'
    KeyExportPolicy = 'Exportable'
    Provider = 'Microsoft Enhanced RSA and AES Cryptographic Provider'
    NotAfter = (Get-Date).AddMonths($certExpiryMonths)
    HashAlgorithm = 'SHA256'
}
$selfSignedCert = New-SelfSignedCertificate @selfSignedCertSplat

#Export SSL certificate to file
Write-Host "Export self signed certificate to folder - $certExportPath"
$certThumbPrint = 'cert:\CurrentUser\My\' + $selfSignedCert.Thumbprint
Export-Certificate -Cert $certThumbPrint -FilePath "$certExportPath\$automationAccount.cer" -Type CERT | Write-Verbose
Please let me know if you have any questions.
---
Please 'Accept as answer' and ‘Upvote’ if it helped so that it can help others in the community looking for help on similar topics.
Hi @AnuragSharma-MSFT ,
Thank you for responding ,I followed steps in your answer ,i ran power shell script and i uploaded certificate in azure Automation Accounts, i tried to execute the below command inside runbook in "Automation Account"
Get-AutomationConnection -Name 'XXXXXX'
$connectionName="XXXXXXX"
$servicePrincipalConnection=Get-AutomationConnection -Name $connectionName
Connect-AzAccount -TenantId $servicePrincipalConnection.TenantId -ApplicationId $servicePrincipalConnection.ApplicationId -CertificateThumbprint $servicePrincipalConnection.CertificateThumbprint -ServicePrincipal
I got the below error:
"ClientCertificateCredential authentication failed: The certificate certificate does not have a private key. "
Any idea where i am going wrong
Let me know if any additional information required
Thanks in advance
Hi @Mounika Ponnam ,
Thank you for the reply to my previous answer. The previous answer was to demonstrate the steps required to create a certificate and upload to Azure Automation where only public key was required. Based on your reply, I understand that you are trying to create a Run As account in Azure Automation, so that you can access other Azure resources in the runbook using Connect-AzAccount. (Please correct me if I am wrong).
The steps below will help you achieve this quickly and will also create a self-signed certificate for you in Azure. For more details, please refer to How to create an Azure Automation Run As account:
1. In your Azure Automation blade, click on "Run As accounts".
2. Select the "Azure Run As account" and after reviewing the information click on Create.
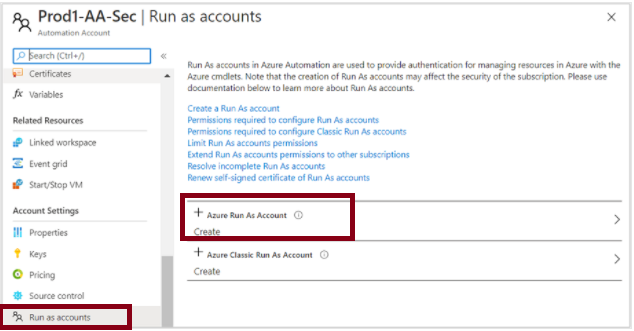
3. Once the Run As account gets created, the following resources will be available in Azure portal:
-->a. A new app (for the automation account) will be registered in Azure Active Directory. You can verify it by going to "Azure Active Directory" and selecting the "App registrations" options under Manage. The registered name looks something like "<your automation account name + some additional characters>".
-->b. When you select this app registration, you can also verify that a self-signed certificate was created in "Certificate & secrets" blade.
-->c. This new "Run As account" is also added to your Azure Automation account under "Connections" with all the required details. (The newly created certificate is also available in "Certificates" of the Azure Automation Account.
4. You can use this connection in your runbook with the Connect-AzAccount cmdlet.
Additional Information:
a. To understand more about various Authentication options available in Azure Automation, please refer to Azure Automation account authentication overview.
b. Managed Identities are the recommended method for authenticating with Azure resources from the runbooks. Managed identity would be more secure than Runas account since it doesn’t require any credentials to be stored. Managed Identities also do not require certificate.
c. You may refer to this video for a brief overview Managed Identities vs Run as Account in Azure Automation.
d. The steps provided above, to create the connection, will generate a self-signed certificate for you in Azure. In case you would want to use another certificate (provided by
your enterprise or third-party certification authority (CA)), please use the PowerShell Script to create this Run As account.
---
Please 'Accept as answer' and ‘Upvote’ if it helped so that it can help others in the community looking for help on similar topics.
@Mounika Ponnam , I wanted to check if you had a chance to review my answer above. Please let me know if you have any queries or concerns.
Please 'Accept as answer' if it helped so that it can help others in the community looking for help on similar topics.