Community Center | Not monitored
Tag not monitored by Microsoft.
This browser is no longer supported.
Upgrade to Microsoft Edge to take advantage of the latest features, security updates, and technical support.
' cx='32' cy='32' r='32' /%3E%3Ctext x='50%25' y='55%25' dominant-baseline='middle' text-anchor='middle' fill='%23FFF' %3EA%3C/text%3E%3C/svg%3E)
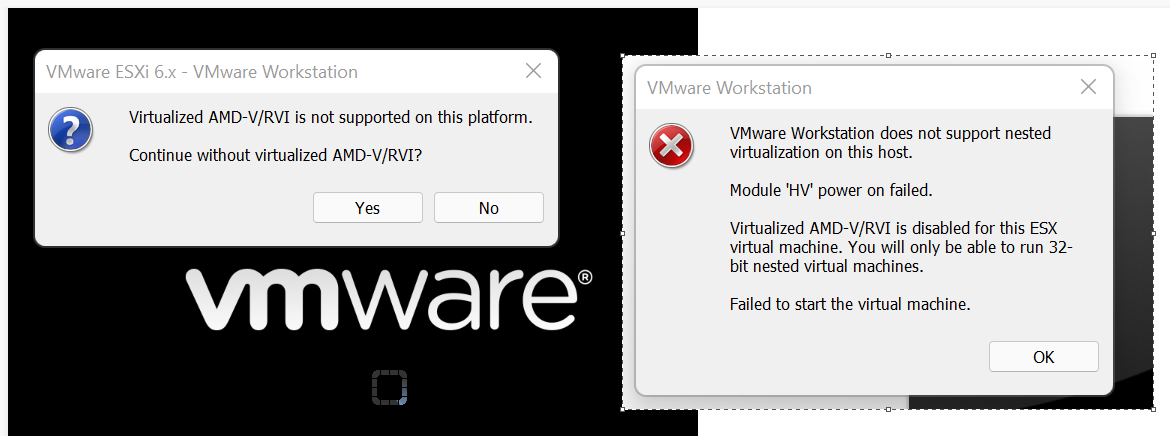
Virtualized AMD-V/RVI is disabled for this ESX virtual machine. You will only be able to run 32-bit nested virtual machines. Failed to start the virtual machine.
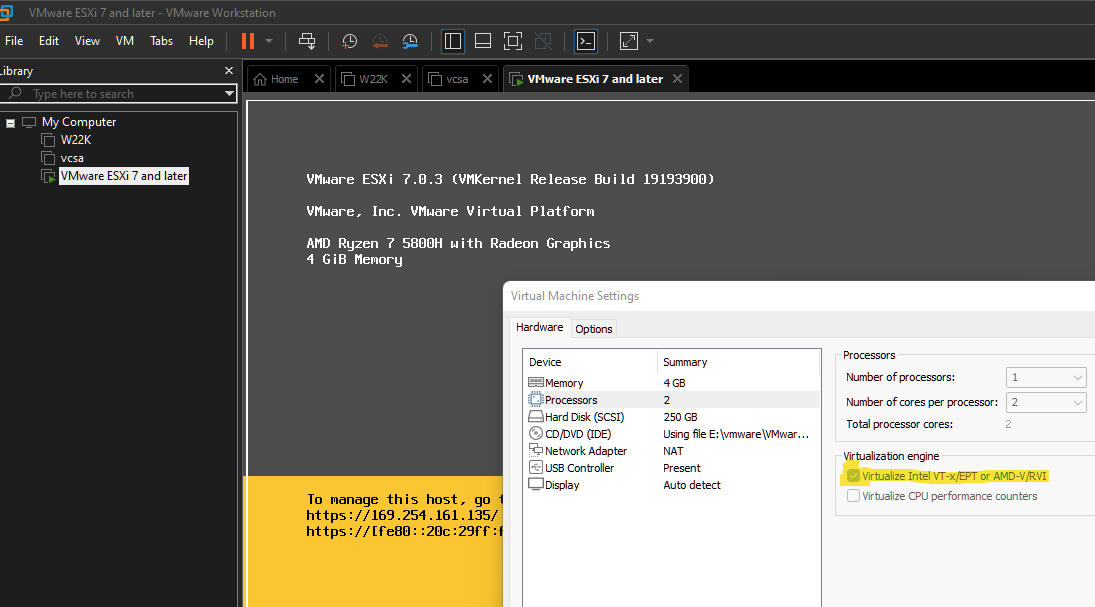
By default it activated VIRTUALIZATION IN BIOS level
Disable Hyper-V In turn windows features on or off windows 11
OS system : windows 11 Enterprise
CPU: AMD Ryzen 7PRO 5850U
Ram : 16GB
VMware workstation 16 pro : 16.2.2
Installed ESXI 6 and ESXI 7 hypervisor
Below is action performed in PowerShell and reboot system:
bcdedit /set hypervisorlaunchtype off and DISM /Online /Disable-Feature: Microsoft-Hyper-V
but the same problem.
Also I changed the number of CPU cores to 1.
but the same problem.
disable Device Guard or Credential Guard.
but the same problem.
After that I fixed it: Windows Security -> Device Security -> Core Isolation and make sure Memory Integrity is “Off”.
Still the problem exists .
I don't know what caused this problem ,however from windows10 it's working fine.
Can anyone suggest to me what goes wrong here ,the problem with Windows 11 or AMD Processor ?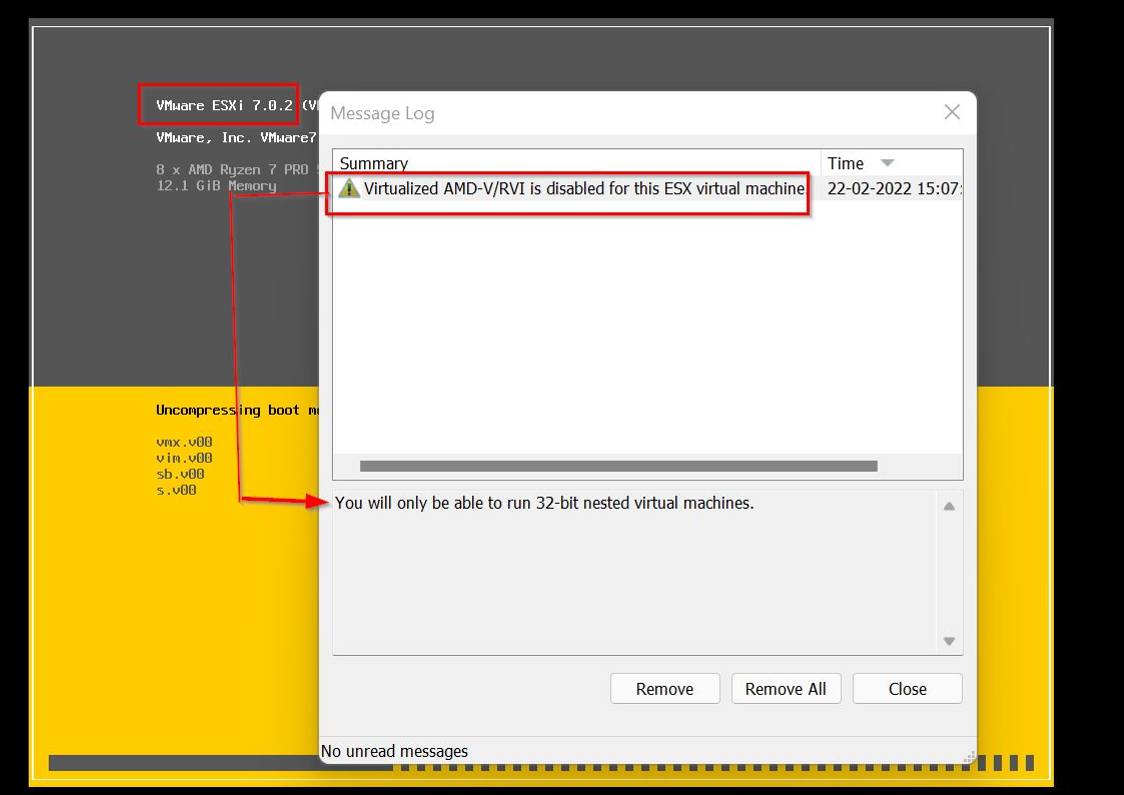
' cx='32' cy='32' r='32' /%3E%3Ctext x='50%25' y='55%25' dominant-baseline='middle' text-anchor='middle' fill='%23FFF' %3ESM%3C/text%3E%3C/svg%3E)
Hello @Anonymous ,
This issue requires deeper investigation. I will request you to open a Support request with the Support team. If you do not have a support plan enabled on your subscription, then please let me know by replying to my comment, and I shall connect with you to enable a one-time free support for your subscription.
Thanks & regards.
Hello @Anonymous , any update ?
' cx='32' cy='32' r='32' /%3E%3Ctext x='50%25' y='55%25' dominant-baseline='middle' text-anchor='middle' fill='%23FFF' %3EVB%3C/text%3E%3C/svg%3E)
Hello ,
Thank for the info ,
Found the solution https://bhanuwriter.com/virtualized-amd-v-rvi-is-disabled/
This comment has been deleted due to a violation of our Code of Conduct. The comment was manually reported or identified through automated detection before action was taken. Please refer to our Code of Conduct for more information.
' cx='32' cy='32' r='32' /%3E%3Ctext x='50%25' y='55%25' dominant-baseline='middle' text-anchor='middle' fill='%23FFF' %3ELS%3C/text%3E%3C/svg%3E)
Ok, i got it working and found the culprit!
It's not just "Core Isolation > Memory Integrity = Disable"
You also have to Disable the "Core Isolation > Firmware Protection"
I Don't think i have seen this being mentioned by anyone, anywhere. Am i wrong?
Screenshot attached!
By the way, having changed this setting, i had to login with password and reconfigure all biometric authentication methods again, including the pin authentication. Not sure why.
So in my case:
1- BIOS Enable Intel VT
2- Remove Windows Features Hiper-V + Virtual Machine Platform + Windows Hypervisor Platform
3- CMD as Admin, Run "bcdedit" and then "bcdedit /set hypervisorlaunchtype off"
4- Turn Off Core Isolation features "Memory Integrity" and "Firmware Protection"
' cx='32' cy='32' r='32' /%3E%3Ctext x='50%25' y='55%25' dominant-baseline='middle' text-anchor='middle' fill='%23FFF' %3EFP%3C/text%3E%3C/svg%3E)
I fixed mine, Windows 11 home, Acer nitro 5 AMD Ryzen 7 by following this VMware kb
https://kb.vmware.com/s/article/2146361
By default, it should be 0, Double click, and confirm the value
 ]1
]1
' cx='32' cy='32' r='32' /%3E%3Ctext x='50%25' y='55%25' dominant-baseline='middle' text-anchor='middle' fill='%23FFF' %3EJC%3C/text%3E%3C/svg%3E)
This solution worked on my machine (AMD Ryzen 7 5800X CPU)
Thanks for the fix!
' cx='32' cy='32' r='32' /%3E%3Ctext x='50%25' y='55%25' dominant-baseline='middle' text-anchor='middle' fill='%23FFF' %3EA%3C/text%3E%3C/svg%3E)
Tried all the above but found that turning off Memory integrity in Core isolation settings resolved it:
' cx='32' cy='32' r='32' /%3E%3Ctext x='50%25' y='55%25' dominant-baseline='middle' text-anchor='middle' fill='%23FFF' %3EA%3C/text%3E%3C/svg%3E)
@Ahansen this one solved my problem as well. At first I had Windows 10 and VMs were working fine then I upgraded to Windows 11 and they stopped working with same error. I downgraded one update but still within Windows 11 and it started working. However after 1 week (today) it started to show same issue. I turned off Memory Integrity and it started working.
If someone know why turning off Memory Integrity resolves this then please comment.
' cx='32' cy='32' r='32' /%3E%3Ctext x='50%25' y='55%25' dominant-baseline='middle' text-anchor='middle' fill='%23FFF' %3EPP%3C/text%3E%3C/svg%3E)
' cx='32' cy='32' r='32' /%3E%3Ctext x='50%25' y='55%25' dominant-baseline='middle' text-anchor='middle' fill='%23FFF' %3ERH%3C/text%3E%3C/svg%3E)
Alternatively, just disable HyperV in Windows features if you are not using HyperV. Reboot and try again.
' cx='32' cy='32' r='32' /%3E%3Ctext x='50%25' y='55%25' dominant-baseline='middle' text-anchor='middle' fill='%23FFF' %3ESR%3C/text%3E%3C/svg%3E)
Thanks, it helped me deactivate the integrity of the memory