' cx='32' cy='32' r='32' /%3E%3Ctext x='50%25' y='55%25' dominant-baseline='middle' text-anchor='middle' fill='%23FFF' %3EPA%3C/text%3E%3C/svg%3E)
3,704 questions
' cx='32' cy='32' r='32' /%3E%3Ctext x='50%25' y='55%25' dominant-baseline='middle' text-anchor='middle' fill='%23FFF' %3ER%3C/text%3E%3C/svg%3E)
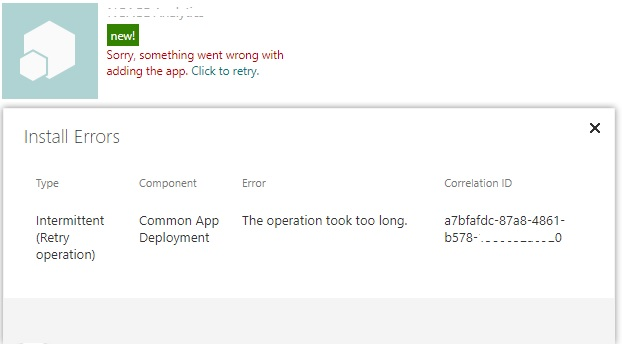
Hi @Pavan Asknani ,
Please check if you have updated web.config with the Client ID and Client Secret. You can follow the steps to develop a Provider Hosted App in SharePoint online.
Step-1: Register your app using appregnew.aspx
Login to your SharePoint Online environment and navigate to the following URL for registering any new app on your site.
https://www.yoursiteurl/_layouts/15/appregnew.aspx.
Generate Client ID and Client Secret.
Enter appropriate title for your app, Enter the domain where your app will be hosted and then enter the start up path for the app and click on Create
Here domain is the server where your source code will be hosted
Step-2: Record the Client Id and Client Secret key
After clicking on Create button if your details are valid then you will be redirected to the page where new Client ID and Client Secret Key will be displayed
Step-3: Create an App solution using visual studio.
Open visual studio and click File -> New -> Project
Select Apps for SharePoint and give appropriate name and click OK
Provide the URL of your SharePoint Online environment and Choose Provider-hosted and click Next
Once you click Next there will be login window, Login with your Office 365 credential and click OK
Select “SharePoint Online” and click Next
Here you can specify which kind of application you want to create, click on Next
Select the Authentication setting, if you are going to use it for your SharePoint farm itself then you can use Certificate and process the steps for creating the public certificate, or else just select the default selection and click Finish
Once you click on Finish your app creation part is done and you will be redirected to the default code page of the app. Add some line of sample code over here. Here you will observe then you have two project solution one is ProjectName and other one is ProjectNameWeb
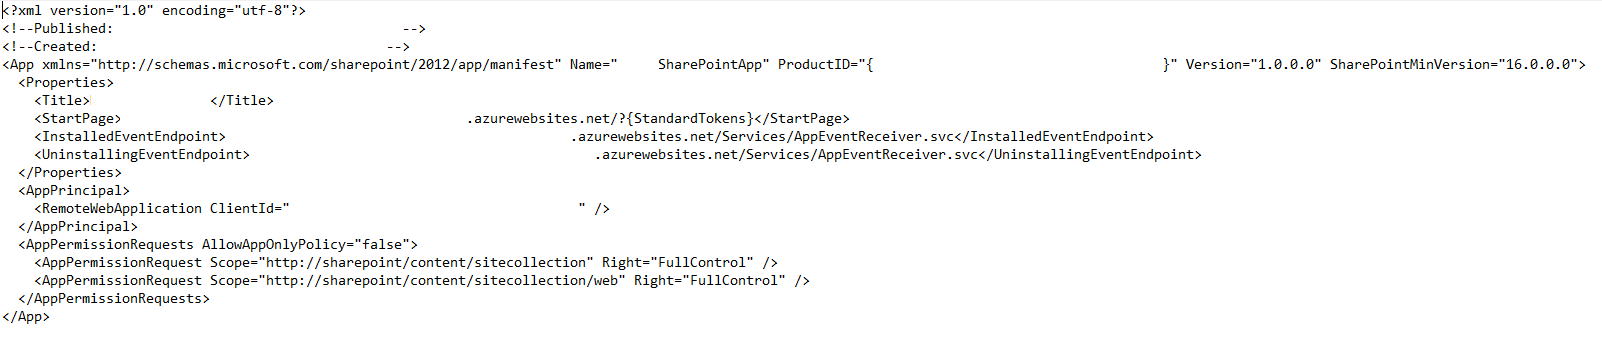
Step-4: Update your web.config and AppManifest.xml file
Update web.config with the Client ID and Client Secret Key which we recorded in Step-2.
Also add into the section of web.config file if it gives some trust level issue.
Update the AppManifest.xml with the Client Id
Step-5: Publish your code.
Now your app is ready with sample code and now its time to publish the code.
So just right click on the ProjectName and select Publish.
Once you click on publish you will have publish window, Just create new profile and click Next
Enter your app Client Id and Client Secret key again here and then click Finish
Once you are done with entering Client Id and Client Secret Key just click on Deploy your web project and follow your traditional way of publishing and publish your code to the domain which you specified at the time of App registration.
After successfully publishing your code to your domain just click on Package the app.
Once you click the Package the app you will be prompted to enter the url of your SharePoint Online where you have registered your app and Client Id, Client Id will be populated but please verify once with your original Client Id, if not same then enter your correct Client Id and click Finish
Once your app packaging is completed you will have your ProjectName.app file which is your app which will be installed on your SharePoint online environment
If the answer is helpful, please click "Accept Answer" and kindly upvote it. If you have extra questions about this answer, please click "Comment".
Note: Please follow the steps in our documentation to enable e-mail notifications if you want to receive the related email notification for this thread.