Xamarin Elements z-index

Eliseo Gamba 21 Reputation points
2022-05-30T21:10:21.527+00:00

Hi!

I have this code:

<?xml version="1.0" encoding="UTF-8" ?>  
<ContentPage  
    x:Class="Components.TestPage"  
    xmlns="http://xamarin.com/schemas/2014/forms"  
    xmlns:x="http://schemas.microsoft.com/winfx/2009/xaml">  
    <StackLayout  
        HorizontalOptions="Center"  
        Orientation="Horizontal"  
        Spacing="0">  
  
        <BoxView  
            Margin="-5,0"  
            CornerRadius="50"  
            HeightRequest="100"  
            VerticalOptions="Start"  
            WidthRequest="100"  
            Color="Red" />  
  
        <BoxView  
            Margin="-5,0"  
            CornerRadius="50"  
            HeightRequest="100"  
            VerticalOptions="Start"  
            WidthRequest="100"  
            Color="Green" />  
  
        <BoxView  
            Margin="-5,0"  
            CornerRadius="50"  
            HeightRequest="100"  
            VerticalOptions="Start"  
            WidthRequest="100"  
            Color="Blue" />  
  
    </StackLayout>  
</ContentPage>  

With that code i get this

206862-screen-shot-2022-05-30-at-180805.png

What i want is to get the green circle to the front, so the green one is gonna cover the blue one and the red one. But i don't to change the position i just want to get the green one to the front, like how set it a greater z-index than red and blue

Developer technologies .NET Xamarin
0 comments No comments
{count} votes

Accepted answer
  1. Anonymous
    2022-05-31T05:53:25.36+00:00

    Hello,​

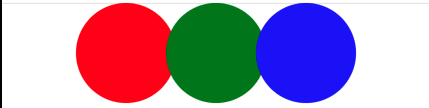
    Please do not use <StackLayout> to achieve covered result. <StackLayout> cannot bring the green circle to the front, you can use <RelativeLayout> to achieve this result.

    Firstly, I notice you set Margin="-5,0", you want to move left 5 pix to achieve covered result, I put the Red BoxView to (0,0) postion, then set Blue BoxView (0,190) postion(Move 190 to the right relative to the x-axis of the redbox). If you want to use green BoxView to the top layer, you need to set it in the end(Move 95 to the right relative to the x-axis of the redbox),

       <RelativeLayout>  
                   <BoxView  
                       x:Name="redBox"  
                        CornerRadius="50"  
                        HeightRequest="100"  
                        VerticalOptions="Start"  
                        WidthRequest="100"  
                        Color="Red"   
                        RelativeLayout.XConstraint="{ConstraintExpression Type=Constant, Constant=0}"  
                        RelativeLayout.YConstraint="{ConstraintExpression Type=Constant, Constant=0}" />  
              
                   <BoxView     
                        CornerRadius="50"  
                        HeightRequest="100"  
                        VerticalOptions="Start"  
                        WidthRequest="100"  
                        Color="Blue"  
                        RelativeLayout.XConstraint="{ConstraintExpression  Type=RelativeToView, ElementName=redBox,Property=X,  Constant=190}"  
                        RelativeLayout.YConstraint="{ConstraintExpression Type=RelativeToView, ElementName=redBox,Property=Y}" />  
                   <BoxView   
                         Color="Green"  
                        HeightRequest="100"  
                        CornerRadius="50"  
                        VerticalOptions="Start"  
                        WidthRequest="100"  
                        RelativeLayout.XConstraint="{ConstraintExpression  Type=RelativeToView, ElementName=redBox,Property=X,  Constant=95}"  
                        RelativeLayout.YConstraint="{ConstraintExpression Type=RelativeToView, ElementName=redBox,Property=Y}" />  
               </RelativeLayout>  
    

    Best Regards,

    Leon Lu


    If the answer is the right solution, please click "Accept Answer" and kindly upvote it. If you have extra questions about this answer, please click "Comment".

    Note: Please follow the steps in our documentation to enable e-mail notifications if you want to receive the related email notification for this thread.


0 additional answers

Sort by: Most helpful

Your answer

Answers can be marked as Accepted Answers by the question author, which helps users to know the answer solved the author's problem.