Azure Virtual Desktop
A Microsoft desktop and app virtualization service that runs on Azure. Previously known as Windows Virtual Desktop.
1,846 questions
This browser is no longer supported.
Upgrade to Microsoft Edge to take advantage of the latest features, security updates, and technical support.
' cx='32' cy='32' r='32' /%3E%3Ctext x='50%25' y='55%25' dominant-baseline='middle' text-anchor='middle' fill='%23FFF' %3ESW%3C/text%3E%3C/svg%3E)
Since 23 may the build in Quick Assist isn't working anymore. You must install the app from the Windows Store.
we are using golden images, what is the best way to install Quick Assist from the store for all users?
The problem i've:
We are creating a golden image, with Ivanti Automation, without any user action on the image vm. We can only install Quick Assist (with Dism command) when once a user has sign in on the golden image vm.

good course

Welcome to Microsoft Q&A Platform, thanks for posting your query here.
I checked with internal team on this and below mentioned is a workaround. Hope this can help you.
Here is a link that explains the new version of Quick Assist.
As you might be aware, customers are requested to use the new Quick Assist version which is available in Microsoft Store and Microsoft Store for Business. The old application is now asking to update to the newest one:

However, there is a known issue now where Windows 10 1909 and below versions are showing the following errors installing the new version of Quick Assist:

UAC (User Access Control) can be disabled as a workaround.
For the Win 10 20H2 21H1 21H2 and above version, the Quick Assist is working fine with the new version.
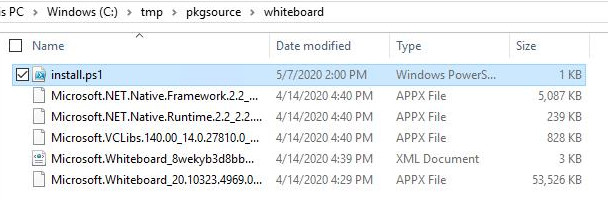
The detailed steps for installing Quick Assist offline:
Then run below command to install Quick Assist:
Add-appxprovisionedpackage -online -PackagePath "MicrosoftCorporationII.QuickAssist_2022.509.2259.0_neutral___8wekyb3d8bbwe.AppxBundle" -LicensePath "MicrosoftCorporationII.QuickAssist_8wekyb3d8bbwe_4bc27046-84c5-8679-dcc7-d44c77a47dd0.xml"
Screenshots for your reference:


You shall see Quick Assist 2.X is installed for the user.
Screenshot for your reference:

You can sign out and sign in with any user in the machine and Quick Assist should be working fine.
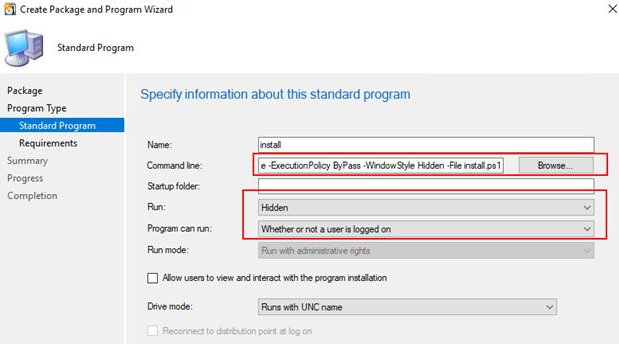
Additionally, good to know steps, How to install QA with SCCM:
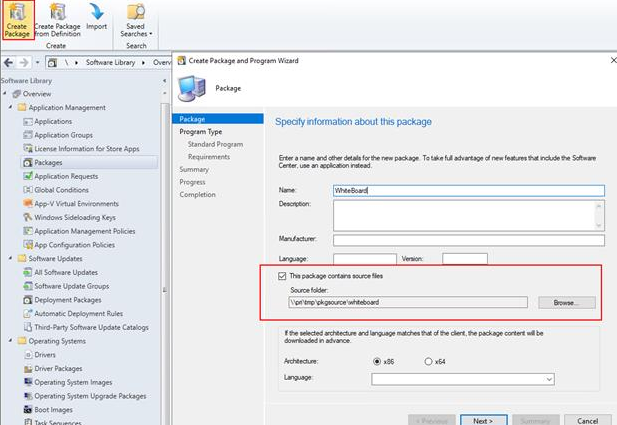
PowerShell.exe -ExecutionPolicy ByPass -WindowStyle Hidden -File install.ps1

Note: If you face any issues with SCCM deployment, you have to get it addressed via support by SCCM team for further assistance.
Hope that helps.
Please 'Accept as answer' if the provided information is helpful, so that it can help others in the community looking for help on similar topics.
the commandline is working, but i've still a problem.
We deploy a vm based on an Azure marketplace Windows 10 multi session template. We push an automation agent to the VM and run an automation runbook to the automation agent. QA seems install succesfully, but there is no QA store app available/installed. When we do the same, but we first logon to the vm, before we the runbook starting, it's working fine. I've this solved by an extra module in runbook, which autologon with at temp user.
Another problem, is that QA is gone, after sysrep of the vm, which will be used as golden image.
' cx='32' cy='32' r='32' /%3E%3Ctext x='50%25' y='55%25' dominant-baseline='middle' text-anchor='middle' fill='%23FFF' %3ED%3C/text%3E%3C/svg%3E)
Same here. It seems not possible to install Storeapps in an non interactive deployment. And so far I never read a working solution for this from MS. More and more Apps coming through Store and no way to properly install it in an automated large scale multiuser environment.
' cx='32' cy='32' r='32' /%3E%3Ctext x='50%25' y='55%25' dominant-baseline='middle' text-anchor='middle' fill='%23FFF' %3EVE%3C/text%3E%3C/svg%3E)
Hello,
Thanks for the tips, Can you please qive access to package and licence file?

@vipullag-MSFT thanks for instructions, but it seems the script will install only one static version of it, so I assume this will not work for long, until new version will be out, right?
Yep, indeed. It's a crime of a job to install store apps. I've for now a workaround, but it isn't very nice.
@vipullag-MSFT how can we install store apps in golden/master images for multiuser sessionhosts?
Workaround:
How do you create the autologon in the installation?
Would you share the used snipped?

Where is this automation agent/automation runbook feature?
Where is this generalization.xml and what do I have to modify? Why would this give issues with other UWP apps?
Where is this automation agent/automation runbook feature?
We are using Ivanti Automation
Where is this generalization.xml and what do I have to modify? Why would this give issues with other UWP apps?
C:\Windows\System32\Sysprep\ActionFiles
The syspep action for UWP/APPx wil be skipped by sysprep. I don't know i this give isses with APPX/UPW apps after the sysprep.


Worked for me and also fixed the problem that all build-in apps were outdated after rollout. Thank you!
You noticed that older FSLogix profiles don't add the Apps to the Start Menu?
If I delete the Profile the new apps are shown. But it should not be the solution.
PS.:
https://www.cloud-architect.be/2021/05/06/msix-app-attach-start-menu-fixed-in-windows-virtual-desktop/
excluding
<Exclude Copy="0">AppData\Local\Packages\Microsoft.Windows.StartMenuExperienceHost_cw5n1h2txyewy\TempState</Exclude>
<Exclude Copy="0">AppData\Local\Packages</Exclude>
from the FSLogix did the trick for us, just to provide a workaround if someone sees similar problems.