Developer technologies | XAML
A language based on Extensible Markup Language (XML) that enables developers to specify a hierarchy of objects with a set of properties and logic.
This browser is no longer supported.
Upgrade to Microsoft Edge to take advantage of the latest features, security updates, and technical support.
' cx='32' cy='32' r='32' /%3E%3Ctext x='50%25' y='55%25' dominant-baseline='middle' text-anchor='middle' fill='%23FFF' %3EEG%3C/text%3E%3C/svg%3E)
Can someone exxplain to me, why my button dosen't wan to go down
  <StackPanel>
            <StackPanel.Resources>
                <helpers:HasText x:Key="HasText" />
            </StackPanel.Resources>

            <TextBox
                x:Name="NameTxt"
                materialDesign:HintAssist.Hint="Name of the building"
                materialDesign:HintAssist.IsFloating="True"
                Text="{Binding Building.Name}">

                <behaviours:Interaction.Triggers>
                    <behaviours:EventTrigger
                        EventName="PreviewTextInput">
                        <behaviours:InvokeCommandAction
                            Command="{Binding ValidateText}"
                            PassEventArgsToCommand="True" />
                    </behaviours:EventTrigger>
                </behaviours:Interaction.Triggers>
            </TextBox>

            <TextBox
                x:Name="DescTx"
                materialDesign:HintAssist.Hint="Description"
                materialDesign:HintAssist.IsFloating="True"
                Text="{Binding Building.Desc}">

                <behaviours:Interaction.Triggers>
                    <behaviours:EventTrigger EventName="PreviewTextInput">
                        <behaviours:InvokeCommandAction Command="{Binding ValidateText}" PassEventArgsToCommand="True" />
                    </behaviours:EventTrigger>
                </behaviours:Interaction.Triggers>
            </TextBox>

            <TextBox
                x:Name="RoomsTx"
                materialDesign:HintAssist.Hint="Rooms"
                materialDesign:HintAssist.IsFloating="True"
                Text="{Binding Building.Rooms}">

                <behaviours:Interaction.Triggers>
                    <behaviours:EventTrigger
                        EventName="PreviewTextInput">
                        <behaviours:InvokeCommandAction
                            Command="{Binding ValidateNumber}"
                            PassEventArgsToCommand="True" />
                    </behaviours:EventTrigger>
                </behaviours:Interaction.Triggers>

            </TextBox>

            <TextBox
                x:Name="AddressTx"
                materialDesign:HintAssist.Hint="Address"
                materialDesign:HintAssist.IsFloating="True"
                Text="{Binding Building.Address}" />

            <ListBox />

            <Button
                Command="{Binding SendCommand}"
                Content="Add"
                VerticalAlignment="Bottom">
                <Button.IsEnabled>
                    <MultiBinding Converter="{StaticResource HasText}">
                        <Binding ElementName="NameTxt" Path="Text" />
                        <Binding ElementName="DescTx" Path="Text" />
                        <Binding ElementName="RoomsTx" Path="Text" />
                        <Binding ElementName="AddressTx" Path="Text" />
                    </MultiBinding>
                </Button.IsEnabled>
            </Button>
        </StackPanel>

' cx='32' cy='32' r='32' /%3E%3Ctext x='50%25' y='55%25' dominant-baseline='middle' text-anchor='middle' fill='%23FFF' %3EHL%3C/text%3E%3C/svg%3E)
StackPanel stacks things. They must be placed one after the other with no extra spacing for further layout arrangements. In this case, the VerticalAlignment property will be ignored.
You could try the following two solutions:
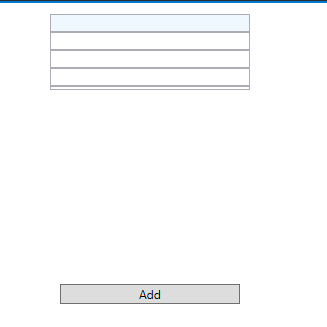
Add <RowDefinition Height="Auto"/> for all of the items except the last. For that one, use <RowDefinition Height="*"/> so that it will take up the remaining space. Then the VerticalAlignment="Bottom" should have the effect you want.
<Grid Width="200" Height="300">
        <Grid.RowDefinitions>
            <RowDefinition Height="auto"/>
            <RowDefinition Height="auto"/>
            <RowDefinition Height="auto"/>
            <RowDefinition Height="auto"/>
            <RowDefinition Height="auto"/>
            <RowDefinition Height="*" />
        </Grid.RowDefinitions>
        <TextBox  x:Name="NameTxt" Grid.Row="0" Background="AliceBlue" Text="{Binding Name}"></TextBox>
        <TextBox  x:Name="DescTx" Grid.Row="1"  Text="{Binding Desc}"></TextBox>
        <TextBox  x:Name="RoomsTx"  Grid.Row="2"  Text="{Binding Rooms}"></TextBox>
        <TextBox x:Name="AddressTx" Grid.Row="3"  Text="{Binding Address}" />
        <ListBox   Grid.Row="4" />
        <Button   Grid.Row="5"  Content="Add" Margin="10"   VerticalAlignment="Bottom"></Button>
    </Grid>
The result:
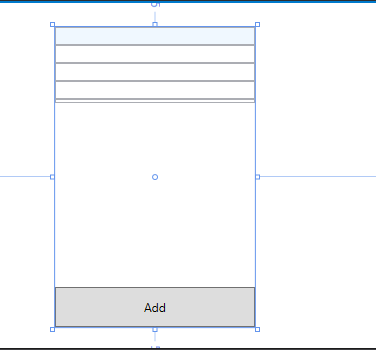
2.Use DockPanel instead of StackPanel.
Put the last item separately as a child for the DockPanel, and set its DockPanel.Dock property as DockPanel.Dock="Bottom". Then after this, include a vertical StackPanel where all the other items are placed. This will default to the Fill value of the Dock property.
<DockPanel Width="200" Height="300" >

        <Button  Height="40"  Content="Add" DockPanel.Dock="Bottom"></Button>
        <StackPanel  DockPanel.Dock="Top" >
            <TextBox  x:Name="NameTxt" Background="AliceBlue" Text="{Binding Name}"></TextBox>
            <TextBox  x:Name="DescTx"  Text="{Binding Desc}"></TextBox>
            <TextBox  x:Name="RoomsTx" Text="{Binding Rooms}"></TextBox>
            <TextBox x:Name="AddressTx"   Text="{Binding Address}" />
            <ListBox   Grid.Row="4" />
        </StackPanel>
    </DockPanel>
The result:
If the response is helpful, please click "Accept Answer" and upvote it.
Note: Please follow the steps in our [documentation][5] to enable e-mail notifications if you want to receive the related email notification for this thread.
[5]: https://learn.microsoft.com/en-us/answers/articles/67444/email-notifications.html