Azure App Service
Azure App Service is a service used to create and deploy scalable, mission-critical web apps.
8,937 questions
This browser is no longer supported.
Upgrade to Microsoft Edge to take advantage of the latest features, security updates, and technical support.
' cx='32' cy='32' r='32' /%3E%3Ctext x='50%25' y='55%25' dominant-baseline='middle' text-anchor='middle' fill='%23FFF' %3EP%3C/text%3E%3C/svg%3E)
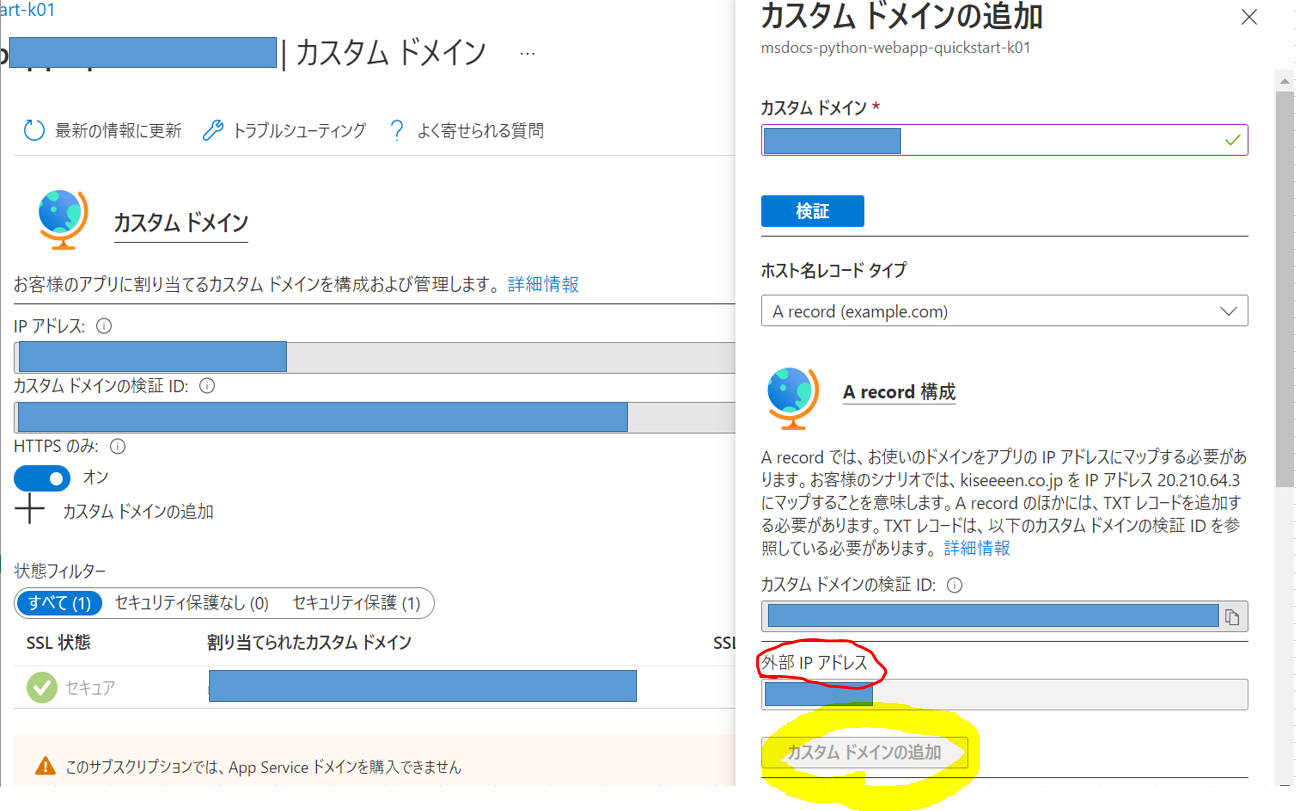
I would like to set custom domain to my web site that is created by Azure web app.
Though I tried to set it with reading web article, I cannot do it.
Because I can't click the button "add custom domain" (marked by yellow hi-light) located in right-bottom in the picture, it is grayed out.
And I mind that "external IP address" (marked by red circle) is filled information but it's also grayed out.
How can I solve this matter?
Please someone give advise.
Thank you.

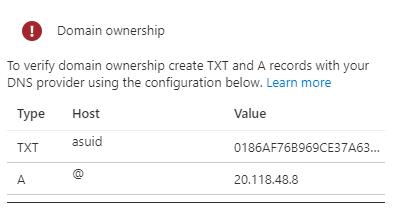
It sounds like, you haven't added the azure suggested entries in your domain's control panel. After adding the entries, you will be able to validate and add the custom domain as your webapp domain name
You can see the values at bottom of the window you showed in the question
I have posted an article in my blog also on the complete steps for the process for custom domain addition to Azure Webapp here: how-to-configure-an-azure-app-from-marketplace-in-a-custom-domain
----------
--please don't forget to upvote and Accept as answer if the reply is helpful--
sorry for late reply.
After following your comment, I've succeeded to get domain ownership.
Thank you.
Glad to hear that you were able to resolve the issue !
' cx='32' cy='32' r='32' /%3E%3Ctext x='50%25' y='55%25' dominant-baseline='middle' text-anchor='middle' fill='%23FFF' %3EA%3C/text%3E%3C/svg%3E)
@pfkbn172 , Just following up, checking in to see if the previous post helped answer your question or point you in the right direction.
To benefit the community find the right answers, please do mark the post which was helpful by clicking on Accept Answer’ & ‘Up-Vote’.
As ManuPhilp’s mentioned ensure that DNS records for the domain that you’re attempting to associate/link with the WebApp has appropriate records added in your domain registrar (where you purchased the domain).
From the screenshots, you’re attempting to map an existing custom DNS name, kindly see the doc below for step-step process (if you haven’t already)
Tutorial: Map an existing custom DNS name to Azure App Service
Note/review the perquisite outlined the doc - "Make sure you can edit the DNS records for your custom domain. To edit DNS records, you need access to the DNS registry for your domain provider, such as GoDaddy. For example, to add DNS entries for contoso.com and www.contoso.com, you must be able to configure the DNS settings for the contoso.com root domain. "
The reason why “Add Custom Domain” option is grayed-out because the domain ownership is not validated (as Manu mentioned, you will need update the record/value information, which would be available at the bottom of the same “Add custom domain” page | your screenshot).
As for as IP address (that you mentioned is grayed-out) – While provisioning the WebApp/App Service Plan a public inbound IP address (virtual IP) is allocated. Regardless of the number of scaled-out instances, each app has a single inbound IP address. You cannot directly change the IP address. Because you're not allowed to move an App Service plan between deployment units, the virtual IP addresses assigned to your app usually remain the same, but there are exceptions.
Please check this doc to understand more about Inbound and Outbound IP address.
--Kindly let us know how it goes, we would be happy to help you further.