Exchange Online
A Microsoft email and calendaring hosted service.
6,171 questions
This browser is no longer supported.
Upgrade to Microsoft Edge to take advantage of the latest features, security updates, and technical support.
' cx='32' cy='32' r='32' /%3E%3Ctext x='50%25' y='55%25' dominant-baseline='middle' text-anchor='middle' fill='%23FFF' %3EBS%3C/text%3E%3C/svg%3E)
Hi
I recently signed up for a M365 E3 subscription.
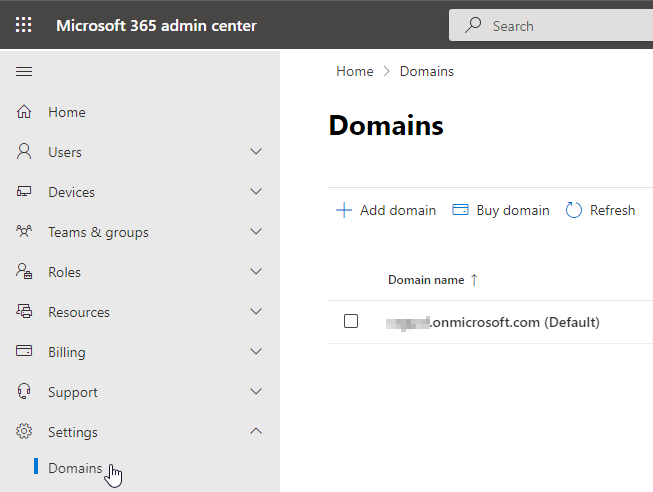
In M365 admin center under Domains, I can only see 1 domain ending with onmicrosoft.com.
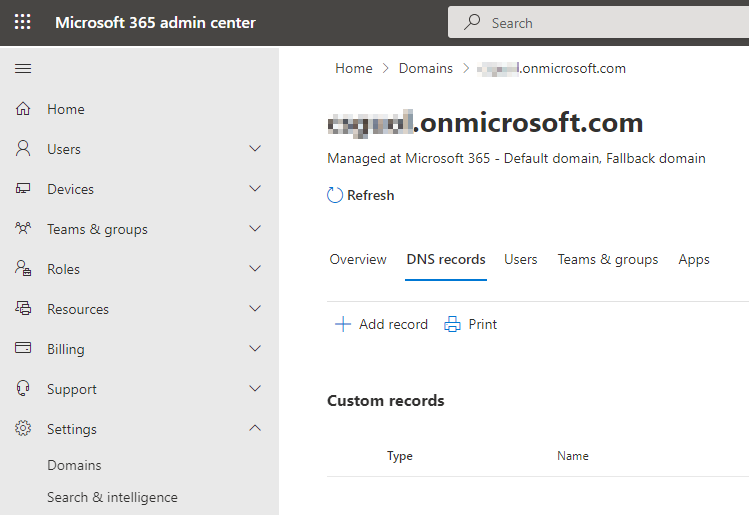
When I selected Add record inside this domain, I can only see TXT (Text) but not MX record.
I am trying to set up a multifunction device to send email using Microsoft 365 or Office 365 and according to following microsoft document under option 3, I need to create an MX record which I can't.
Appreciate your advice what went wrong. Thanks.
Regards
Ben
' cx='32' cy='32' r='32' /%3E%3Ctext x='50%25' y='55%25' dominant-baseline='middle' text-anchor='middle' fill='%23FFF' %3EJS%3C/text%3E%3C/svg%3E)
Hi @Ben Summers
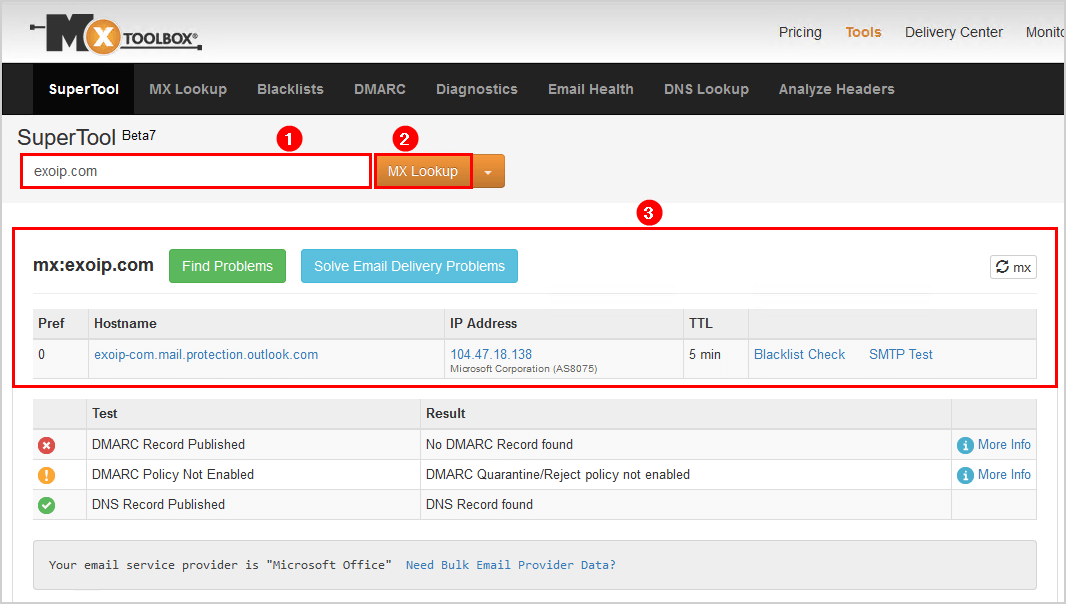
Any update about your issue here, I agree with the suggestions below, we could check it using MxToolBox, like below:
If an Answer is helpful, please click "Accept Answer" and upvote it.
Note: Please follow the steps in our documentation to enable e-mail notifications if you want to receive the related email notification for this thread.
Hi,
I am writing to see how everything is going on with this thread. If you still have further concern on this, please feel free to let us know.
If an Answer is helpful, please click "Accept Answer" and upvote it.
Note: Please follow the steps in our documentation to enable e-mail notifications if you want to receive the related email notification for this thread.

You can't add MX records for .onmicrosoft.com domains. These are managed by Microsoft and by default their MX record points to the Exchange online service and you cannot change this.
If you want to add your own custom domain then you first must verify that you own this domain. Otherwise, you could just add an MX record for any domain you want which could create conflicts with existing MX records belonging to other organisations.
The verification process is performed by first creating a TXT record. This allows Microsoft to verify that you have access to the DNS zone and can create DNS records. Once the TXT record is verified then you can create MX records. The verification process is quite quick to perform.
More details here: https://learn.microsoft.com/en-us/microsoft-365/admin/setup/add-domain?view=o365-worldwide
Hi Alan
Thank you for the reply.
Does it mean if I wish to set up a multifunction device or application to send email using Microsoft 365 or Office 365, I will first need to purchase a domain and add it to my Domains in M365?
Regards
Ben
No, you don't have to. Most organisations would want to use their own vanity/custom domain name but you can use the .onmicrosoft.com if you want to.
Here's how you can configure your device/app to send email: https://learn.microsoft.com/en-us/exchange/mail-flow-best-practices/how-to-set-up-a-multifunction-device-or-application-to-send-email-using-microsoft-365-or-office-365
Hi Alan
I accessed the link that you provided and tried out Option 3 - Configure a connector to send mail using Microsoft 365 or Office 365 SMTP relay.
I followed the instructions by signing in to the Microsoft 365 admin center, Go to Settings > Domains, selected my .onmicrosoft.com domain. I was unable to find the MX record mentioned in the instructions.
Appreciate your advice what went wrong. Thanks.
Regards
Ben
Hi Alan
I used the MX lookup tool and this is what I got.
Does that mean I can use this hostname and IP address to configure on the Multi-function device to make the send to email to work?
Regards
Ben

You should use the hostname rather than the IP address and yes, as long as your ISP does not block you sending SMTP traffic to this address then it should work.
Your ISP may provide their own outbound SMTP server as an alternative.
Hi Alan
Will try using the hostname to configure on the Multi-function device and have the send to email tested. Thanks.
Regards
Ben
Hi Alan
The send to email was tested using the hostname[<domain>.mail.protection.outlook.com] retrieved using mxtoolbox.com.
This hostname was used in place of smtp.office365.com as the smtp server.
The result was no good even using port 25 or 587.
Anything I try differently?
Regards
Ben
Hi Ben,
Trying using an MX lookup tool like mxtoolbox.com to check this.
It should be something like: (domain prefix).mail.protection.outlook.com
Hi Alan
Do I need to create a connector in Exchange Admin Center. Currently there are no connectors.
Step-by-step configuration instructions for SMTP relay
The MX record will have data for Points to address or value that looks similar to contoso-com.mail.protection.outlook.com.
Classic EAC:
Open the EAC at https://admin.protection.outlook.com/ecp/ and go to Mail flow > Connectors, and then click Add Add icon.. In the wizard that opens, choose the options that are depicted in the following screenshot on the first screen:
Choose from your organization's email server to Microsoft 365 or Office 365.
Click Next, and give the connector a name.
On the next screen, choose By verifying that the IP address of the sending server matches one of these IP addresses that belong to your organization, and add the IP address from Step 1.
Leave all the other fields with their default values, and select Save.
New EAC:
Open the EAC at https://admin.protection.outlook.com/ecp/ and go to Mail flow > Connectors. Or, to go directly to the Connectors page, use https://admin.exchange.microsoft.com/#/connectors.
Click Add a connector Add a connector icon.. In the wizard that opens, choose the options that are depicted in the following screenshot on the first screen:
The screen on which you configure the sending server as your organization server and the destination server as Microsoft 365 server.
Click Next. The Connector name screen appears.
Provide a name for the connector and click Next. The Authenticating sent email screen appears.
Choose By verifying that the IP address of the sending server matches one of these IP addresses which belong exclusively to your organization, and add the IP address from Step 1 of Step-by-step configuration instructions for SMTP relay section.
Click Save.
Regards
Ben