Note
Access to this page requires authorization. You can try signing in or changing directories.
Access to this page requires authorization. You can try changing directories.
Click image for full size
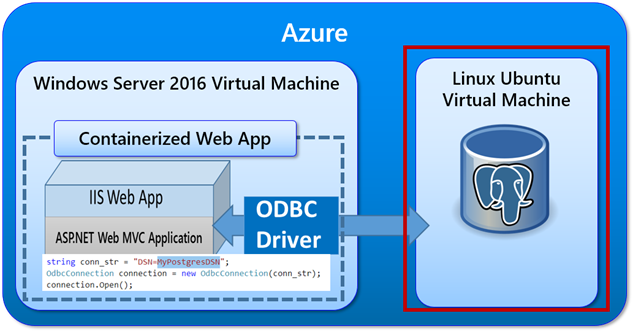
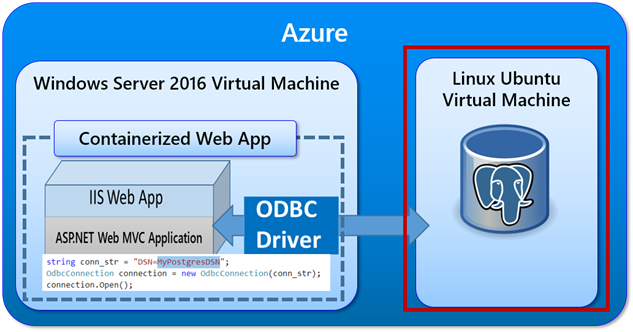
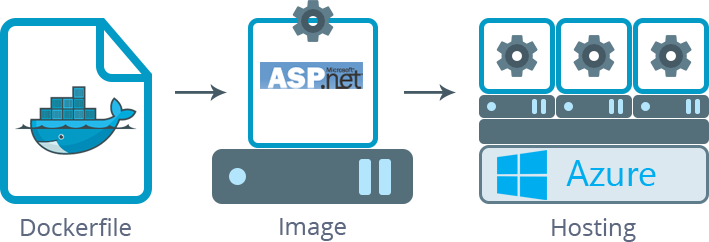
Figure 1: The Big Picture
Value of this post
There are a lot of useful insights this post can provide. The first is the proof of why Docker containers are so powerful with respect to streamlining application delivery, the so-called DevOps concept that you hear so much about. Another insight you will gain from this post is how to build ASP.NET MVC Web API application and deploy it to a Windows-based Docker Container. The third benefit from this post is that you will learn how to install an ODBC driver inside of a Docker container. this last bit is important because it really points to the power of containerization, namely the ability to couple all the dependencies for an application inside the container itself. Once this web app is deployed it will come with its ODBC driver, meaning that the VM to which it will be deployed does not need to have any preconfigured ODBC driver.
Imagine the following scenario:
- You have an ASP.NET MVC app you want to run in a Windows Container
- You want to connect to an external database using ODBC
- You need to automate the installation and configuration of the ODBC Driver on Windows
High Level - Creating a Web App/Service inside a container
Click image for full size
Figure 2: ASP.NET MVC Web API applications
Viewing the finished product first
There are a number of steps to this post. The first is the high level overview. Let’s begin by looking at a running ASP.NET MVC Web API app that we wish to run in a container.
It begins by running our application locally on our laptop. I will review building this application later in this post. For now, we will run the project in Visual Studio. That will bring up the browser. We will navigate to https://localhost:[port-number]/api/values to make a call into one of the methods in the ValuesController.
Click image for full size
Figure 3: The URL that calls the method Get()
A breakpoint that I have set will be hit. In the future section will actually build this code out. right now were just trying to prove that this is a web service call that is generated by an Http request. in our case we are doing it from a browser. But the web request could be executed from any client capable of a http.
In addition, localhost:61532 will be replaced by the IP address where our container will be running in production. localhost:61532 is the URL generated by Visual Studio while debugging as it runs locally.
The rest of this post is how we would build this application, install the necessary ODBC drivers, and deploy to a container running on a virtual machine.
Click image for full size
Figure 4: Hitting the breakpoint
Retrieving records from Postgres
As you can see, we will connect up to a database (PostgreSQL running on Linux). The purpose of this post is to create an image that has both our web app as well as an ODBC driver. When our image is run, it becomes a container.
Will take a closer look at the database in a moment.
JSON Payload
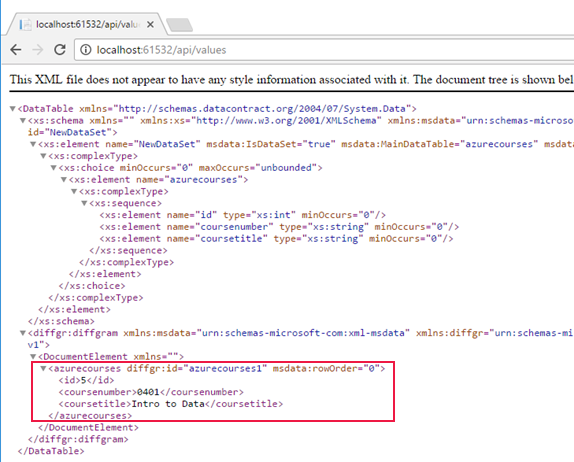
When this function completes, it will automatically transform our DataTable object to JSON code, as seen below. Notice the course number of 0401. The transformation from a data table to JSON payload is provided automatically by the framework. You could do this yourself through the use of NewtonSoft, that we get it for free in this case.
Click image for full size
Figure 5: The JSON results coming from PostGres
Viewing the PostGreSQL Database
Click image for full size
Figure 6: Viewing the PostGreSQL Database
Below you can see the query from the command line to select from courses. The assumption for this post if that you have a database, tables, and some data. The point is to build a web app that will consume this data from within a container as seen previously.
Click image for full size
Figure 7: Selecting from the courses table
Download ODBC Driver
Click image for full size
Figure 8: Downloading the ODBC Drivers
Windows Server 2016 Container Support TP5
The assumption is that you have provisioned a VM with Windows Server 2016 Container Support TP5. Instructions on provisioning a VM can be found here.
Why we need this VM
This VM is where we will do all of our work. We will build and run our Docker image here. We will use Visual Studio to build our ASP.NET Web Api application. We will download the ODBC driver to this VM and install and configure it.
In short, this will be the main development computer where we will build our ASP.NET Web API application and test it before deploying inside of a container.
Begin by downloading the PostgreSQL
We will need to install an ODBC driver inside of a Docker image so that it can run inside of a container. To do so, we will need to download it.
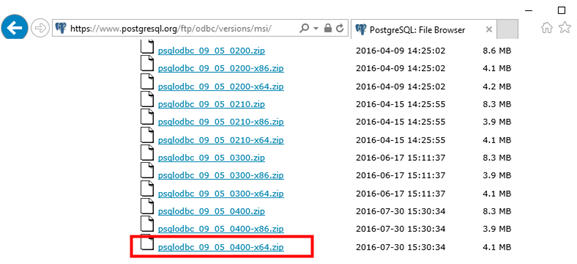
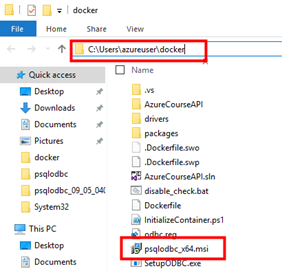
Because I am running on Windows 2016 x64, you need to download the x64 version. Unzip the file and copy psqlodbc_x64.msi to a folder called c:\users\azureuser\docker.
This msi file will get executed during the build process for our Docker image.
I created the docker folder on the Windows Server 2016 VM.
https://www.postgresql.org/ftp/odbc/versions/msi/
You will notice a file called, psqlodbc_09_05_0400-x64.zip. Download and unzip it. An MSI file is what we want.
Click image for full size
Figure 9: The PostGreSQL ODBC Drivers
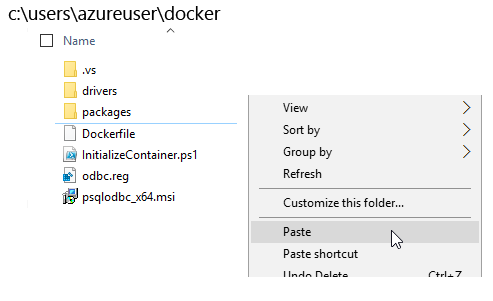
The psqlodbc_x64.msi file can be seen below. Notice that it is in the c:\users\azureuser\docker folder.
The key point is that we will need to run this MSI file inside of a docker container. that will be explained in a future section.
Click image for full size
Figure 10: psqlodbc_x64.msi in c:\users\azureuser\docker
Creating the Web Application (ASP.NET MVC Web API)
Click image for full size
Figure 11: Creating the web application
The Container encapsulates both the web app as well as the ODBC driver
We will now create the web service application. It will run from within the container.
It will run containerized in our Windows 2016 VM inside of Azure. In a future post we will describe how to run the container inside of some cluster orchestration software, such as Docker Swarm.
The key point to notice is that the container holds both the app as well as its dependencies.
Encapsulating the dependency
The dependency in this case is the ODBC driver. The beauty of this is that the container can run on any generic VM without any dependency of an ODBC driver.
Click image for full size
Figure 12: A web app running with its ODBC driver inside of the container inside of a virtual machine in Azure
Let’s create the Visual Studio Project
It is important that we create an x64 Visual Studio project so that we can correctly run the ODBC connection code.
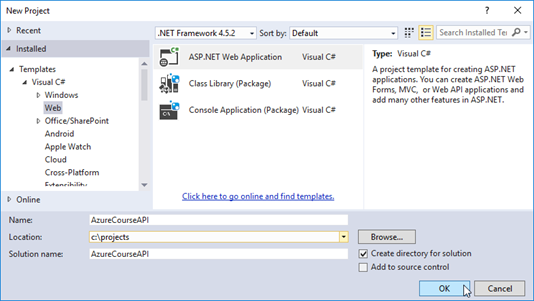
We will begin with a “File/New Project.”
Click image for full size
Figure 13: File/New Project
Select “ASP.NET Web Application” as your project type. Also provide (1) Name; (2) Location for your project.
Click image for full size
Figure 14: Naming the project
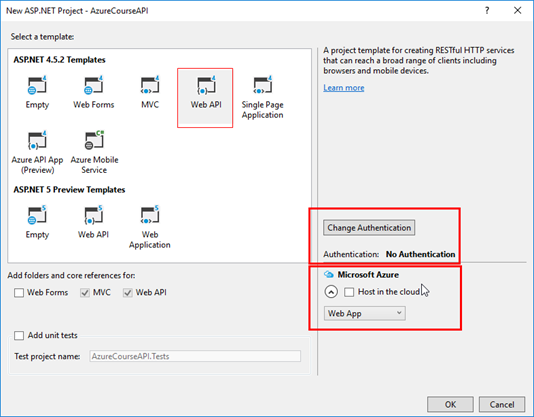
The type of ASP.NET project we will build is “Web API.” This means we will create an http-based web service application. In addition, remove authentication and do NOT host in cloud.
Click image for full size
Figure 15: Choosing Web API
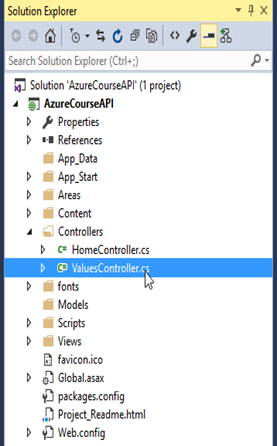
It is in the ValuesController.cs where http requests get mapped to functions. That means that when a client app issues an http request like, https://OUR-APP/api/values will end up calling the Get() method inside of ValuesController.cs file. We write this code next.
Click image for full size
Figure 16: Solution Explorer
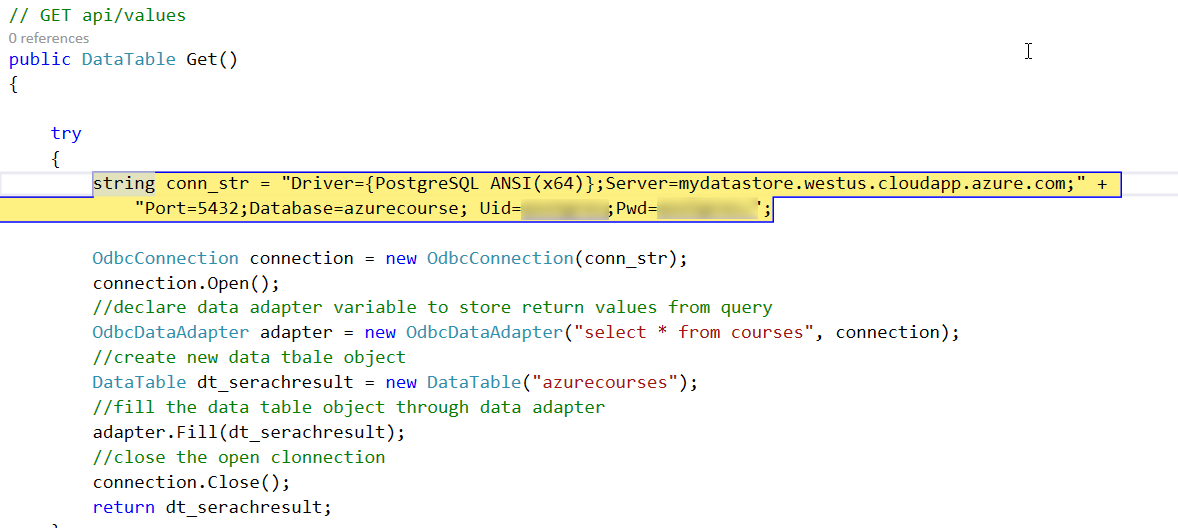
This is what the default implementation of Get() looks like. What we need to do is replace it with code that will connect up to the database and retrieve records to display in JSON format, as shown in the beginning of this post.
Click image for full size
Figure 17: Default implementation of the Get() method
Revising Get()
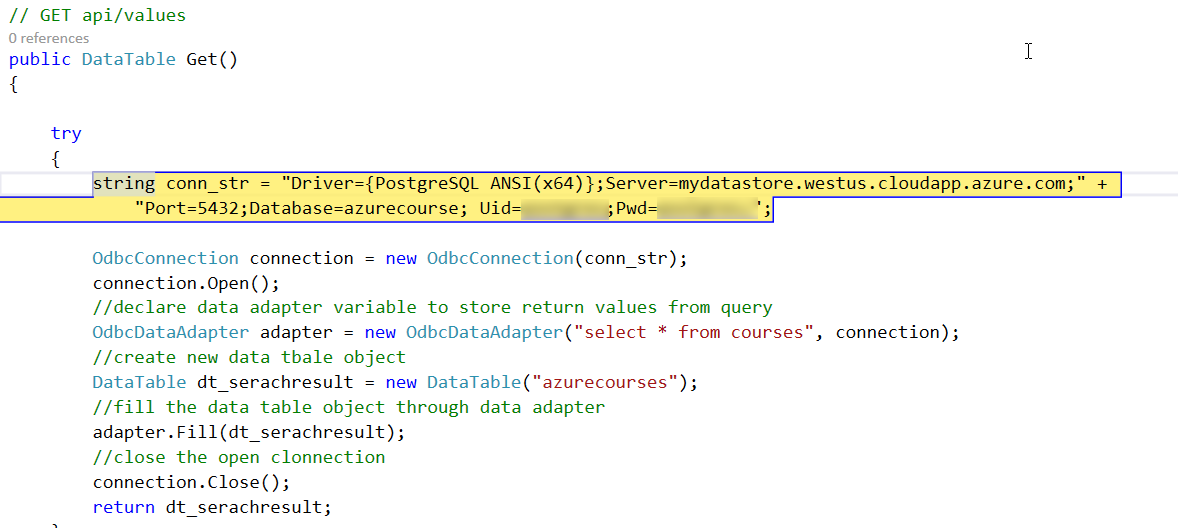
This is what the final implementation should look like. Notice there are a few things here that we should notice. For example, the very first line of code is leveraging the yet to be created data source name of MyPostgresDSN. This will be covered in a future step. The rest is fairly self-explanatory. Notice that we are issuing a select query that returns records from the courses table. We letthe power of the framework convert the DataTable object into a JSON payload that is delivered back to the browser or to the client making the API call.
.
Click image for full size
Figure 18: The revised Get() method
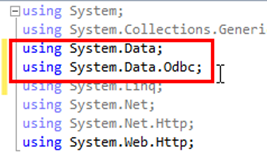
Before the code can be compiled, we need to add a couple using statements to the top of the ValuesController.cs file.
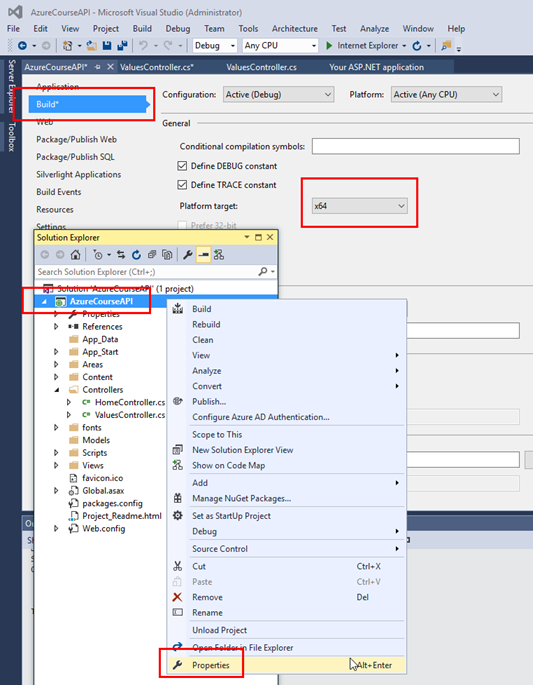
In order to avoid a run-time error, we will need to change the platform target to x64. This is important as we are making a call into the 64-bit ODBC driver. Right mouse click on your project and select project properties, navigating to the build tab. From there you will be able to set the platform target property to X64.
Click image for full size
Figure 19: Adding using statements
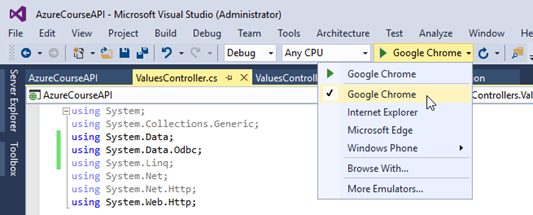
We are ready to run the application. The reason I am choosing Chrome as the browser is that it is capable of displaying JSON data Internet explorer will ask you to save the file first.
Click image for full size
Figure 20: Compiling for 64-bit architectures (x64)
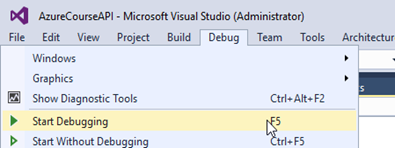
The final step we will run the application locally on the virtual machine without any regard for containerization at this point. Simply go to the “debug” menu and select “start debugging.”
Click image for full size
Figure 21: Setting the browser to Chrome
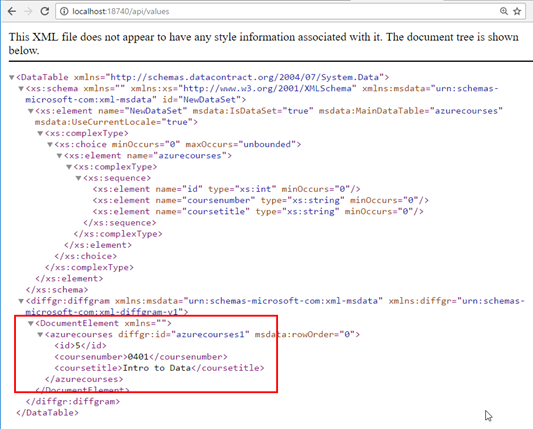
Once the browser shows up, make sure you add “api/values” to the end of the URL. This will trigger a call to the G et() get method that we just counted up. The data source form will be used to connect up to the PostGres database running on Linux. Once connected, select statement will be issued to retrieve all the courses in the courses table.
Click image for full size
Figure 22: Running our web application
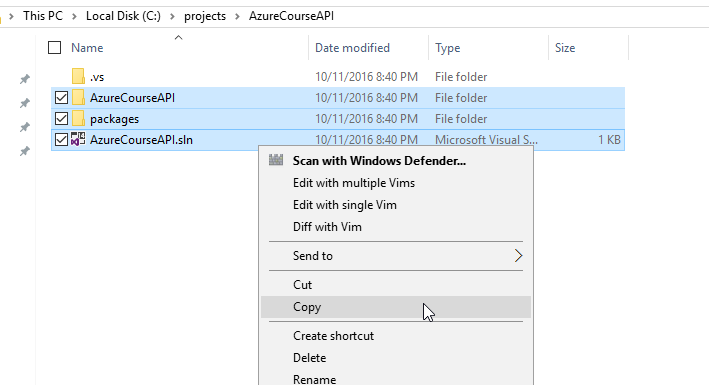
Now that we’ve built out our application, we need to copy it into our main docker directory (c:\users\azureuser\docker). The reason it needs to be here is that it will be compiled right before it gets deployed into an image. Later in this post we will learn about the Dockerfile, which provides instructions on how to build an image. As part of those instructions we will take the source code that we just built, and compile it. Once it is compiled it will be copied to IIS’s home folder, which is “c:\inetpub\wwwroot”. In other words, we will compile the source code and deploy it he as a web app running under the control of our Web server, which is IIS.
The command below is used to copy from the location of AzureCourseAPI. We will paste into c:\users\azureuser\docker.
Click image for full size
Figure 23: The correct data is returned
Copying the code to the docker folder
When we start to build our image, all of the files we need for building image needs to be in the same directory. Paste into the c:\users\azureuser\docker folder.
Click image for full size
Figure 24: Copying the source code
Now we will go to the docker and do the paste.
Click image for full size
Figure 25: Pasting the source code
Building the Docker Image
Click image for full size
Figure 26: Understanding Dockerfile
The docker file acts as a blueprint to create our image. That image will become a running container on Windows Server 2016, hosted in Azure.
At this point we are ready to start talking about building the Docker image. The way this is done is by using a Dockerfile. This is simply a text file that contains all the instructions we wish to use to build our Docker image.
At some point will issue a command that looks like this, “docker build -t docker-demo .”.
docker build -t docker-demo .
This command tells the docker build utility to look in the current folder for a file called, Dockerfile. And it’s inside that file, as we just discussed, that the instructions for building out the image are provided.
Including the dependencies for our application ( the ODBC driver )
This brings us to one of the essential value propositions of running our application inside of a Docker container. Installing the ODBC driver in the container rather than the host virtual machine makes it possible for us to run this container anywhere, not depending whatsoever on the ODBC driver being installed on the host operating system or virtual machine. Therefore, we will talk about installing the ODBC driver in the context of the docker file.
Two ways To install the ODBC driver
Actually, there two ways to install the ODBC drivers. The first way is somewhat manual and requires a bit of work. Between lines 17 and 21 are the manual commands needed to install the ODBC drivers. In ODBC driver is nothing more than some registry entries along with some supporting binaries, which in this case are being stored in the “drivers” folder. If you’re interested, I can send you odbc.reg, which is nothing more of a registry export once you have manually installed the ODBC drivers.
The odbc.reg file contains the necessary registry modifications. We are deliberately avoiding the long discussion about the odbc.reg file, because on lines 24 to 27 is the easier way to install the ODBC drivers.
Actually, there two ways to install the ODBC drivers. The first way is somewhat manual and requires a bit of work.
Later in this document we show the entire Dockerfile. Let's talk about some of the snippets that you will find in it.
It starts by creating a folder called drivers on the image itself. It then copies odbc.reg in addition to a bunch of DLLs from the drivers folder. Odbc.reg represents what the desired status for the registry to support the ODBC driver. Effectively, what it really does is it points back to the local drivers folder where all the ODBC driver code lives. If you’re interested, I can send you odbc.reg, which is nothing more of a registry export once you have manually installed the ODBC drivers.
 RUN md c:\drivers
COPY odbc.reg c:/drivers
COPY drivers c:/drivers
RUN reg import c:/drivers/odbc.reg
The odbc.reg file contains the necessary registry modifications. We are deliberately avoiding the long discussion about the odbc.reg file
psqlodbc_x64.msi – The automated way to install the ODBC driver
As you recall, previously we talked about copying the psqlodbc_x64.msi file into the appropriate folder, which is the same folder of the Dockerfile. Notice that we copy that file (psqlodbc_x64.msi) to the “drivers” folder before executing it, because the docker build utilities require that the file be copied to a local folder (c:/drivers) in the image before it is executed.
The first line merely copies it to the drivers folder. The second file on blocks it. This is necessary because the binary MSI is not signed in the security mechanism present in Windows server 2016 requires the user to enter “YES” through a graphical user interface. Unfortunately, no graphical user interface can be involved when generating your image. Therefore we use Powershell’s Unblock-File to indicate that this file is safe and that the graphical user interface need not appear.
The third line is the key line because that is where we actually execute the installation of the ODBC driver.
Notice the flags indicate that we don’t want a user interface interfering with the installation. All those parameters you see (/qn /quiet /passive) indicate that no user interface should be used during the installation process.
 RUN md c:\drivers COPY psqlodbc_x64.msi c:/drivers
RUN powershell Unblock-File C:/drivers/psqlodbc_x64.msi; Start-Sleep -Second 1
RUN c:/drivers/psqlodbc_x64.msi /qn /quiet /passive
Installing the ODBC driver and the Dockerfile listing
Click image for full size
Figure 27: Understanding the contents of Dockerfile
In the next section of this post we will dive deeper into the building of the Dockerfile. As you recall, this file is used as a blueprint for the image we wish to build. It is simply a text file that can contains commands. These commands do such things as copying binaries into folders that we create.
One of the things that we will do is install the built tools into the image.
Dockerfile - the crucial blueprint that will build our image
Click image for full size
Figure 28: Building the docker image
As we just discussed, the Dockerfile represents the blueprint for the image that we wish to build. Our image will contain web services that retrieve data from a PostGres database.
Just reiterating to be clear....
Docker can build images automatically by reading the instructions from a Dockerfile. A Dockerfile is a text document that contains all the commands a user could call on the command line to assemble an image. Using docker build users can create an automated build that executes several command-line instructions in succession.
Let’s break up our Dockerfile into various sections, so we can better understand it. Dockerfile it is heavily commented below.
 #---------------------------------------------------------------------------------------------
# This line below indicates that the base image for the current image
# that we are building is microsoft/iis:TP5. You see the syntax for the version of
# TP5, because we are using technical preview at this time. Once Windows Server
# 2016 goes GA, we will not need the TP5 syntax. Simply put, the command below
# will build on top a Windows server with IIS preinstalled, which is the Web server.

FROM microsoft/iis

#---------------------------------------------------------------------------------------------
# Install Chocolatey. These are the build tools that will allow us to compile
# the web application built previously (AzureCourseAPI.sln).
# Chocolatey is a Windows package manager, making it easy to install our web app

ENV chocolateyUseWindowsCompression false
RUN @powershell -NoProfile -ExecutionPolicy unrestricted -Command "(iex ((new-object net.webclient).DownloadString('https://chocolatey.org/install.ps1'))) >$null 2>&1" && SET PATH=%PATH%;%ALLUSERSPROFILE%\chocolatey\bin

#---------------------------------------------------------------------------------------------
# Install build tools. We mentioned that we would compile AzureCourseAPI.sln.
# This provides the appropriate.net framework and the ability to compile.

RUN powershell add-windowsfeature web-asp-net45 \
&& choco install microsoft-build-tools -y --allow-empty-checksums -version 14.0.23107.10 \
&& choco install dotnet4.6-targetpack --allow-empty-checksums -y \
&& choco install nuget.commandline --allow-empty-checksums -y \
&& nuget install MSBuild.Microsoft.VisualStudio.Web.targets -Version 14.0.0.3 \
&& nuget install WebConfigTransformRunner -Version 1.0.0.1

#---------------------------------------------------------------------------------------------
# Cleanup the default web folder with the content that comes preinstalled.
# We will install our own application there at the root.

RUN powershell remove-item C:\inetpub\wwwroot\iisstart.*

#---------------------------------------------------------------------------------------------
# Install ODBC drivers. This is commented out. This is the manual way
# to install ODBC drivers. Later in this file, we will use an automated approach.

# RUN md c:\drivers
# COPY odbc.reg c:/drivers
# COPY drivers c:/drivers
# RUN reg import c:/drivers/odbc.reg

#---------------------------------------------------------------------------------------------
#Install the ODBC drivers for PostGres. This was discussed previously in this post.
RUN md c:\drivers
COPY psqlodbc_x64.msi  c:/drivers
RUN powershell Unblock-File C:/drivers/psqlodbc_x64.msi; Start-Sleep -Second 1
RUN c:/drivers/psqlodbc_x64.msi /qn /quiet /passive

#---------------------------------------------------------------------------------------------
# Create a directory to hold our utilities.
RUN md c:\build
WORKDIR c:/build
COPY . c:/build


#---------------------------------------------------------------------------------------------
# Use the previously installed binaries to compile our app.
# This is where our web app (AzureCourseAPI.sln) gets compiled and copied
# to the root folder of IIS.
RUN nuget restore \
&& "c:\Program Files (x86)\MSBuild\14.0\Bin\MSBuild.exe" /p:Platform="Any CPU" /p:VisualStudioVersion=12.0 /p:VSToolsPath=c:\MSBuild.Microsoft.VisualStudio.Web.targets.14.0.0.3\tools\VSToolsPath AzureCourseAPI.sln \
&& xcopy c:\build\AzureCourseAPI\* c:\inetpub\wwwroot /s

# DEPRECATED –> ENTRYPOINT powershell .\InitializeContainer
Issuing the "docker build" command
Click image for full size
Figure 29: Building the Image
This is the moment we’ve been waiting for, to actually build the image using the Dockerfile. Once the image is built, we can just run it. Normally, you would run this on some type of cluster orchestrator, such as Docker Swarm, Mesos-DC/OS, or Kubernetes. But to keep things simple, we will just run this on the current Windows Server 2016 VM that supports containerization.
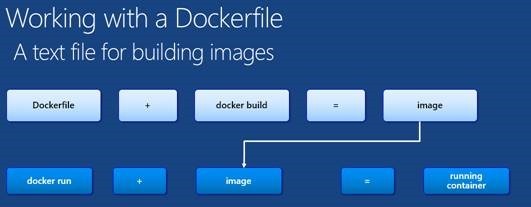
As you can see from the diagram below, the road to an image is simply issuing the docker build command against the Dockerfile that we just built. Once we have the image we can simply apply the “docker run” command to end up with a running container.
The command we will use to build our image looks like this:
docker build -t docker-demo .
Notice the period at the end of the command, which indicates that we will retrieve the Dockerfile from the current folder, which is c:\users\azureuser\docker.
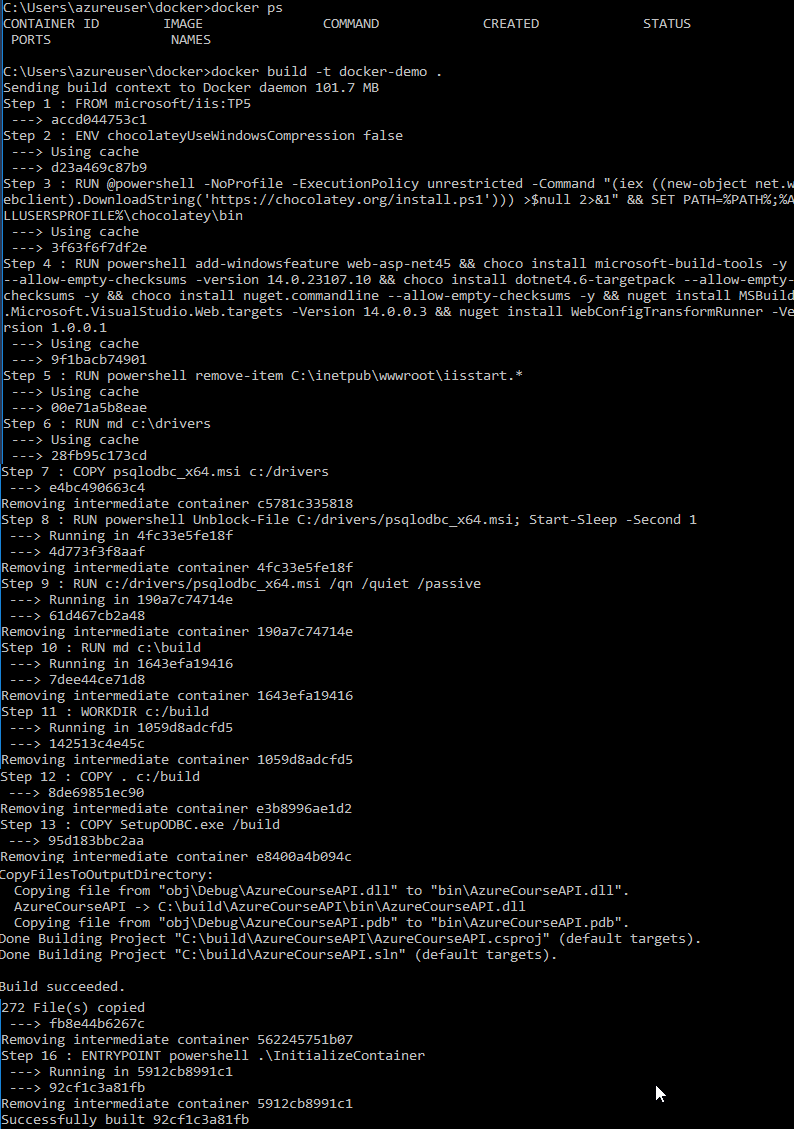
The output of that command looks like this.
Click image for full size
Figure 30: The workflow to building docker images and running them as containers
We can also take a look at the build image with the “docker images” command. The docker images command shows that docker-demo has been built. At this point it is ready to run.
Notice in the image below that all the commands indicated in the Dockerfile are spelled out as steps in the command line.
Click image for full size
Figure 31: The output of the docker build command
To view the images that are available to run, simply issue the docker images command.
docker images
Click image for full size
Figure 32: The docker images command
At this point we are ready to run the application within the container. That is achieved through the “docker run” command.
docker run -d -p 80:80 docker-demo
If you get an error, you may need to run:
Get-NetNatStaticMapping | Remove-NetNatStaticMapping
Followed by a reboot.
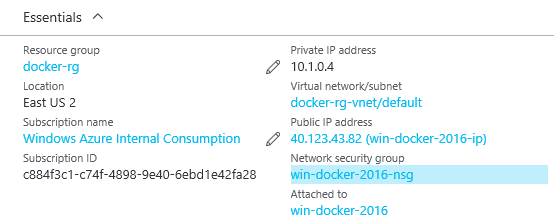
We will need the public IP address to connect up to that VM with the browser to test the web service.
https://40.123.43.82/api/values
Obviously, you will have an IP address other than 40.123.43.82. You can retrieve this from the Azure portal.
Port 80: Make sure you use the Network security groups to open port 80.
Opening up port 80 in the VM is key.
Click image for full size
Figure 33: Retrieving the IP address of our VM as well as the ability to access the container through port 80
Running the image as a container
Click image for full size
Figure 34: Running the Docker Image as a container
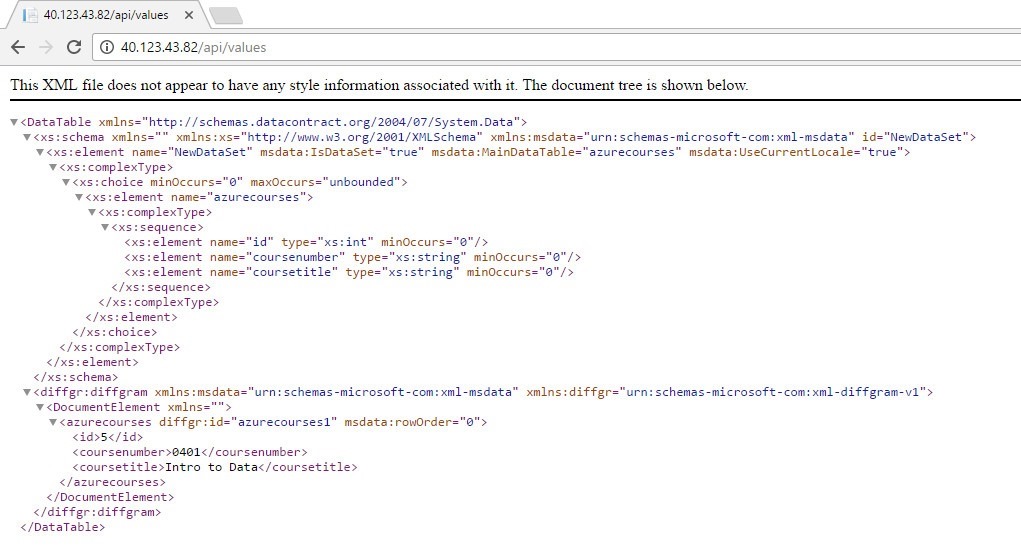
So pictured below is the coup de grace, the final running container with our ASP.net web application running in a Windows container.
In a future post we will explore using docker swarm to run this container.
This represents the final piece of work where we access the web application that is running in a container. That container is running on a Windows server 2016 in Azure that has all the docker tooling already installed in the ability to run containerized docker applications.
Click image for full size
Figure 35: The output from the client request into our running application in a docker container
Conclusion
The goal of being able to create a web application and run it inside of a docker container, along with all its dependencies has been demonstrated in this post. the architecture presented here can be used in many other web-based scenarios that requires applications to run in a Windows environment.
