Note
Access to this page requires authorization. You can try signing in or changing directories.
Access to this page requires authorization. You can try changing directories.
Hi, my name is Scott McArthur and I am Supportability Program Manager in Surface. Today I am going to walk through deploying Windows 10 Enterprise Version 1703(Creators Update) to a Surface Studio using Microsoft Deployment Toolkit 8443. Microsoft Deployment Toolkit is the preferred tool to use when building reference images or just deploying Windows to a device. Reference images you build using Microsoft Deployment Toolkit can be used with System Center Configuration Manager or other deployment tools. In this scenario, I am using Gen1 virtual machine as my reference image. We do not recommend using physical devices for reference images
Assumptions:
- You have already installed Windows ADK for Windows 10, version 1703
- You have already installed Microsoft Deployment Toolkit Build 8443
- You have downloaded Windows 10 Enterprise 1703 (Creators update) ISO from the MVLS site
- You have downloaded the latest Surface Studio driver download. Currently, at the writing of this blog, that driver package is called SurfaceStudio_Win10_15063_1701606_0.msi
Notes:
- These same steps would apply if you decided to deploy Windows 10 Professional instead of Enterprise
- These same steps would apply if you want to deploy Windows 10 Version 1607(Anniversary update/RS1). Surface Studio requires at least Windows 10 1607
Step 1: Extract Studio drivers
- Copy SurfaceStudio_Win10_15063_1701606_0.msi to c:\bin
- At elevated cmd prompt run the following:
- msiexec /a c:\bin\SurfaceStudio_Win10_15063_1701606_0.msi targetdir=C:\SurfaceStudioDrivers /qn
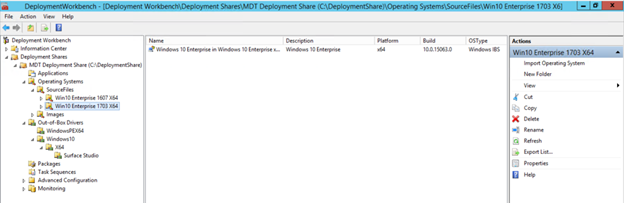
Step 2: Add Operating System
- Under operating systems create folder structure SourceFiles\Windows 10 Enterprise 1703 X64
- Right click “Windows 10 Enterprise 1703 X64” and choose import operating system
- Browse to Windows 10 Enterprise 1703 ISO mounted to DVD drive
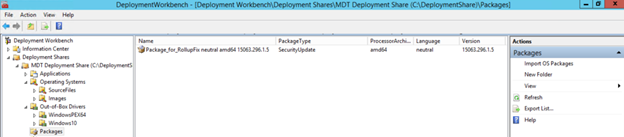
Step 3: Add latest cumulative update
- Go to the Windows 10 Update history page
- Locate the latest cumulative update for the operating system you are deploying
- Download the update (*.msu) from the Microsoft Update catalog and put it in a folder, c:\update
- Right click packages and choose import OS package
- Browse to c:\update
- Choose Finish
Note:
It should be easy now to add any future updates in same manner to update your image to latest updates. I would recommend replacing the current cumulative update with the latest one since these updates are cumulative
Step 4: Add Surface Studio Drivers to Out of Box Drivers
- Under “Out of box drivers” create folder called WindowsPEX64
- Under “Out of box drivers” create folder structure Windows10\x64\Surface Studio
- Right click “Surface Studio” and choose import drivers
- Browse to c:\SurfaceStudioDrivers

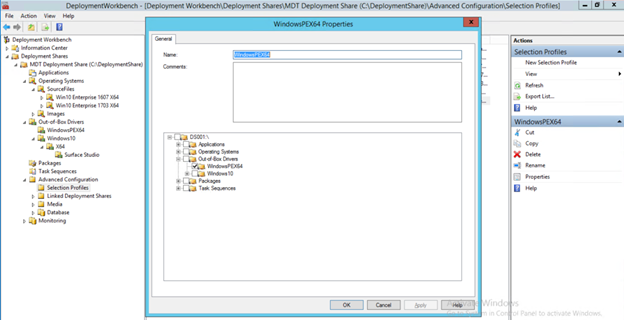
Step 5: Create selection profile for Lite Touch (WindowsPE)
It is best practice to create a selection profile for Lite Touch (WindowsPE) so that only the necessary storage and network drivers are added instead of all drivers under Out Of Box Drivers
- Under Advanced configuration right click selection profile and choose “New selection profile”
- Name the selection profile WindowsPEX64
- Choose the WindowsPEX64 folder under Out Of Box Drivers
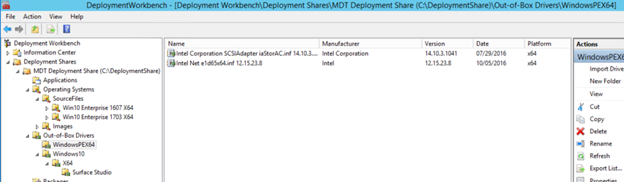
Step 6: Add Surface Studio storage controller driver and Intel network card driver to Lite Touch Boot image (WindowsPE)
The following imports the Hybrid Drive Intel Chipset SATA Raid Controller driver and the Intel Ethernet Connection I219-LM drivers. This ensures that you can talk to the Hybrid Drive and network during Lite Touch
- Right click WindowsPEX64 and choose import drivers
- Browse to C:\SurfaceStudioDrivers\SurfacePlatformInstaller\SurfaceStudio_Win10_1701006_0\Drivers\System\RST_AHCI
- Right click WindowsPEX64 and choose import drivers
- Browse to C:\SurfaceSTudioDrivers\SurfacePlatformInstaller\SurfaceStudio_Win10_1701006_0\Drivers\Network\Ethernet
Step 7: Configure Lite Touch for selection profile
- Right click the Deployment Share and choose properties
- Click the WindowsPE tab
- Click Drivers and Patches
- Choose X64 for platform. NOTE: Make sure you are configuring X64
- For selection profile choose WindowsPEX64

Step 8: Create Task Sequence
- Right click Task Sequences and choose “new task sequence. Set the following options:
- Task Sequence ID: 1
- Task Sequence Name: “Build Windows 10 Enterprise 1703”
- Standard Client Task Sequence
- Choose the Windows 10 Enterprise 1703 source files install.wim
- Do not specify product key
- Set your organization
- Set local admin password
Step 9: Set DriverGroup001 variable
The following sets up a variable so that when “Surface Studio” is detected as model, the drivers under the Surface Studio folder in Out Of Box Drivers will get added to the deployment. A best practice is to only install those drivers for that particular device you are deploying to. This ensures that no other drivers from other devices or platforms get added to the deployment to this device
- Right click “Build Windows 10 Enterprise 1703” task sequence and choose properties
- Click Task Sequence tab
- Under Preinstall section choose Enable Bitlocker (offline)
- Click add, general, set task sequence variable
- Set:
- Name: Set DriverGroup001 to Model
- Task Sequence Variable: DriverGroup001
- Value: Windows10\X64\%model%
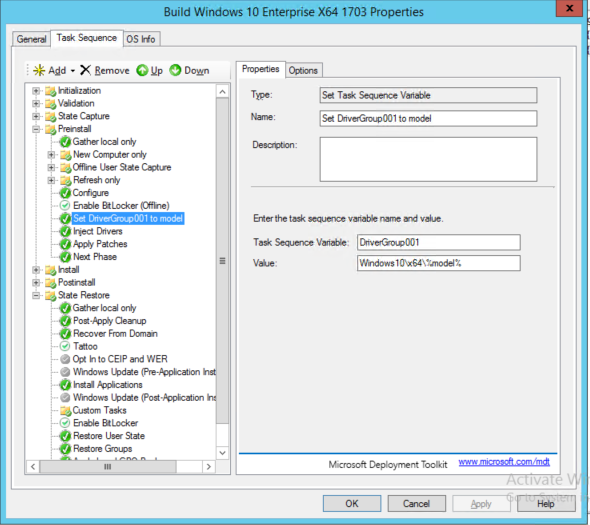
- Choose Apply
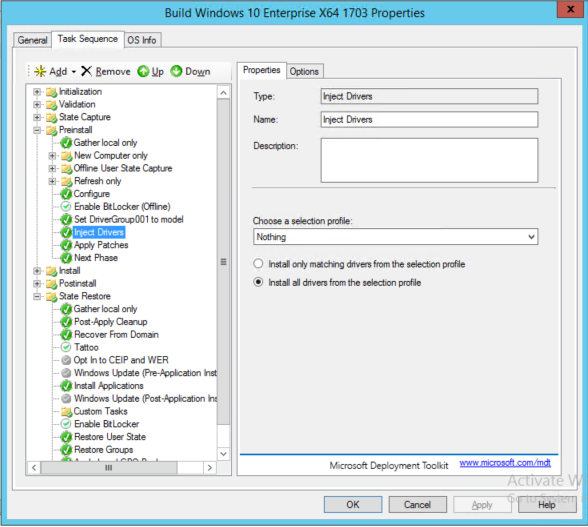
- Choose the Inject Drivers step
- Set “Choose a selection profile” to nothing
- Choose “install all drivers from the selection profile”
Step 10: Update Lite Touch Images
- Right click the deployment share and choose “Update Deployment Share”
- Choose “completely regenerate the boot images”
- This updates the Lite Touch boot images located in \DeploymentShare\Boot

Step 11: Boot Lite Touch
How you boot Lite Touch varies based on your configuration
- Import Lite Touch Images(DeploymentShare\Boot\LiteTouchPE_X64.wim) into your Windows Deployment Server (WDS) and PXE boot.
- Boot Lite Touch from USB drive (which connects back to your MDT server over network)
- Create MDT Media deployment on USB drive. This is basically a copy of your entire deployment share on USB drive and does not require any network connectivity back to MDT server. See steps below for creating
Steps to create MDT Media Deployment
If you want to deploy to Surface Studio using USB drive(no network connection required to MDT server)you can use the following steps to create one. Make sure the drive is large enough to hold all the content
- Under Advanced Config right click Selection Profile, choose new selection profile
- Name it “Offline Media Deployment 1703”
- Choose these folders
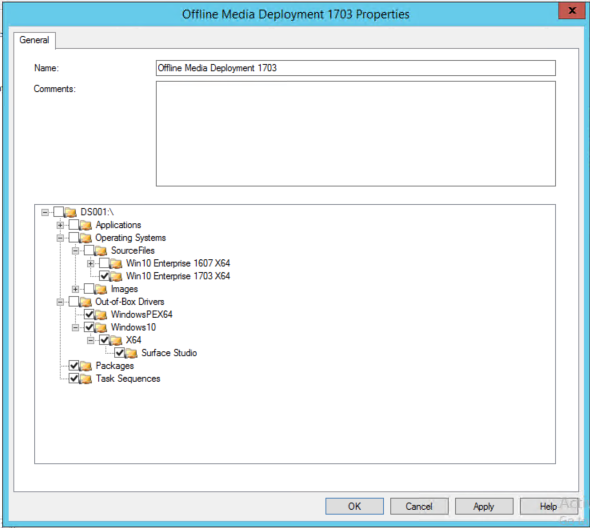
Note: Be sure and choose all folders noted
- Choose Ok
- Create a folder c:\mediadeployment
- Under Advanced Config, right click media and choose “new media”
- Choose the “Offline Media Deployment 1703” selection Profile
- Choose c:\mediadeployment
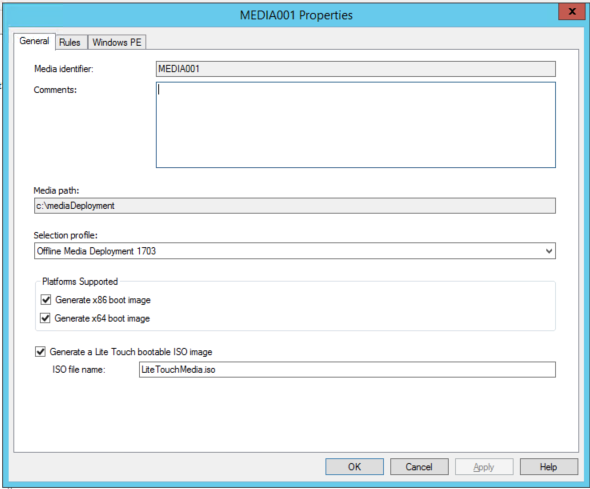
- Click the Windows PE tab
- Choose X64 platform. NOTE: Be sure and choose X64
- Choose Drivers and patches tab
- Set the selection profile to WindowsPEX64

- Choose OK
- Right mouse click Media001 and choose Update Media Content
- This will create the following files/folders:
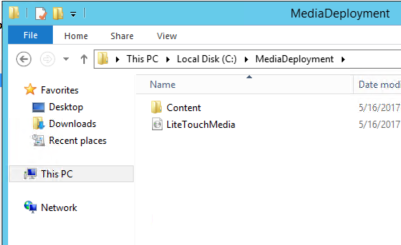
- Format a USB drive as FAT32
- Copy everything under the content folder to the root of the USB drive
- You can now boot from this USB drive on Surface Studio and do your deployment
Additional Surface Studio Deployment Notes
- When PXE booting Lite Touch you will have to use the OSK keyboard (located in lower right corner of screen) or physical USB keyboard to press Enter if required by your PXE server.
- During Lite Touch, touch is available to choose options but in order to type in credentials or other information you will need a physical USB keyboard attached. It is possible to fully automate Lite Touch by adding appropriate entries into customsettings.ini
- The keyboard and mouse included with Surface Studio are Bluetooth and require pairing once setup is complete.
I know this blog has been a long one but once you get this setup it is pretty easy to customize and update it easily. Hope this helps with your Surface Studio Deployments
Scott McArthur
Comments
- Anonymous
October 23, 2017
Hi Scott,Having some issues doing this. I'm doing it through SCCM instead of MDT, and I can PXE boot it with no issues into the WinPE environment. Hitting a SYSTEM_THREAD_EXECUTION_NOT_HANDLED bsod immediately when trying to complete the format stage. Noticed a couple of other threads on other sites mentioning the same error, but without a fix.Any ideas?