WebJobs in Azure with .NET Core 2.1
WebJobs aren't new to Azure or .NET. There's even a default Azure WebJob template in Visual Studio 2017 for the full .NET Framework. However, a similar template for WebJobs in .NET Core is somehow missing from Visual Studio. In this post, I'm using .NET Core 2.1.
Creating a WebJob in .NET Core isn't hard, but you have to know some tricks, especially if you want to use some .NET Core goodies like logging and DI.
In this post, we're going to build a WebJob and release it to Azure using Visual Studio, the Azure portal, and VSTS.
You can find the code samples for this post on GitHub.
What are WebJobs
A WebJob is a program running in the background of an App Service. It runs in the same context as your web app at no additional cost. Maybe you need to do some hourly task or do some cleanup task every night at 1 AM. Azure Application Insights uses a WebJob to report your app's statistics.
WebJobs can be scheduled, like hourly or daily, but they can also be triggered. A trigger could be a file upload or a new message on a queue.
WebJobs vs. Functions
I've often found comparisons between WebJobs and Azure Functions. In a way, Functions are the successors to WebJobs. Functions are (usually) small pieces of code that run in Azure and are, just like WebJobs, triggered at a certain event, including an HTTP trigger.
Functions are often a great alternative to WebJobs, but if you already have a web app it could make sense to use a WebJob instead. Especially if you want to share code and/or settings between the WebJob and your web app as they run in the same context, which also makes deployment quite easy.
Creating a Storage Account
Before we continue let's take care of something first. A WebJob requires an Azure Storage Account. I'll quickly walk you through the process of creating one.
In Azure, find "Storage Accounts" and add one. You'll have to pick a name that's unique across Azure. Other than that you can leave the defaults. We're talking about cents per GB, so don't worry about costs too much.
Once your Storage Account is ready, select it and find your "Access keys". We'll need one of the two connection strings later.
Creating a WebJob
As said, there's a WebJob template for the full .NET Framework. I recommend you check it out. Start by creating an ASP.NET Web Application and then add a new WebJob. If you try to create the WebJob right away you'll get an error saying that the project needs to be saved first (although it does create the WebJob).
We're here for the .NET Core version of a WebJob though. So start by creating an ASP.NET Core Web Application and then add a new .NET Core Console App project to your solution.
The first thing we need to do to is install the Microsoft.Azure.WebJobs package from NuGet. We should also install Microsoft.Azure.WebJobs.Extensions. Here's the catch though, the latest stable versions of these libraries have dependencies on the full .NET Framework so we're going to need version 3.0.0-beta5 (at the time of this writing), which is fully compatible with .NET Core.
Other NuGet packages we'll need are Microsoft.Extensions.Options.ConfigurationExtensions (which also gives us the Microsoft.Extensions.Options package, which we also need), Microsoft.Extensions.DependencyInjection and Microsoft.Extensions.Logging.Console. Be sure to install version 2.1.0 of these packages because there seems to be a bug in .NET Core 2.1 that prevents you from using packages with patch versions, like 2.1.1.
Join the Program
The next thing we need to do is change our Program.cs file. If you've created a WebJob using the .NET Framework template you can simply copy and paste the Program.cs file that was generated there (although you might want to change the namespace).
[code]using Microsoft.Azure.WebJobs;
namespace NetCoreWebJob.WebJob
{
// To learn more about Microsoft Azure WebJobs SDK, please see https://go.microsoft.com/fwlink/?LinkID=320976
internal class Program
{
// Please set the following connection strings in app.config for this WebJob to run:
// AzureWebJobsDashboard and AzureWebJobsStorage
private static void Main()
{
var config = new JobHostConfiguration();
if (config.IsDevelopment)
{
config.UseDevelopmentSettings();
}
var host = new JobHost(config);
// The following code ensures that the WebJob will be running continuously
host.RunAndBlock();
}
}
}
Adding Configuration and DI
So I promised you'd get all the .NET Core goodies like logging and DI. By default, a Console App doesn't have any of that, but you can add it yourself.
[code]private static void Main()
{
IServiceCollection services = new ServiceCollection();
ConfigureServices(services);
// ...
}
private static IConfiguration Configuration { get; set; }
private static void ConfigureServices(IServiceCollection services)
{
var environment = Environment.GetEnvironmentVariable("ASPNETCORE_ENVIRONMENT");
Configuration = new ConfigurationBuilder()
.SetBasePath(Directory.GetCurrentDirectory())
.AddJsonFile("appsettings.json", optional: false, reloadOnChange: true)
.AddJsonFile($"appsettings.{environment}.json", optional: true, reloadOnChange: true)
.AddEnvironmentVariables()
.Build();
services.AddSingleton(Configuration);
services.AddTransient<Functions, Functions>();
services.AddLogging(builder => builder.AddConsole());
}
Next, create an appsettings.json file and set the "Copy to Output Directory" property to "Copy always". The appsettings.json file should have two connection strings as mentioned in the Program.cs template file. These are the Storage Account connection strings we created earlier.
[code]{
"Logging": {
"LogLevel": {
"Default": "Warning"
}
},
"ConnectionStrings": {
"AzureWebJobsDashboard": "[your Storage Account connection string]",
"AzureWebJobsStorage": "[your Storage Account connection string]"
}
}
The next thing we need is a custom IJobActivator that can be used to inject dependencies into our classes. It needs to be set on the JobHostConfiguration in the Program class.
[code]using Microsoft.Azure.WebJobs.Host;
using Microsoft.Extensions.DependencyInjection;
using System;
namespace NetCoreWebJob.WebJob
{
public class JobActivator : IJobActivator
{
private readonly IServiceProvider services;
public JobActivator(IServiceProvider services)
{
this.services = services;
}
public T CreateInstance<T>()
{
return services.GetService<T>();
}
}
}
[code]var config = new JobHostConfiguration();
config.JobActivator = new JobActivator(services.BuildServiceProvider());
Adding a Trigger
After that, create a class and name it Functions (just like in the WebJob template). The Functions class will have the actual code for our WebJob.
Of course, we'll need to add a trigger. This is different than the full .NET Framework. After all, the template uses a static method, which makes DI impossible. Speaking of DI, notice that we've also added the Functions class itself to the DI container.
For simplicity, we'll use a TimerTrigger, which is triggered with a so-called CRON expression. This simply means it's triggered at a certain minute, hour, day, etc. In this example, it triggers every minute.
We'll also need to configure timers on the JobHostConfiguration.
[code]using Microsoft.Azure.WebJobs;
using Microsoft.Extensions.Logging;
using System;
namespace NetCoreWebJob.WebJob
{
public class Functions
{
private readonly ILogger<Functions> logger;
public Functions(ILogger<Functions> logger)
{
this.logger = logger;
}
public void ProcessQueueMessage([TimerTrigger("* * * * *")]TimerInfo timerInfo)
{
logger.LogInformation(DateTime.Now.ToString());
}
}
}
[code]var config = new JobHostConfiguration();
config.JobActivator = new JobActivator(services.BuildServiceProvider());
config.UseTimers();
Running the example
If you did everything correctly, or if you're running my code from GitHub, you should now be able to run the Console App. If you break on exceptions or if you're watching the Output window you may notice a lot of StorageExceptions. Don't worry about them and ignore them. This is a bug in the WebJobs library and will not affect your program. It may take a minute for your trigger to go off, so have a little patience.
If you head over to your Azure Storage Account you should see two Blob Containers, "azure-jobs-host-output" and "azure-webjobs-hosts". There's quite a lot going on here, but you can just ignore it. I've found that my WebJob triggers wouldn't go off for some reason, deleting the Blob Containers usually helped. Apparently, there's some state stored in there which isn't always disposed of properly when (re-)adding and removing WebJobs.
Deploying to Azure
The next thing we want to do is deploy our WebJob to Azure. In order for a WebJob to run it needs some executable script that it can use to get going. Many file types are supported, but for us Windows users it makes sense to use an exe, cmd, bat or PowerShell file.
A Console App used to be an exe file, but in .NET Core, it produces a regular DLL file that we need to start manually. So, create a file and name it "run.cmd" and make sure that it's encoded in UTF-8 no BOM (you can check this using something like Notepad++). It just needs a single line of code, which is "dotnet NetCoreWebJob.WebJob.dll". This runs your Console App. Make sure you set the "Copy to Output Directory" of the file to "Copy always".
One last thing, for some reason Azure WebJobs needs all the dependencies of a WebJob, which means all .NET Core packages we used to build it. You can do this by editing the csproj file and adding "<CopyLocalLockFileAssemblies>true</CopyLocalLockFileAssemblies>" to the first <PropertyGroup> (underneath "<TargetFramework>").
Before we can deploy our WebJob we need to deploy our web app. Right-click the ASP.NET project and click "Publish...". Simply follow the wizard and Visual Studio will deploy your app for you. You can create a new web app or select an existing one. This step isn't strictly necessary as you can host stand-alone WebJobs, but this should be familiar and it gives you an App Service we can use for our WebJob.
Deploy using Visual Studio
Deploying WebJobs using Visual Studio should be easy as pie. In fact, you probably already know how to do this (don't do it yet though). Right-click your WebJob project and click "Publish...". The following wizard looks a whole lot like the publication of a web app, which we just did. You can pick "Select existing" and pick the Azure web app we just created.
Unfortunately, Microsoft messed up this feature in the worst way possible. Visual Studio will deploy the WebJob with the same name as the project, which is "NetCoreWebJob.WebJob", except the dot is an illegal character in a WebJob name! This messed up my project so bad I had to manually edit it to make my solution working again. Nice one, Microsoft!
So here's what you do. At the start of the wizard, where you pick either a new or existing App Service, click the arrow next to "Publish immediately" and pick "Create Profile" instead. Now you can first change the name of your WebJob in the settings and deploy after that. Make sure you don't select "Remove additional files at destination" or you'll remove your web app.
Now, browse to the Azure Portal and look up your web app. You'll find "WebJobs" in the menu. You'll see your WebJob, but it's not doing anything. You need to manually run it by selecting it and clicking "Run". The status should update to "Running". You can now check out the logs to see that it actually works. You may see an error about the connection strings, but you can ignore those. If you toggle the output you'll still see a log is written to the console which lets you know it works! If you don't see a log right away try waiting a minute or two and don't forget to manually refresh the output.
[caption id="attachment_10025" align="alignnone" width="867"] WebJobs in Azure[/caption]
Deploy using the Azure Portal
When you add a new WebJob you'll need to fill out some options. You can make up some name, set the type to "Triggered" and the triggers to "Manual". Your alternatives are a "Continuous" WebJob, which just runs and closes (unless you've implemented an endless loop in your application); and a "Scheduled" triggered job, which is basically what we have except we've implemented the schedule ourselves.
The "File upload" needs a bit of explanation. Here you can upload a zip file that contains your WebJob. So head over to Visual Studio and build your solution. Then go to the output folder of your WebJob project, something like "MyProject\bin\[Debug|Release]\netcoreapp2.1", and put everything in that folder into a zip file. Then select it in the "File upload" in your new WebJob.
[caption id="attachment_10035" align="alignnone" width="520"]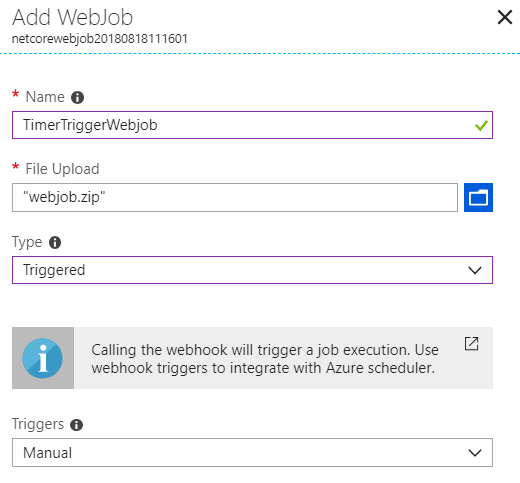 Add WebJob[/caption]
It will take a few seconds for Azure to create your WebJob so keep refreshing until it pops up. After that, you have to start it manually again and you can check out the logs.
Deploy using VSTS
Ultimately, we want to add our WebJob to our CI/CD pipeline in VSTS. Unfortunately, this functionality doesn't come out of the box. Luckily, it's not very difficult either. If you're not familiar with builds or releases in VSTS check out one of my previous blogs Azure Deployment using Visual Studio Team Services (VSTS) and .NET Core or ARM Templates to Deploy your Resources to Azure.
When you're in the Azure Portal find the "App Service Editor (Preview)" of your App Service. This lets you browse all the files in your App Service. One thing we notice is that your WebJob is located in "App_Data\jobs\triggered\[WebJob name]". And since your WebJob is really just the output of the WebJob project build it's simply a matter of copying your WebJob files to App_Data.
[caption id="attachment_10045" align="alignnone" width="452"]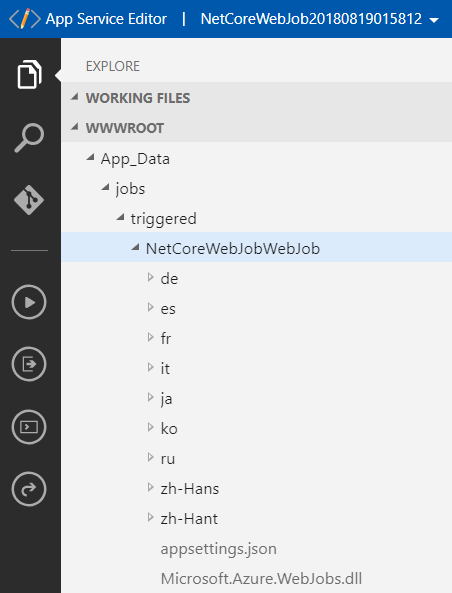 WebJob file location[/caption]
The build
So go to VSTS and create a new build. Select your repository, your branch, and select "ASP.NET Core" as a template. We only need to change two things here. We need to change the existing "Publish" task and add a new ".NET Core" task to publish our WebJob.
Change the name of the existing publish task to "Publish web app", untick the "Publish Web Projects" checkbox, and enter the "Path to project(s)", which is "**/NetCoreWebJob.csproj". Also, untick the "Zip Published Projects" and "Add project name to publish path" checkboxes as they will eventually mess up our release.
After that create a new .NET Core task, set the "Command" to "publish" and change the name of the task to "Publish web job". Again, untick "Publish Web Projects" and set the "Path to project(s)", which is "**/NetCoreWebJob.WebJob.csproj". And once again, don't zip the published projects or add the project name to the publish path. The last step here is the "Arguments" field, which can be copy/pasted from the other publish step, except we're going to add a bit to it: "--configuration $(BuildConfiguration) --output $(build.artifactstagingdirectory)\App_Data\jobs\triggered\WebJobVSTS".
[caption id="attachment_10055" align="alignnone" width="851"]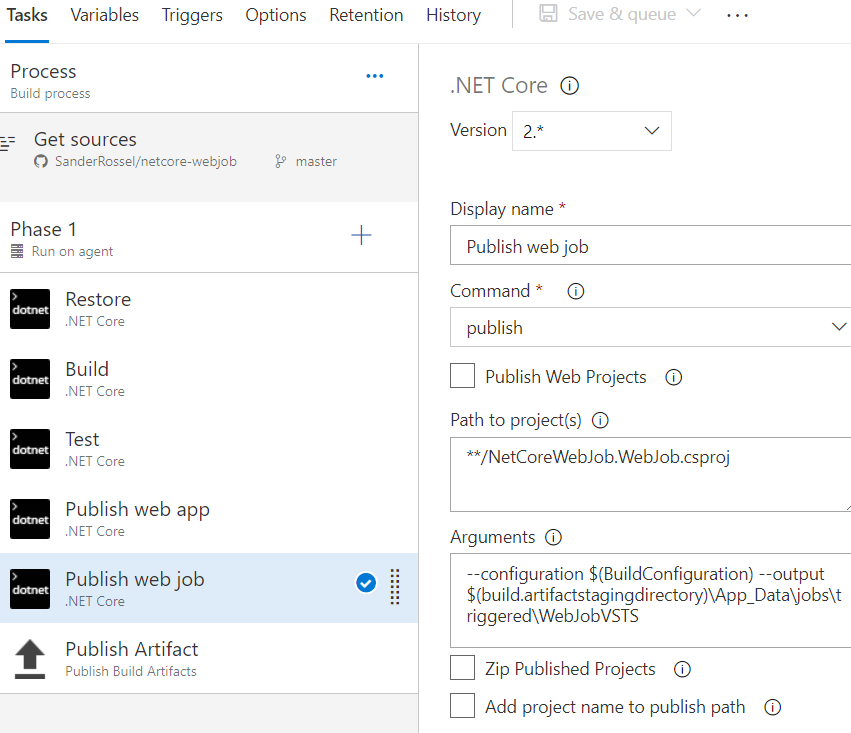 VSTS WebJob build[/caption]
The release
Last, but not least, is the release. Create a new release in VSTS, pick the "Azure App Service deployment" template and fill in the blanks, which is an artifact and your Azure settings in the Environment. Because we're not zipping our build we just need to change one setting. In the "Deploy Azure App Service" task is a "Package or folder" setting, which has a default of "[...]/*.zip" which obviously isn't going to work. Instead, use the browser (the button with "...") and select your drop folder.
Save it, hit new release and pick your latest build. If all goes well you should see your new WebJob in the Azure Portal!
Wrap up
Hopefully, Microsoft will come with a built-in solution for creating, consuming, and deploying WebJobs to Azure in .NET Core soon. Until that time it's not particularly difficult, it's just a matter of knowing what to do.
In this post, we've seen the TimerTrigger, but there's a QueueTrigger, a BlobTrigger, and a FileTrigger as well. Experiment, google, and read the official documentation.
Don't forget to delete your resources.
Happy coding!
Comments
- Anonymous
August 22, 2018
This is very thorough. Thanks, Sander!- Anonymous
August 22, 2018
Thanks Ed!
- Anonymous
- Anonymous
August 23, 2018
Thanks Sander! An awesome first post, really looking forward to the next one.- Anonymous
August 23, 2018
Thanks Sjoukje, second one coming soon ;-)
- Anonymous
- Anonymous
August 25, 2018
Just epic! Really enjoyed this.A lot of wise words and hard work went into this piece Sander, keep em coming!- Anonymous
August 26, 2018
Thanks Pete, a follow-up is in the making!
- Anonymous
- Anonymous
August 27, 2018
Very nice end-to-end walk through!- Anonymous
August 27, 2018
Thanks Stephane!
- Anonymous
- Anonymous
October 18, 2018
The host model has changed and will result in errors when you upgrade to the stable Microsoft.Azure.WebJobs -Version 3.0.1The new model is shown herehttps://github.com/Azure/azure-webjobs-sdk/blob/dev/sample/SampleHost/Program.cs- Anonymous
October 19, 2018
I noticed the new stable version, but I haven't got around to updating my software yet (if it ain't broke don't fix it). Thanks for the link. Every new project should use the stable version, of course.
- Anonymous
- Anonymous
December 04, 2018
Can you add MSI authentication to a .net core web job?- Anonymous
December 05, 2018
I will answer my own question and say yes, you can... :)- Anonymous
December 05, 2018
Yes, you can. But it seems I'm a little late to the party ;-p
- Anonymous
- Anonymous
- Anonymous
January 23, 2019
Your blog post helped a lot. Thanks Sander!- Anonymous
January 23, 2019
Glad to be of help! Please keep in mind that this blog is a few months old and a stable version of the Microsoft.Azure.WebJobs package that fully supports .NET Core is available now.
- Anonymous
- Anonymous
March 06, 2019
I would like to receive messages instantly from azure service bus multiple topic's subscriptions into Azure SQL DB using Azure WebJob with .net core 2.0 or later version. Are there any options?- Anonymous
March 06, 2019
You could use one or more ServiceBusTrigger(string topicName, string subscriptionName) and then write something to Azure SQL.- Anonymous
March 07, 2019
I got it. Thanks for suggested. But I need some clarification on it, my case is like a huge amount of data will be transferred between the multiple subsystems(many to many relationships) for my business. I have a little bit scared to implement this functionality on my project because I'm not aware of the full scope and how is the future support will be for the Azure Service Bus WebJobs SDK in .NET Core 2.1 or later. In this situation, I'm having little bit confusion to implement receiving messages from the service bus topic subscription's whether I should choose Azure Service Bus WebJobs SDK (https://github.com/Azure/azure-webjobs-sdk/wiki/Service-Bus) or Normal Service Bus (https://docs.microsoft.com/en-us/azure/service-bus-messaging/service-bus-dotnet-how-to-use-topics-subscriptions)? Just share your input if you would like to say something about it.- Anonymous
March 08, 2019
Support should be fine, these same attributes are used in Azure Functions, which could also be a valid use case in your scenario. So by all means, use the WebJobs SDK.
- Anonymous
- Anonymous
- Anonymous
- Anonymous
June 19, 2019
> We're here for the .NET Core version of a WebJob though. So start by creating an ASP.NET Core Web Application and then add a new .NET Core Console App project to your solution.Hi, you missed up important details when you had been writing the article. You referred on two different applications but after say about dependencies and did not clarify which one of these apps should depend on dependencies. Or for newbies, it would be an easy way at least if you gave names to apps. Thanks.- Anonymous
June 19, 2019
Not sure what you mean, but this article is outdated. There's a stable version of the WebJobs.Extensions package (so it's no longer beta) and the entire API has changed. Even VSTS is no longer VSTS, but Azure DevOps (although I think the pipelines haven't changed too much and should still be relevant).
- Anonymous