Note
Access to this page requires authorization. You can try signing in or changing directories.
Access to this page requires authorization. You can try changing directories.
Visual Studio Team Test is part of the Visual Studio 2010 that encapsulates a suite of testing tools for Application Lifecycle management. Some of the features of VSTT are the ability to create Unit Tests, Web tests and Load tests for Performance and Stress testing, more importantly the Functional Testing capabilities that addresses the needs of both Manual and Automated testers. The following note will explain in detail about the Functional Testing features in Visual Studio for Automated testers. This is achieved through the UI Automation techonologies along with Record and Playback framework.
CodedUITest:
Visual Studio 2010 introduces a new test type – Coded UI Test [CUIT] , which enables you to create automated UI tests which can then be added to a regression test suite. Coded UI Tests may be run as part of a Build Verification Test suite, thus giving the developer immediate feedback on any UI regressions. The developer can run these UI Tests before his check-in and ensure that there are No more UI regressions.
It supports the following tools
1. Coded UI Test recorder allows users to record test actions and generate code for them. Generated code is re-factored into methods based on user gestures
2. UI Control Locator allows users to add UI controls to a repository and generate assertion code on their properties
3. Coded UI Test has excellent integration with Team Foundation Server
The following sub-sections provide details on the features supported by the engine.
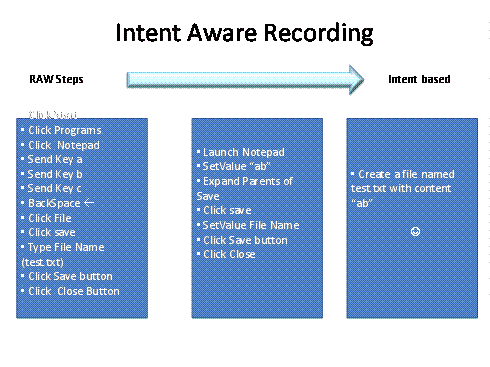
· Intent-aware, non-intrusive and resilient action recording: Instead of just capturing raw user actions, the engine has been designed to be intent aware. Set of actions are aggregated into equivalent action to provide an intent aware playback.

Additionally, the engine uses smart algorithms to accommodate changes in configurations like window resize/Minimize/Maximize, screen resolution changes etc to provide a resilient playback support.
· Strong UI technology and platform support: The engine supports a wide range of platforms out-of-the box covering thick client applications built with .Net technologies to latest web applications
- Internet Explorer 7.0 and Internet Explorer 8.0
- Support for applications written in ASP.Net, PHP, JSP, ASP, Ajax, SharePoint and other Web 2.0 applications.
- Win-forms Controls for Microsoft .Net framework 2.0, 3.5 SP1 and 4.0. Win32 / MFC controls with good accessibility.
- Windows Presentation Framework (WPF) for .Net framework 3.5 SP1 and 4.0
Internally the engine uses features of IEDOM for recording actions on the web applications being tested via Internet explorer. It uses accessibility technologies in Windows to capture actions on AUTs. Specifically it uses Microsoft Active Accessibility (MSAA) for Win-form support and UI automation (UIA) for WPF support. Custom controls that are developed for Win-form and WPF that follow accessibility guideline are also supported.
· In-built sophisticated mechanisms for handling complex UI action recording scenarios
- Fast Search: In order to be able to playback user actions, the engine must be able to search for the Control that was acted upon. It uses fast search algorithms to quickly identify the controls and take appropriate actions on them.
- Wait For Ready Mechanism: When playing back an action the engine needs to know that the UI is ready to act on the next action. For example, if the application was navigating to a web page, the engine needs to wait for the navigation to complete before taking an action. The WaitForReady mechanism provides this support by intelligently detecting the application’s readiness to act on the next action.
- UI Synchronization: If the user acted on a control (e.g. a mouse click), the engine needs to ensure that the control actually did receive the input. UI synchronization feature provides this support to the engine allowing it to perform a more resilient playback.
- Ensuring UI Control is Visible: In a fast-forward scenario, the UI element (e.g. a list box) that needs to be acted upon might not be visible (scrolled our) or hidden behind another window. This feature ensures that the element is visible before taking an action on it.
How is CUIT different?
CodedUITest has an edge over the existing automation Frameworks in terms on the following
1. Robustness
2. Scalability in different dimensions like number of actions, number of controls and the length of the recording and playback
3. Performance of the Automation
4. Breadth in Platform Support
5. Integration with Visual studio Team System for Planning, Authoring, Executing test cases and Reporting.
To get more insight on the comparison with other automation frameworks, visit the UI Automation Wiki page here [Microsoft internal link]
Creating Automated Functional Tests using CUIT:
A typical functional test encompasses a series of Actions to be performed on the application under test followed by set of Validations that will verify the functionality of the test application at that stage of execution.
The following are the steps to be followed to create a CodedUITest. The underlying sample application is a Form-filling application.
1. Start Visual Studio 2010 IDE
2. Click on “Test” menu and select “New Test”
3. Selected “CodedUITest” from the list of available test types and create a Project
Note: It is preferable to add the Test project to the Application’s solution itself so that the Test code will be built as part of the product code build process.
Screenshot of the Application under Test:

Recording the actions and Generating code for Automated Test:
1. From the Dialog that opens on creating a new instance of CUIT, Select “Record Actions, Edit UIMap or Add Assertions”
2. CodedUITest Builder Window opens just above the task bar with 4 buttons [ Record/Pause, View Actions, Add Assertions, Generate Code ]
3. Click on “Record” and Start performing actions on the Application.
In this example of Form-Filling Application, we will be keying in the details for Name, DOB, Sex and Profession fields and Click on Submit to generate some results
4. Now that we have recorded the application, we need to generate code for the recorded actions to create an automated test for the underlying scenario. To do so, Click on “Generate Code”
5. Key in a Name for the Method and Click on “Add and Generate”

Inserting Assertions for validations:
1. Any functional testing scenario is complete only if the validation is done for the actions done on the application. In our example, we will be validating the Output of the Results Textbox at the bottom.
2. To Insert Assertion, Click on “Add Assertion”. This opens up CodedUITest Builder in Assertion mode.
3. The Window has 2 panes.
a. Left pane shows all the controls interacted till now. This is called UIMap Viewer.
b. Right pane shows all the Properties of the selected control. This is called Property Explorer.
4. To add validation for a control that is already added to UIMap
a. Click on the control in Left pane. Select the validation property. Right Click on it and Click “Add Assertion”
b. In order to undo adding Assertion on the same session, Right Click on the property to select “Delete Assertion”
5. To add validation for a new control
a. Point to the control on the Application. Use the Global Hot-key for Add Control to UIMap [ Win + I ]
b. Same as above, select the validation property to Assert on and Key in the Assert Value in the dialog that opens up.
6. Click on “Generate code” to generate the code for the Assertion added.
Code Snippet of the generated assertion:
/// <summary>
/// CheckResult - Use 'CheckResultExpectedValues' to pass parameters into this method.
/// </summary>
public void CheckResult()
{
WinEdit rtbDetailsEdit = this.FormFillingApplicatiWindow.RtbDetailsWindow.RtbDetailsEdit;
// Verify that 'rtbDetails' text box's property 'Text' equals 'You are Hari born on 19 July 1988 working as Engineer
Assert.AreEqual(this.CheckResultExpectedValues.RtbDetailsEditText, rtbDetailsEdit.Text);
}

Contents of CodedUITest Project:
1. UIMap.uitest – This is a xml file that is a repository for the UIObjects interacted in the test and the list of Recorded and Assertion methods added to the test
2. UIMap.Designer.cs – Auto-generated file [ Not to be edited by the users ] , which contains the Class definitions of the UIObjects in the UITest
3. UIMap.cs – Partial class, which is a place-holder for overriding the properties of the UIObjects in UIMap
4. CodedUITest.cs – Test Class that instantiates the UIMap in the current project and calls the Recorded and Assertion methods
5. UserControls.cs – Control Type classes for each of the types of the UIObjects added to the UITest file
a. In case of a Winforms button, the generated UserControls class name will be WinButton

Finally, run the test to verify the scenarios / validations and hence the functionality of the application will be tested.
Maintainability of CodedUITest:
Any Application’s User interface is subject to change over the product cycle. This adds up to the maintainability cost of the automated functional tests.
In the context of CodedUITest, the recorded actions and assertions are code-generated on the controls in the application, which are found through a set of properties called “Search and Filter Properties”. In many instances, the functional tests are not agnostic to the changes in the application. So, the changes in the functional tests are highly vulnerable. The following segment will explain in detail about the series of the recommended steps that needs to be followed for fixing the CodedUITest for a corresponding change in the application.
What are the possible changes in the Application that will affect CodedUITest?
1. Change in the Expected Value of the Validation Property
2. Change in Value of the Search Properties.
3. Change in the UI Hierarchy of the control [ like moved to a different container ]
How to deal with changes in Validation properties:
1. The obvious solution would be to make the CodedUITest fail because of incorrect expected value. On the Error Stack Trace in Test results window, Click on the Assertion line link and fix the Expected value.
2. CodedUITest generated code has a Partial class from which the tester will have access to Recorded methods, Assertion methods and the ExpectedValues classes. So the other way to fix the expected value is to write an Initialization function that will change the expected value of the assertion. See sample code below
//Partial Class Code
public partial class UIMap
{
/// <summary>
/// Method to set the Expected value to String.Empty
/// </summary>
public void Init()
{
this.CheckResultExpectedValues.RtbDetailsEditText = String.Empty;
}
}
//CodedUITest Class Code
[TestMethod]
public void CodedUITestMethod1()
{
UIMap map = new UIMap();
//Call Init() to reset the Expected value
map.Init();
//Call Assertion method
map.CheckResult();
}
How to deal with changes in Search properties:
Any change in Search Properties will result in failure of Recorded methods as well as the assertions added, as both are dependent on the Search properties of the underlying control.
1. One of the recommended solutions is to re-fetch the control to the UIMap. Add the new control to the UIMap and generate code to reflect the changes of the UIMap in the code. To update the code replace all instances of the old object with the new object added.
a. This can be done by copying the “Reference of the new and old Object to clipboard” and do a Find-replace in the Test project
b. You may also delete the old object from the UIMap by clicking on the “Delete” button on CodedUITest builder toolbar. This can be done only when no references to the object is present in the test classes.
c. Note that, we need to generate code from updated UIMap to remove the obsolete UIObjects in UIMap.Designer.cs file.
2. Search properties can be overridden inside the Partial class using some Initialization methods. See sample code below
/// <summary>
/// Method to override the Search properties in UITest
/// </summary>
public void ChangeProperties()
{
this.FormFillingApplicatiWindow.SubmitWindow.SearchProperties[WinProperties.Window.Name] = "SubmitDetails";
}
//CodedUITest Class Code
[TestMethod]
public void CodedUITestMethod1()
{
UIMap map = new UIMap();
//Call ChangeProperties () to change the search properties
map.ChangeProperties ();
//Call Recorded method
map.Bvtmethod();
}
3. The last resort would be edit the UITest [xml formatted] file directly and “Generate Code” for the changes to reflect in UIMap.Designer.cs file. This is not the recommended way as editing the UITest incorrectly may result in incorrect functionality.
Ready to try out CodedUITest?
Visual Studio 2010 Beta2 is available in this link.
Visual Studio Beta2 Forum : https://social.msdn.microsoft.com/Forums/en-US/vsautotest/threads
Comments
- Anonymous
February 28, 2011
Nice blog but the link to the wiki page is broken.