BCS Solutions in Outlook
If you’ve read Brad Stevenson’s post Types of Solutions then you’re already familiar with the three types of BCS solutions:
- Simple Out-Of-Box Solutions
- Intermediate Declarative Solutions
- Advanced Code-Based Solutions
This post will discuss the different types of BCS solutions possible in Outlook 2010.
Simple solutions can be created using out-of-box capabilities, by simply clicking the “Connect to Outlook” button in the ribbon of a SharePoint External List.
At that point, a new folder will be displayed in Outlook. Clicking on the item type in that folder will display the external data items, previously seen in the External List, inside of Outlook either as a Contact, Post, Task or Appointment. See External Lists in Outlook for an example.
The fields that are unique to this External Content Type (i.e. “Customer ID Number”) that were not mapped to Outlook fields (such as First Name, Phone Number, Email, etc.) will be displayed in a standard auto-generated form region when opening up an item. All of the names and icons for the solution will be automatically selected.
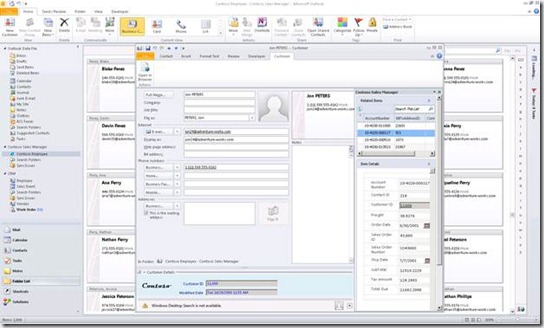
For developers that want to create a similar type of solution in Outlook, yet customize it to extend its capabilities and look more uniquely professional, an intermediate declarative solution can be created for these needs. This will allow you to customize the:
- Number of External Content Types that appear in the solution folder in Outlook
- Solution names and icons used
- Taskpane, which displays related items for External Content Types with associations
- Ribbon, which contains custom action ribbon buttons
- Form region, used to show the unique fields
In addition to these Simple and Intermediate solutions, developers can also create Advanced BCS solutions in Outlook with code, by creating an Outlook Office Add-In in Visual Studio 2010 and packaging it together with a BDC Model, subscriptions and a Solution Manifest in a BCS Solution Package.
Let’s look a little closer at both the Intermediate Declarative Solution and the Advanced Code-Based Solution.
Intermediate Declarative Solution
To create an intermediate declarative solution:
- Create the required artifacts (see table below for details)
- Put the artifacts in a folder
- Create a BCS Package (a unique kind of VSTO ClickOnce package) from that folder
- Deploy the solution to Outlook
- You’re done!
To create the required artifacts, you can either:
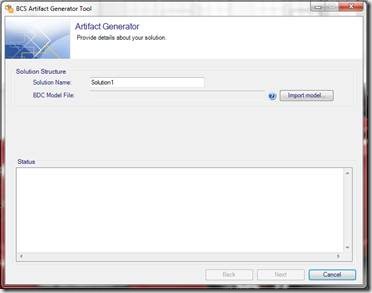
a) Create them automatically using the BCS Artifact Generator tool, or
b) Create them by hand, following the guide Creating Intermediate Declarative Outlook Solutions Using Business Connectivity Services
Be sure to check out the following resources as well:
To package the required artifacts, you can either:
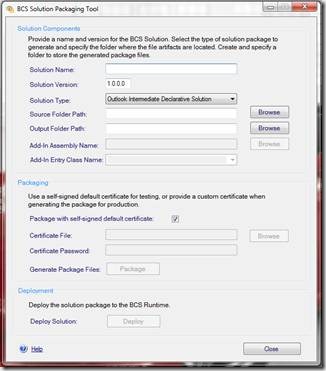
a) Use the BCS Solution Packaging Tool with type “Outlook Intermediate Declarative Solution”, or
b) Use the server APIs to package manually
Here’s an example of what a custom intermediate declarative solution can look like in Outlook:
The following table lists the required and optional artifacts:
Component |
Artifact |
Details |
BDC Model |
Metadata.bdcm |
Required; must have .bdcm file extension or be named exactly “metadata.xml” |
Subscription file(s) |
*Subscription.xml |
Required, one for each External Content Type; must be named as *Subscription.xml (i.e. “myCustomerSubscription.xml”) |
Solution Manifest |
OIR.config |
Required; must be named OIR.config |
OIR or layout resource file(s) |
*.resx |
Optional |
Outlook ribbon file(s) |
*.xml |
Optional |
Layout file(s) |
*.xml |
Optional |
InfoPath form(s) |
*.xsn |
Optional |
Outlook form region(s) |
*.ofs |
Optional |
Form region manifest file(s) |
*.xml |
Optional |
Custom Ribbon Manger, Custom Action and Custom OBPart assembly |
*.dll |
Optional |
Outlook view definition(s) |
*.ovd |
Optional |
Icon(s) |
*.ico, *.jpg, *.png |
Optional |
Advanced Code-Based Solution
To create an advanced code-based solution:
- Create the required artifacts (see table below for details)
- Create an Outlook Office 2010 Add-In using Visual Studio 2010
- Put the artifacts and Add-In DLL in a folder
- Create a BCS Package (a unique kind of VSTO ClickOnce package) from that folder
- Deploy the solution to Outlook
- You’re done!
To create the required artifacts, you can either:
a) Create them automatically using the BCS Artifact Generator tool, or
b) Create them by hand
To package the required artifacts, you can either:
a) Use the BCS Solution Packaging Tool with type “Outlook Advanced Code-Based Solution (OIR)”, or
b) Use the server APIs to package manually
The following table lists the required and optional artifacts:
Component |
Artifact |
Details |
BDC Model |
Metadata.bdcm |
Required; must have .bdcm file extension or be named exactly “metadata.xml” |
Subscription file(s) |
*Subscription.xml |
Required, one for each External Content Type; must be named as *Subscription.xml (i.e. “myCustomerSubscription.xml”) |
Solution Manifest |
OIR.config |
Required; must be named OIR.config |
VSTO Add-In assembly |
*.dll |
Required |
OIR or layout resource file(s) |
*.resx |
Optional |
Icon(s) |
*.ico, *.jpg, *.png |
Optional |
BCS Solution Tools
For more information on the BCS Solution Packaging Tool read the blog post BCS Solution Packaging Tool.
For more information on the BCS Artifact Generator see the blog post BCS Artifact Generator.
Further Reading
For more information check out the follow MSDN articles:
- Types of Solutions You Can Create Using BCS
- Creating Advanced Code-Based Solutions Using Business Connectivity Services
- Creating Intermediate Declarative Outlook Solutions Using Business Connectivity Services
- Useful Resources for Creating an Intermediate Declarative Outlook Solution
- Frequently Asked Questions: Declarative Outlook Solution
Thanks for reading!
Russell Palmer
Program Manager


