Note
Access to this page requires authorization. You can try signing in or changing directories.
Access to this page requires authorization. You can try changing directories.
In this post I want to discuss how to use Visual Studio Code in order to create cross-platform mobile solutions with Apache Cordova.
Of course, if we are talking about native applications for iOS, it’s better to use XCode but in many cases you need to support several mobile platforms, and you simply don’t have enough resources to build a native application for each of them. That’s why it’s better to think about cross-platform frameworks and tools. After looking for some information about tools you can find that today developers like to use Xamarin and Apache Cordova. In case of Xamarin you can use C# to build native applications for iOS, Android and Windows but in case of Apache Cordova you can use HTML and JavaScript. Let’s talk about Apache Cordova in this topic.
In fact, Apache Cordova is a framework that allows to utilize WebView control to present web content in HTML5, JavaScript and CSS. Of course, it’s a very simple description because Apache Cordova supports integration with platform-specific features using plug-ins, allows to configure application packages and avoids explicit WebView in some cases (Windows 10) but you can do all these things from a command line tool and still need to answer the question about an editor for code itself. Therefore, I propose to use Visual Studio Code as the best tool for editing HTML/JavaScript/TypeScript/CSS.
In general, before we start we need to install Apache Cordova and learn the command-line interface there. But if you have experience with Visual Studio 2015 and Visual Studio Tools for Apache Cordova you know that Microsoft supports its own set of tools for Windows developers. Of course, we cannot use VS 2015 on Mac but about month ago Microsoft has presented a cross-platform tool that we can use on Mac as well. So, it’s better to start with this tool rather than install the cordova command-line interface.
You can find new Tools for Apache Cordova (TACO) visiting https://taco.tools site. There you can find documentation, blog posts, forum and link to github (yes, it’s open source).

Using the tools you can find the following benefits there:
- You can use the Terminal as a single tool for all your command around TypeScript, Node.js and Apache Cordova. So, you should not switch between several windows;
- Using taco as a simple command line tool you can easily configure all needed tasks inside Visual Studio Code and not even have to leave the editor;
- Taco provides contextual help that allows you to understand that went wrong and how to fix problems;
- Taco allows to install all needed SDKs and build tools for all platforms. Of course, you still need to install XCode but all other things Taco can do for you;
- Taco supports several pre-validated kits. Each kit is a version of the cordova command-line interface and set of plugins and platforms that are already tested for this version. It allows to minimize the number of possible problems with migration from one version of CLI to another, and you always know that everything that you can find in the kit – just works;
In order to install Taco, you can use Node.js package manager and run the following command:
npm install –g taco-cli
If everything is OK, Node.js package manager will add taco-cli module and you can start using Taco:

Before to create any projects using Taco I would recommend to execute the following command:
taco kit list
Running this command, you can see list of all available kits:

Of course, this information is not very useful right now but when ingreview all available kits you can add a parameter with a kit name:
taco kit list --kit tacokit@2.0.0
After running this command you can find all plugins and platforms in the selected version of kit:
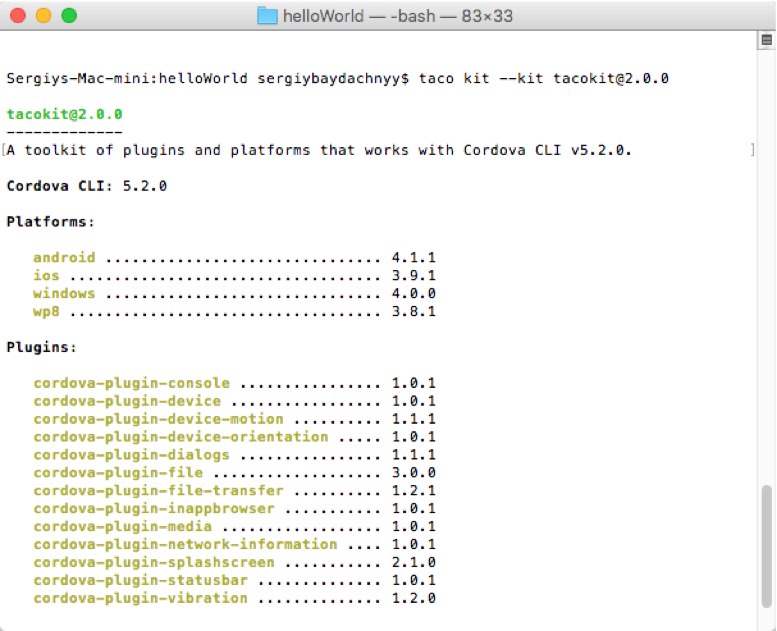
By default, Taco will use 5.1.0 version of the apache command-line interface but if you have already updated your Mac to OS X El Capitan and XCode to 7.1 version, I would recommend to use 5.2.0 version, so, you need to use Taco kit 2.0.0 rather than 1.0.0 (default).
It’s time to create a new project. In order to do this, you can simply open the Terminal, navigate to any working folder and run the following command:
taco create myCordovaPrj --template typescript --kit tacokit@2.0.0
In this example we used --template typescript parameter that allows us to utilize typescript. If you are going to use JavaScript, you can simply remove the parameter.
Right now you can open the folder that is created with Taco in Visual Studio Code and start coding there.
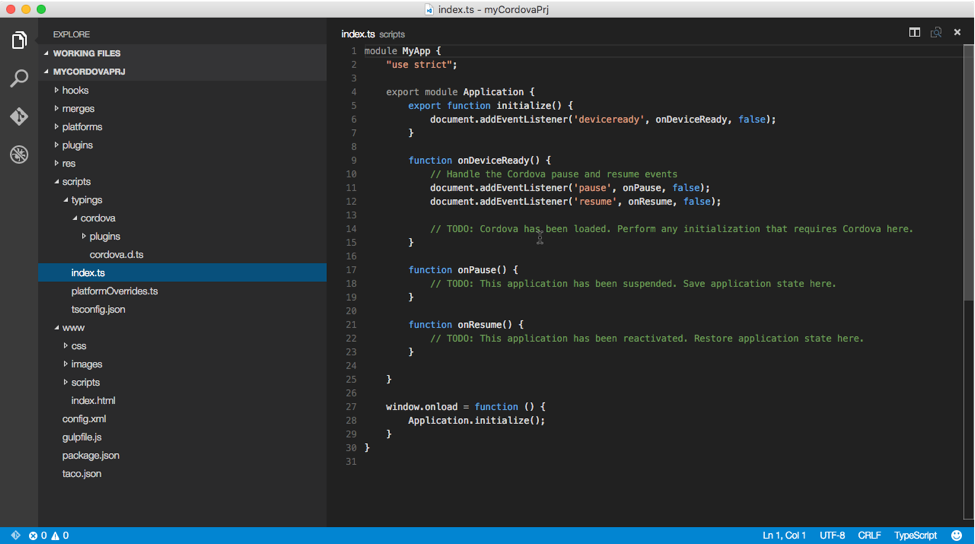
You can see that taco creates several important folders there but in context of Visual Studio Code we will use scripts and www. In scripts folder you can find all TypeScript files as well as TypeScript definition files that allows to work with Cordova framework and use IntelliSense. In www folder you can find all application files, including JavaScript files that should be generated thanks to TypeScript compiler. So, in order to use TypeScript you need to create a task that will compile all your typescript code and place it to the right folder. But the template already includes this task and you can find it in gulpfile.js. So, in order to finish configuring our project we need to run two more commands (don’t forget to change the context of the Terminal):
sudo npm install –g gulp
sudo npm install
Right after that Visual Studio Code will recognize all gulp tasks and you will be able to use Command Palette to run them.

Ok, let’s try to compile our project for couple platforms. To add a platform, you can use the following command:
taco platform add ios|wp8|windows|android|browser
Let’s add iOS and Android platforms. Because these platforms require some additional components we need to install them as well. But thanks to Taco we can install all needed things using the following command:
taco install-reqs
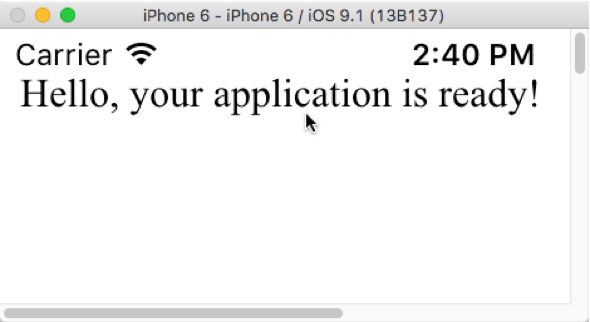
That’s all, and we can build and run our application right now. In order to do it you can use:
taco emulate ios
to start the application in iOS simulator or
taco build android
to create .apk package for Android devices (or install Android emulators using Android SDK).