Note
Access to this page requires authorization. You can try signing in or changing directories.
Access to this page requires authorization. You can try changing directories.
The typical usage of the Dynamics Marketing feeds is through Power BI. A user would use Excel Pro and with the Power Query plugin he would connect to the OData endpoint of Dynamics Marketing.
e.g. “https://contoso.marketing.dynamics.com/analytics/”
But before the OData endpoint needs to be enabled in the Site Settings – look all at the bottom on that page.
“But is Power Query really the only way to access the OData feed endpoint?”
This question has reached my desk a few times now. First of all: The OData endpoint was designed for analytic reporting. Still it is technically possible to access the service endpoint by other dedicated clients as well. In this post I will lay out how that works and even provide a sample OData client application.
 |
Accessing the MDM OData endpoint with other tools than PowerQuery is not officially supported for the current releases of Dynamics Marketing. |
For the restless reader (“in a few words”)
These are the steps needed to write your own client application that is permitted to connect, send data queries and process responses from the MDM OData endpoint.
|
|
|
|
Defining the application in WAAD
An application definition in Azure Active Directory provides the control of the consumers that may use the endpoint of a certain service in a specific subscription. This is used in addition of user credentials to sign in. You need to have an Azure subscription enabled for your organization. (The procedure described in this post will not introduce any costs in your subscription.)
Why do you need that? because as and administrator of Contoso you want to control explicitly which applications or services may access your Dynamics Marketing OData endpoint. PowerQuery in Excel is by default permitted to do so for every deployment of Dynamics Marketing.
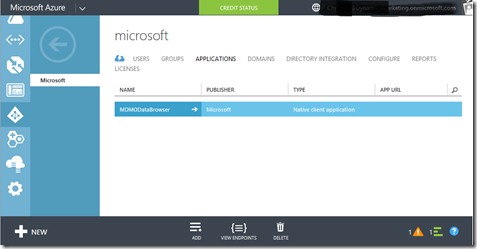
Define an application in Azure Active Directory
Note the generated App ID. For the Redirect URI we use https://localhost. We actually doe not need a redirect URI on which we would receive responses to any request for OAuth requests. We are listening in the application directly.
Grant permissions to access the Dynamics Marketing service (to be updated…)
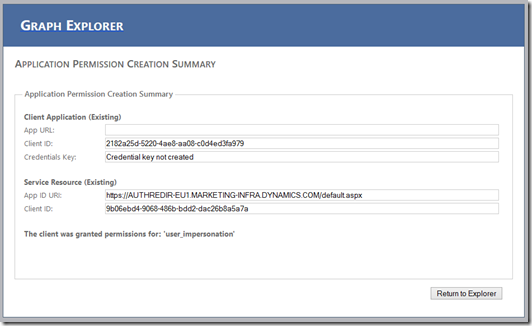
Now we need to grant the permissions to our new Azure app to access Dynamics Marketing. For other services like Dynamics CRM the necessary steps have been take to show the service in the section “permissions to other applications”. But this not available for Dynamics Marketing yet. Therefore we need to take workaround through the so called Graph API. This API has been provided to configure the Active Directory programmatically.
!! Many have reported that Graph Explorer does not support setting the App permissions any longer. We are looking into other ways to allow this configuration !!
But no worries we do not need to write our own Graph API client application in order to do the missing step of granting permissions. The Azure team has provide a sample service called Graph Explorer, which we can use to configure the permissions. Lets open the too and Sign In with the account that can administer Azure account. You as well press then the “Get” button in order to then browse through the different configuration information in your Azure Directory.
You will see of course the address of your own Dynamics Marketing instance for Resource and the Responses below.
Click on “Add Application Permission” in order to establish the trust relationship between your application definition in Azure and the Dynamics Marketing service.
Write the basic code to access the MDM OData endpoint
 |
Prerequisites: In order to build a OData client application you will need to install first the WCF Data Services 5.6.0 RTM Tools. Some of the libraries we need for our experiment are located then on your local machine: C:\Program Files (x86)\Microsoft WCF Data Services\5.6\bin\.NETFramework Notably it is the client library “Microsoft.Data.Services.Client.dll” to which we must add a reference in our project. |
The sample client application that comes with this post does two things in order to authenticate:
1. It requests an authorization token by
-
- Using the correct Url that provides the authentication, which is:
https://login.windows.net/common/ - Specifying the correct resource name for which the access token shall be issued:
https://marketing-infra.dynamics.com/ - Requesting it for the client app ID from the Application registration in Azure
- Specifying the Redirect Uri that we had entered into the application registration (https://localhost/)
- Using the correct Url that provides the authentication, which is:
|
In the process of getting an the authentication token, the authentication service at https://login.windows.net/common/ will request the user to sign in and provide respective UI
(Find the respective code in CurrentEnvironment.cs)
The authentication token will also be cached such that the user does not have to enter the credentials every time. Resetting the cache token will require the user to sign in again. The application can control that by simply calling:
(AuthenticationContext.TokenCache as DefaultTokenCache).Clear();
This is a typical activity if the user chooses to sign out or the connection parameters have changed.
2. For each request we send we need to make sure to include the authentication token into the request header.
|
The simple procedure is simply to add a header value of type Authentication to the http request where the Name is “Bearer” and the value is the authentication token that we have received.
Process data with the help of the data model
The easiest way to query and consume entities from a OData service is through a data model in your client application code. Visual Studio allows developers to connect to an OData service endpoint and generate code by adding a service reference. This generates code in form of a DataServiceContext class implementation. And that comes with a query for each entity, a class for each entity with all entity fields as properties, a queries or relations to other table (like Company.Leads).
With such a data model all we need to do is create an instance of the data model for our OData service end point address. Then we need to make sure to subscribe to any activity that builds the http requests for each OData query, so we can inject our authentication token. And with that we are ready to query data and bind the returned data filled with information to any UI we like or use the data in other business logic.
Unfortunately Visual Studio does not know how to use OAuth on the data service of Dynamics Marketing. Therefore I have provided a generated data model as part of this sample application.
You will find that in the source file MDMOData161.cs. This is for the version of the data model that currently is live in the production instances. The sample will need to be updated for future releases.
Try out the Sample App
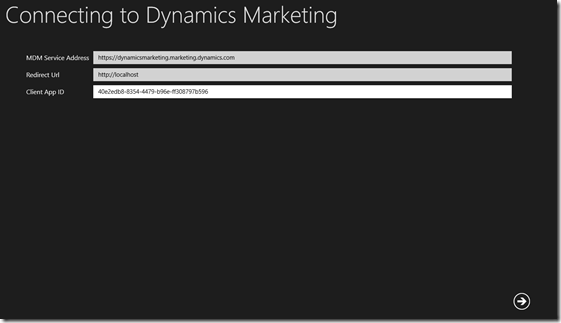
After you start the OData application for MDM you need to enter the MDM Service Address (without the “/analytics” at the end). Also the reply URI and Client App Id from the definition of the application in Azure.
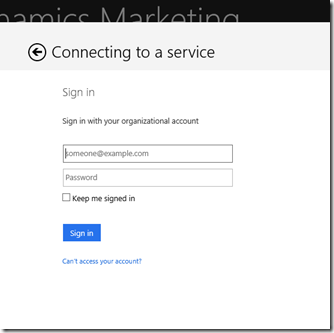
Next you will need to sign in.
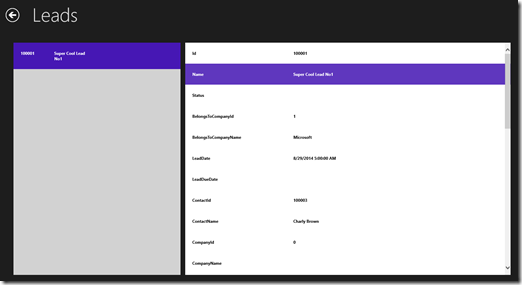
After the Sign in succeeds you will be able to request entities for a few select types. In the sample these are just Contacts, Companies, Leads, Campaigns.
For the selected entity, the client app will retrieve all respective entities from the service.
The sample code shows how to authenticate against WAAD, and use the authentication token to run asynchronous queries on the OData endpoint and also bind the result to a simple generic data view in a Windows 8 Store application.
Download the sample code for Microsoft Dynamics Marketing 2016 (ver. 19.0) from HERE
Enjoy!
Christian Abeln
Senior Program Manager
Microsoft Dynamics Marketing
Follow My Curah!s on Microsoft Dynamics Marketing
Comments
Anonymous
September 12, 2014
This Post has been updated with the sample code for Microsoft Dynamics Marketing Autumn 2014 release (build 16.2.62.0).ChristianAnonymous
March 10, 2015
Is it possible to get the Access Token via an OAuth 2.0 Client Credentials Grant using just the Client Id and Credentials Key?I can access the GraphApi this way allowing my service to access without prompting the user once they have filled out the ClientId and Credentials Key.Anonymous
March 10, 2015
Hi Matthew,Dynamics Marketing require a user authenticating when accessing the OData endpoint. Please note the access to OData feeds is controlled by user permissions.ChristianAnonymous
April 01, 2015
Christian, I assume the same concept would apply to the OData endpoints in Dynamics CRM 2011, 2013 and 2015. Is this correct? As a Microsoft partner we are looking to retrieve the Contact information from Dynamics Marketing and the various Dynamics CRM versions previously mentioned in order to build personal offers/coupons for consumers as we as to retrieve phone numbers and email addresses. What about static and dynamic marketing list information?Anonymous
April 04, 2015
Hi, only the OData feed for Dynamics Marketing has a limited default target audience of Microsoft PowerBI as the client. At the moment In Dynamics Marketing we have not an "official" support other consumption, e.g. to rely in that as a read only API channel, because you might find a few things missing. Yet it is technically possible to do so by setting up a client application in WAAD in the way I have shown in the Blog Post. Just be not disappointed if you find that certain data are missing in order to use it as a read-only SDK channel - like the External IDs that we use in the supported SDK channel. And you will find that the data model evolves through versions of MDM and might break any hardcoded proxy code (like in the sample code that comes with this post). Such static proxy code does not like elements added or changes in new releases of the service. I have shown a dynamic way to process the OData response from the service as well. This can be seen in the PowerShell command lets for Dynamics Marketing OData and SDK endpoints here: friendlydude.github.io/Dynamics-Marketing-PowerShell Hope this helps, Regards, ChristianAnonymous
July 06, 2015
When I enter on Graph Explorer I can't see any option like "Add Application Permission"! Anyone is facing the same problem? Best regardsAnonymous
July 06, 2015
I have the same problem but still don't found how to resolve this. Do anyone know how or have a workaround to give the "Add Application Permission" ? Best Regards, CharlesAnonymous
July 07, 2015
Hi Jaime and Charles, i also have that problem and it seems to be a show stopper. If you guys have any news please share. I'll do the same. CheersAnonymous
January 27, 2016
Hi,I'm finding this code a bit complicated. All what i need is to get events list from MDM throw a console application. What do i have to keep from this code. i'm lost. Many thanksAnonymous
January 28, 2016
Hi, Chris, It is the same for me. I'm trying to synchronise Events List between MDM and a sharepoint site. I synchronised contacts between CRM and Sharepoint site and sdk was doing well. But with MDM SDK i'm not finding methods helping me to do my need. I need a programmatic way to have Events list and to check if a connected user to sp site is subscribed or not to an event. Could you please help me. I'm a novice with MDM and i'm not knowing how to neither use OData feed nor your code. Should i use an app azure betwwen sharepoint and MDM?Anonymous
February 04, 2016
Hi Christian, I decided to write a console app that is permitted to connect Microsoft Dynamics Marketing OData endpoint. I enabled the endpoint so I could consume data feed by Power Query... I defined the application in Azure Active Directory But I couldn't grant permission to Microsoft Dynamics Marketing service by Graph Explorer: The Add Application Permission menu is miising. How can I add permission to MDM via Azure Management Portal? Thanks, Zsolt Zombik https://zsoltzombik.com

