Note
Access to this page requires authorization. You can try signing in or changing directories.
Access to this page requires authorization. You can try changing directories.
IoT Project for Anyone Blog Series:
This is one of a series of blogs developed as part of an overall IoT implementation project for beginners. The project will walk through the hardware needed, operating system installation, data collection and a Power BI dashboard to view the data. These blogs can be reviewed in sequence as part of the overall project or on their own if looking for information on a particular IoT topic.
Project Blog Index:
IoT for Anyone - Materials and Connections (this blog)
IoT for Anyone - Windows 10 IoT Core Operating System Installation
IoT for Anyone - Raspbian Operating System Installation
IoT for Anyone - Power BI Streaming Dataset Setup
IoT for Anyone - Collecting and Streaming Data from Windows 10 IoT (coming soon)
IoT for Anyone - Collecting and Streaming Data from Raspbian Operating System
IoT for Anyone - Designing IoT Microsoft Power BI Dashboard
Introduction:
This blog focuses on the Raspberry Pi hardware components needed to complete the project and how they are connected. The components listed can be purchased directly from the manufacturer or other online retailers. Although this project focuses on the Raspberry Pi 3 Model B, additional IoT boards are available such as an Intel Joule.
Raspberry Pi 3 Components Overview:
For an overview of the Raspberry Pi components (to explain several of the components you will need to purchase), see the two short videos below.
Getting Started - Windows 10 IoT Core + Raspberry Pi 3
Project Materials Needed:
Raspberry Pi 3 model B (or later)
This card can be ordered from many online retailers in the $35 price range. The Raspberry Pi 3 contains the processor, memory, hard drive (MicroSD card), video processor, USB ports, RJ45 network port, Wi-Fi, HDMI port, etc. In other words, this is the brain of the unit.
MicroSD card
The speed and capacity of the MicroSD card used as the hard drive is important. I recommend the 16gb Samsung EVO Class 10 card. The Class 10 card provides ample read/write speeds for the operating systems running on the Raspberry Pi. I suggest getting the 16gb size because, at the time of my testing (July 2017), the 32gb card seemed to be unstable. Without anything conclusive, when researching the problems I was having I read many online comments about there being issues with how FAT32 partitioning was done on 32gb or higher cards. While a 32gb card may initially work, later reboots may result in system that will no longer boot. A patch may resolve this issue at a later point.
Heat syncs
The Raspberry Pi is designed to run reliably at normal room temperatures. In one of my projects tests with a heat and humidity sensor I placed the unit outside on a hot July day in the Washington, DC area. Even while placed in the shade the Raspberry Pi reached an extreme temperature and partially malfunctioned. For an additional $5, I recommend purchasing heat syncs to help control the temperature. If you plan to use your unit outside, consider a mounting kit with an included fan for additional cooling capacity.
Temperature/Humidity Sensor
For this project, we are going to use a temperature and humidity combination sensor from Adafruit. Adafruit AM2302 (Wired DHT22) temperature and humidity sensor
Adafruit full sized breadboard
We will use the Adafruit full size breadboard to connect the temperature/humidity sensor with the Raspberry Pi 3.
Adafruit Female/Male extension jumper wires
These Adafruit Female\Male jumper wires will be used to connect the sensor with the breadboard.
Adafruit Cobbler Breakout Cable
The Adafruit Cobbler Breakout Cable will be used to connect the breadboard with the Raspberry Pi 3.
Wiring the Sensor and Raspberry Pi 3
Once you have the items listed above, we will proceed with connecting the Raspberry Pi and temperature sensor. When wiring these components together, remember that this is pretty straight forward.
Connect the ribbon cable to the Adafruit full sized breadboard
- Connect one female end of the ribbon cable to the Raspberry Pi 3 and the other end to the Cobbler breakout board. Reference picture.
- Connect the Cobbler breakout board to the full-size bread board. Align it to the board as shown in this diagram.
Connect the temperature and humidity sensor to the breadboard
Adafruit has wiring diagrams available for most of their products, including the temperature and humidity sensor. See the diagram posted at the site below and connect the wires accordingly.
Notes:
- The cable ends of the temperature/humidity sensor were a little short to insert directly into the board. I stripped off a little more of the shielding and then twisted the exposed wire together to make it easier/more sturdy to insert into the bread board (do not combine all three wires).
- If you align the ribbon cable connector the same way as displayed in the diagram, it will make your setup more straight forward. https://learn.adafruit.com/assets/1862
Raspberry Pi 3 Project Pictures
Below are several pictures and captions of my Raspberry Pi 3 connected with the temperature/humidity sensor for reference.
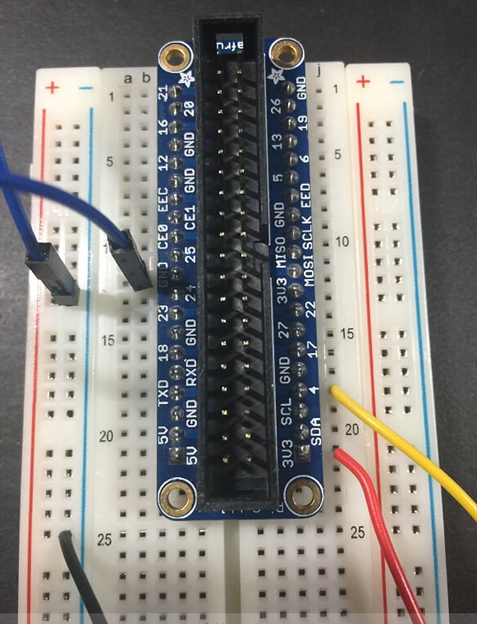
Picture 1: View of the Cobbler connection board without the ribbon cable attached. Along with the three wires connected properly for the temperature and humidity sensor. The two wires on the upper left are for ground.
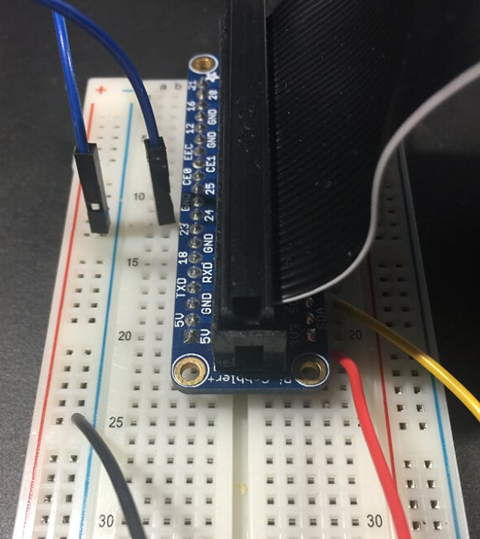
Picture 2: View of the Cobbler connection board connected with the ribbon cable. Along with the three wires connected properly for the temperature and humidity sensor.
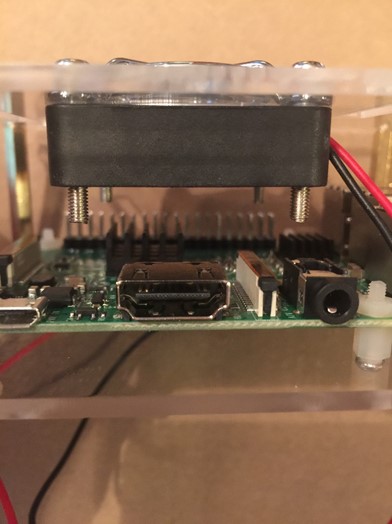
Picture 3: View of the Raspberry Pi 3 board mounted in a tray with a fan. This unit also has heat syncs attached to each processor (not visible here).

Picture 4: Side view of the Raspberry Pi 3 board mounted in a tray with a fan. This unit also has heat syncs attached to each processor (visible here).
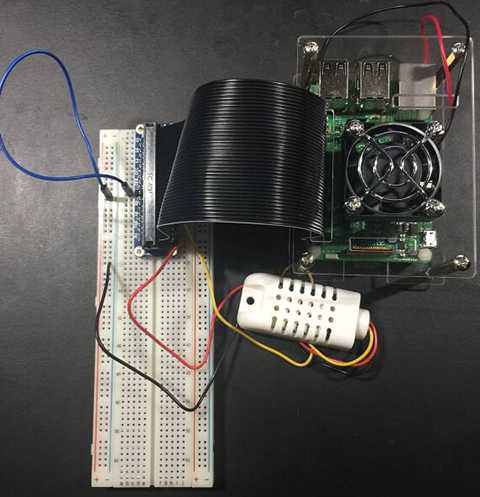
Picture 5: View of the Raspberry Pi 3, full size bread board, and the temperature/humidity sensor.
Next in this blog series, I provide instructions about how to install Windows 10 IoT and Raspbian, providing your choice of operating systems. I will also provide instructions about how to stream the data collected from either operating system to Microsoft Azure Power BI.