Setting Up a Kali Linux Machine in Azure
This blog will be moving in 2019! Check out my new blog location at https://aka.ms/cloudyhappypeople
A Quick Overview of Kali
One of the tools that many security professionals use on a regular basis is the Kali Linux penetration testing platform. This tool is built and maintained by Offensive Security (www.offensive-security.com), an organization that also provides extensive training on the platform and a variety of other security and penetration testing topics.

The Kali Linux platform is based on Debian GNU/Linux distro and contains hundreds of open source penetration-testing, forensic analysis, and security auditing tools. However, it isn’t exclusively used by traditional “red teams” and “blue teams”. In fact, it can also be used by IT admins to monitor their networks effectively (whether wired or wireless), perform analysis of data, and a variety of other tasks.
It’s important to remember that Kali Linux is NOT a static tool. Rather, you’ll likely have updates to the Kali distro on a daily basis, so make sure you perform updates before use the tool every time. (I’ll show you how in a few minutes)
Kali Linux can run on laptops, desktops or servers. You can download the ISO for Kali from https://www.kali.org/downloads, and create a bootable USB drive if you want to. But what we are doing today is running it on Azure, and this is one of the easiest ways to get started.
Let’s take a look.
Provisioning Kali on Azure
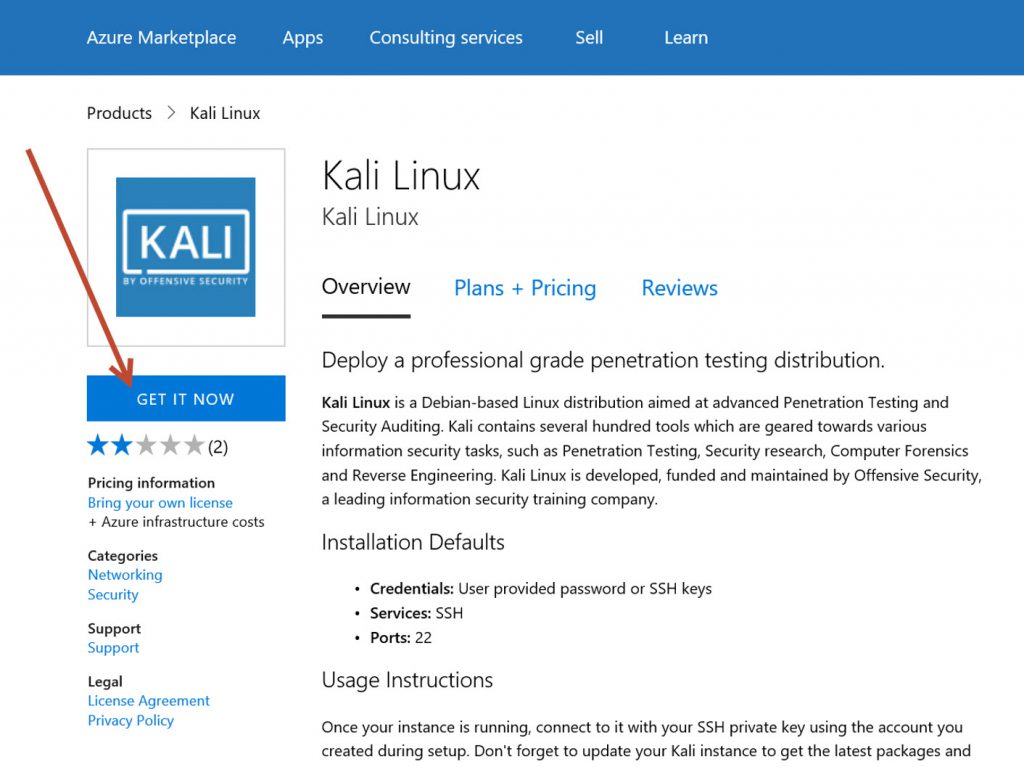
The Kali Linux distro is available without cost on Azure, but it might not be obvious where to find it. If you log in to your Azure subscription and try to provision a Kali box, you simply won’t find it in the list of operating systems or images you can deploy.
What you actually need to do is request it from the Azure Marketplace. To do this, go to https://azuremarketplace.microsoft.com/en-us/marketplace/apps/kali-linux.kali-linux . There, you’ll see a page similar to the one shown below. Click on the “Get It Now” button to request the Kali Linux distro.
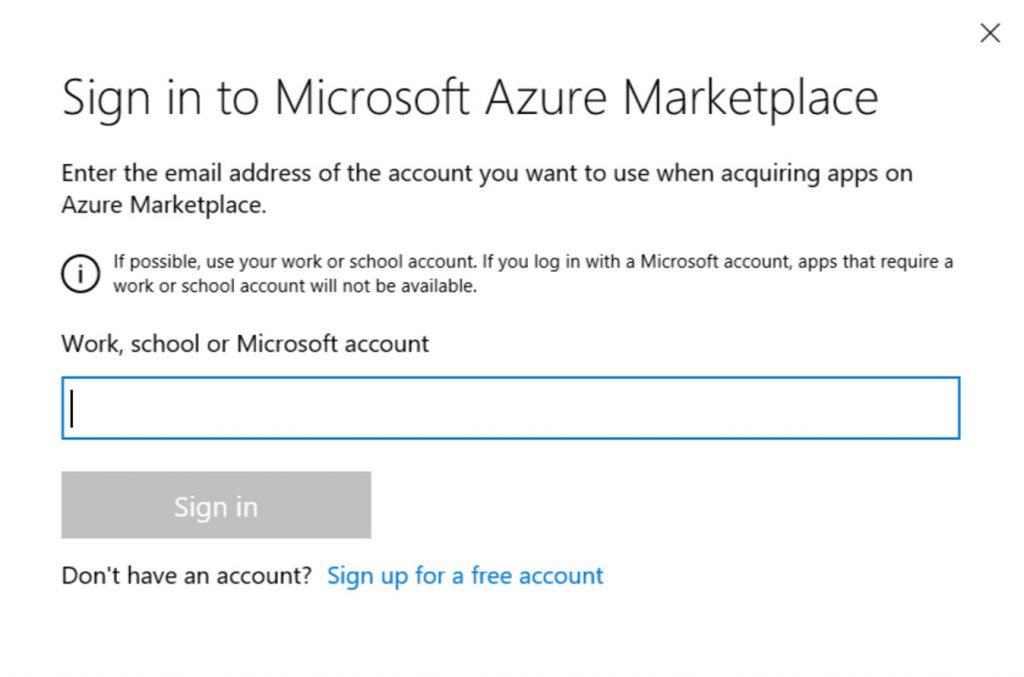
After you request the Kali Linux machine, you’ll be asked which account you use to sign in when you request apps from the Azure Marketplace. Enter the login ID that you use for your Azure subscription.
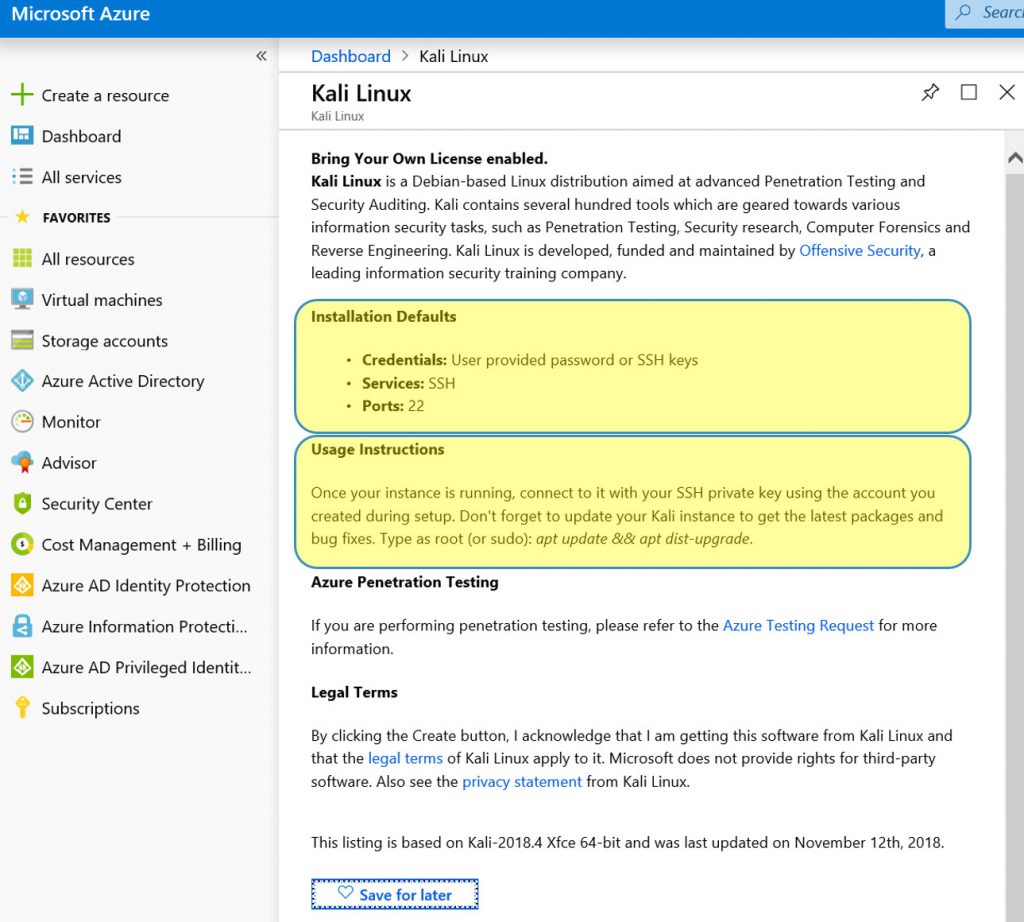
Once you request the machine as described above, you’ll be able to provision the Kali box just like you would any other virtual machine or appliance. There are a couple points that should be highlighted in the description provided when you provision the box.
First, the Installation Defaults section tells us that, by default, the only way to log in to your Kali instance is by using SSH over port 22 and using either a set of SSH keys or a user-provided password. This is because the default configuration for the installation does not include a graphical user interface (GUI). The majority of the tools in Kali work just fine without a GUI, so this is the preferred way to use it, but if you are just getting started, you may want the benefit of a GUI while you figure out how the tools work and how Linux itself is set up. I’ll show you how to install the GUI later in this article. For this article, I’ll be using a username/password to log in, but again, SSH keys are more secure and would be preferred in a production environment.
Additionally, we see that it is recommended that you update the packages on your Kali machine after you deploy it. I’ll walk you through how to do that as well.
After you’ve provisioned your Kali Linux machine (using username and password during the initial configuration in the Azure portal), you’ll want to connect to the machine.
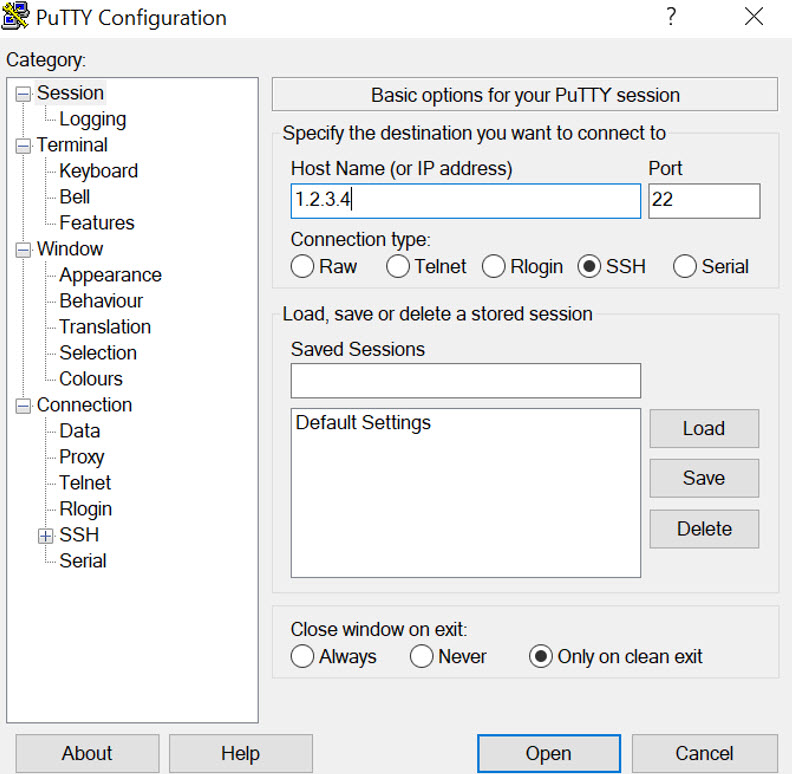
To do so, download and install PuTTY, or a similar SSH/telnet tool. PuTTY can be downloaded here: https://putty.org/
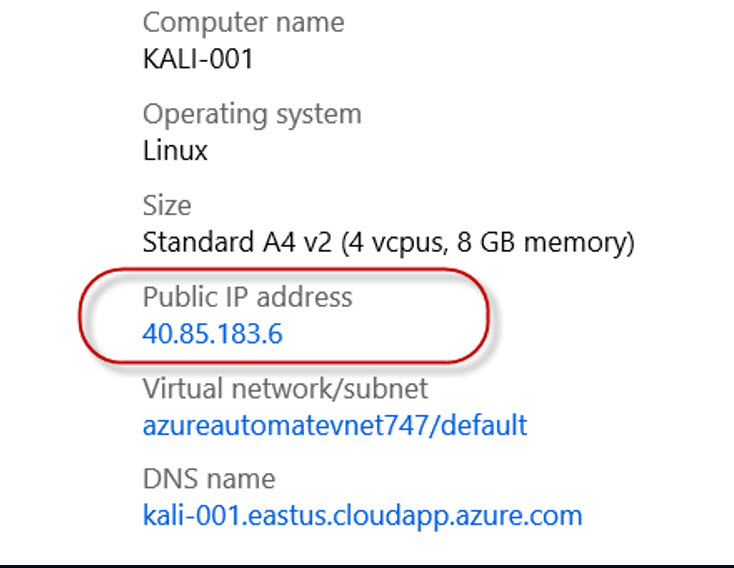
When PuTTY is installed, it will require you to enter the IP address of your Kali machine in order to connect. You can get the public IP address of the Kali machine from the Azure portal, as shown below.
Next, open your PuTTY client and connect to the IP address and port 22 of your Kali machine.
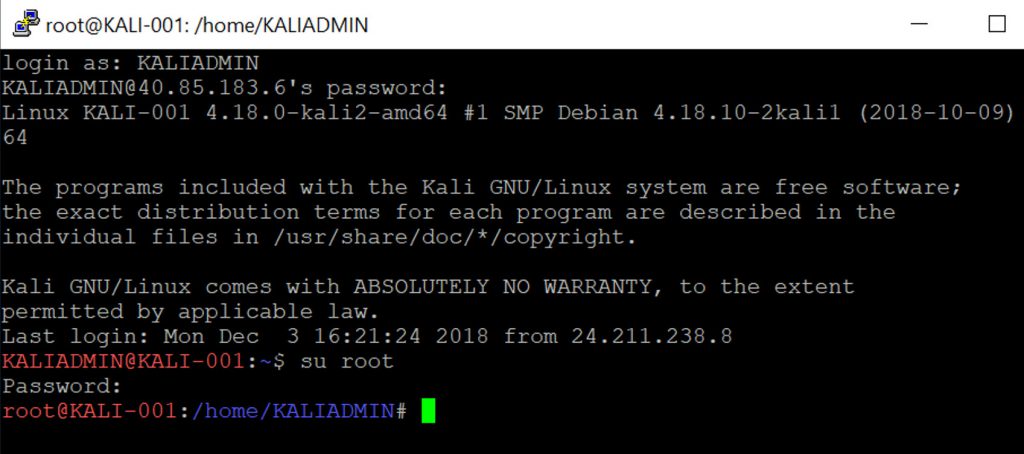
One thing that’s unusual about the install is that the username and password that you defined for the Kali machine when you provisioned it does NOT have root access to the machine. This means you cant make any updates or modify the install with the set of credentials you are logging in with.
Let’s fix that.
As you can see below, I’m logged in to my machine KALI-001 as the user named KALIADMIN. I now need to set a password for the root (administrator) account. To do this, I type:
sudo passwd root
Then I define the password I want to use. That’s all there is to it!
Now I can log in as root using the command
su root
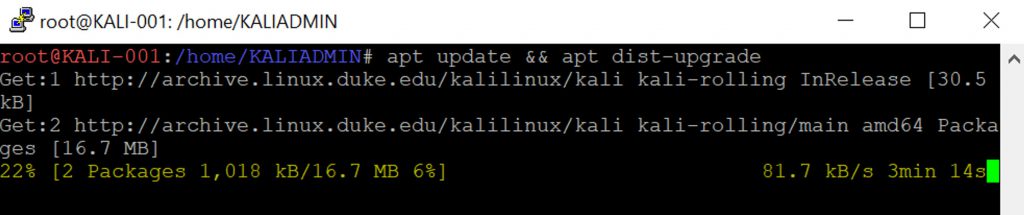
Now that I’m logged in with root permissions, I need to update my Kali machine. To do this, simply type:
apt update && apt dist-upgrade
Type y to confirm the updates. Depending upon how many updates are available, this could take a while. For example, when I ran this command after provisioning my machine, it took about 20 minutes to get all the updates.
At this point, you have logged in over SSH, set a password for the root account and updated the machine. However, you still are doing everything from the command line. You may want to install GUI. Basically, there are three tasks you have to perform to be able to able to manage the Kali instance the same way you’d manage a Windows server:
- Install a GUI
- Install RDP
- Configure networking to allow connection over RDP
Install a GUI
Kali comes by default with the GNOME desktop package, but you need to install it.
To do so, use the command below:
apt-get install -f gdm3
Install RDP
Next, you’ll need to install an RDP package and enable the services using the commands below.
apt-get install xrdp
systemctl enable xrdp
echo xfce4-session >~/.xsession
service xrdp restart
Configure Networking to Allow Connection over RDP
Lastly, you’ll need to configure your Azure Network Security Group (NSG) to allow TCP port 3389 inbound (RDP) to your Kali machine. In the Networking section of your machine’s configuration, configure an inbound port rule for TCP 3389. Again, this is a penetration testing tool, so in a production environment, you would likely lock down the source IP addresses that can connect to this machine, but for this demonstration, we are leaving it at Any/Any.

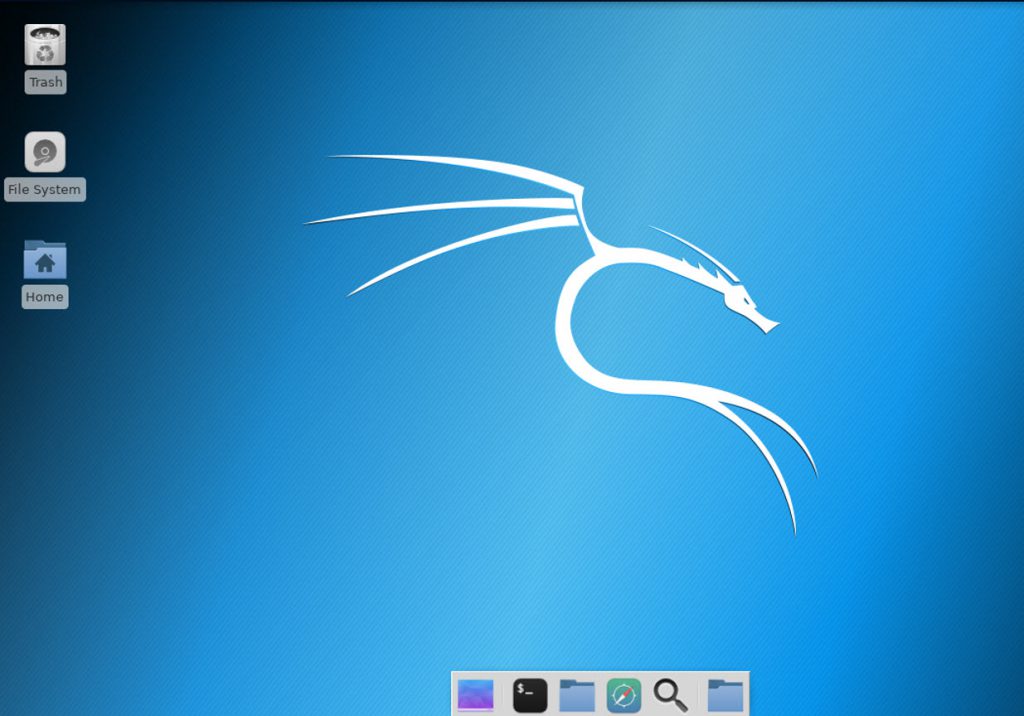
Now that you have this set up, you should be able to connect to your Kali box using RDP, just as you would connect to a typical Windows machine. The interface for GNOME will look something like this, but it can be customized.
What Can I Do with It?
In the past, Microsoft required you to submit an Azure Service Penetration Testing Notification form to let Microsoft know that it was not an actual attack against a tenant. However, as per the documentation noted here, /en-us/azure/security/azure-security-pen-testing, this is no longer a requirement.
“As of June 15, 2017, Microsoft no longer requires pre-approval to conduct penetration tests against Azure resources. Customers who wish to formally document upcoming penetration testing engagements against Microsoft Azure are encouraged to fill out the Azure Service Penetration Testing Notification form. This process is only related to Microsoft Azure, and not applicable to any other Microsoft Cloud Service.”
In other words, there is no strict requirement to notify Microsoft when you perform a penetration test against your Azure resources. This means that you can perform many of the standard penetration tests against your Azure tenant, such as :
-
-
- Tests on your endpoints to uncover the Open Web Application Security Project (OWASP) top 10 vulnerabilities
- Fuzz testing of your endpoints
- Port scanning of your endpoints It should be obvious, but just to be clear: DON’T use your Kali machine to attack anybody else’s stuff. You would most definitely find yourself in a legal pickle if you decided to attack resources that didn’t belong to you (or one of your customers) without explicit permission in writing. Please, just don’t run the risk. Practice using the 600+ tools available in the Kali Linux distro and learn how to better secure your environment.
-
However, one type of test that you can’t perform is any kind of Denial of Service (DoS) attack. This includes initiating a DoS attack itself, or performing related tests that might determine, demonstrate or simulate any type of DoS attack.
Thanks, Captain Obvious……
It should be obvious, but just to be clear: DON’T use your Kali machine to attack anybody else’s stuff.
You would most definitely find yourself in a legal pickle if you decided to attack resources that didn’t belong to you (or one of your customers) without explicit permission in writing. Please, just don’t run the risk.
Practice using the 600+ tools available in the Kali Linux distro and learn how to better secure your environment!
Comments
- Anonymous
January 10, 2019
Thanks for the tutorial! When I connect to the machine RDP is extremly laggy. Working is not possible, since everything has a 4sec delay. Any idea what I can do?- Anonymous
January 11, 2019
Hmmm....not really sure what that might be. You could try bumping up to a better virtual machine configuration and see if that helps. Otherwise, it should work pretty well, assuming good network connectivity. I haven't seen any lag on my machine connecting from my home wifi.- Anonymous
April 05, 2019
Really great writeup! Thank you for this. Even thou I selected to use an ssh key in the Azure build I was able to pretty much follow this step by step.I too am noticing very slow performance in the GUI as well, but it may be that I set this VM in North-Central-US and I'm an in East-US. I built it with a Standard_B2ms size (2x vCPU, 8GB memory, and premium SSD Max IOPS/MBps 2400/35) which although nice it's nothing amazing.I am interested enough to try and sort this out and see if I can solve it and if I do I'll post my findings here. For me it might just be something as simple as building a new on in EastUS region, and selecting a faster VM size. Perhaps even a GPU vm.Did you happen to use a GPU VM, or not or recall the VM size you used?Really thou, thanks again! Great write up, following it was perfect.Thanks,-John- Anonymous
April 05, 2019
@COuntGiovanni - I'm glad you found the post usefulI think i used a standard VM, just a little more memory and processing power than the default VM. I certainly didn't use a GPU VM. Too pricey for my blood.
- Anonymous
- Anonymous
- Anonymous