ARM Template to deploy Technical Preview
This post introduces two topics which are all the rage at the moment - Azure Resource Manager (ARM) templates and Desired State Configuration (DSC). As I get tired of building demo labs for technical preview releases I decided to automate the build of a simple lab in Azure.
You can read more about ARM templates here - but the basic premise is that we declare the state of resources in Azure then press deploy and it goes off and builds to the exact specification. My template involves a number of components - a storage account, virtual network, public IP addresses, network interfaces and two virtual machines. One is the domain controller and one will be a primary site server. I build the template using Visual Studio because with the Azure SDK installed I get a nice JSON viewer which I can easily add resources to and set the dependencies. When I use this process - I can select to deploy a compute object and Visual Studio will also prompt me to create a storage account, a NIC and a virtual network. As the JSON file is text based I can simply copy / paste and change sections of the template to create the rest of the objects.
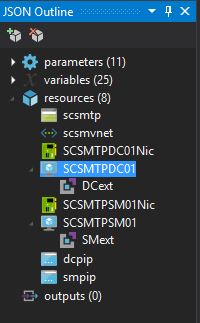
Using this method is how I get the basic structure of the resources for my environment. (Ignore some of the naming conventions - they need to be tidied up - see the end of this post for how you can contribute via GitHub). This is the view of resources inside the Visual Studio JSON explorer - there are variables and parameters which I use to control certain settings. You can investigate these in the project itself.
So now that I have the basic layout the fun begins - I can deploy this template time and time again with the same repeatable results. If I choose to add a new resource the deployment process will look at what is already deployed and simply add to it.
Of course having two servers that do nothing isn't really useful - but I can use DSC to declaratively specify the configuration of these servers. DSC works on the premise that we declare what a server should look like (e.g. roles/features, registry, services, packages, 100's more) and then write a configuration file which is pushed to the server. The way this works in Azure is we add an extension to each server - the extension contains the code and resources to configure the server. (DSC is the future of managing how a system should be created - everyone should be using it and you can read more about it here - think Compliance Settings on steroids.)
The planning process for this environment runs something like this. I need a domain controller - so I have to install some PowerShell tools, change the DNS address, install the AD tools - then promote the server to be a domain controller. There are some built in resources to modify some settings in Windows but for the majority of changes I use the modules at the PowerShell Gallery. For my domain controller I use two resources from the gallery xNetworking and xActiveDirectory. xNetworking allows me to modify the server DNS to point to itself and xActiveDirectory will turn the server into a domain controller. All of these resources are simply PowerShell modules hosted on GitHub - if you are unsure of how something works you can easily view the module contents online - and of course if it isn't working or you can think of a better way you can contribute as well.
The basic configuration I use is below - it work from top to bottom and I specify some dependencies to make sure things run in order. The DSC engine (Local Configuration Manager - LCM) handles the reboot for me.
Configuration DCConfig
{
Param(
[string]
$NodeName = 'localhost',
[PSCredential]$DomainAdminCredentials
)
Import-DscResource -ModuleName PSDesiredStateConfiguration,xActiveDirectory,xNetworking
Node $nodeName
{
LocalConfigurationManager
{
ConfigurationMode = 'ApplyAndAutoCorrect'
RebootNodeIfNeeded = $true
ActionAfterReboot = 'ContinueConfiguration'
AllowModuleOverwrite = $true
}
WindowsFeature DNS
{
Ensure = "Present"
Name = "DNS"
}
WindowsFeature ADDS_Install
{
Ensure = 'Present'
Name = 'AD-Domain-Services'
}
WindowsFeature RSAT_AD_AdminCenter
{
Ensure = 'Present'
Name = 'RSAT-AD-AdminCenter'
}
WindowsFeature RSAT_ADDS
{
Ensure = 'Present'
Name = 'RSAT-ADDS'
}
WindowsFeature RSAT_AD_PowerShell
{
Ensure = 'Present'
Name = 'RSAT-AD-PowerShell'
}
WindowsFeature RSAT_AD_Tools
{
Ensure = 'Present'
Name = 'RSAT-AD-Tools'
}
WindowsFeature RSAT_Role_Tools
{
Ensure = 'Present'
Name = 'RSAT-Role-Tools'
}
xDNSServerAddress DnsServer_Address
{
Address = '127.0.0.1'
InterfaceAlias = 'Ethernet'
AddressFamily = 'IPv4'
DependsOn = '[WindowsFeature]RSAT_AD_PowerShell'
}
xADDomain CreateForest
{
DomainName = $Node.DomainName
DomainAdministratorCredential = $DomainAdminCredentials
SafemodeAdministratorPassword = $DomainAdminCredentials
DomainNetbiosName = $Node.DomainNetBiosName
DependsOn = '[WindowsFeature]ADDS_Install', '[WindowsFeature]DNS'
}
}
}
It is reasonably easy to follow through what is happening here - I then add a DSC extension to my virtual machine and tell it to run the above configuration. There is some work involved in getting the modules uploaded during deployment however Visual Studio takes care of this for us as well. As you can now tell - using Visual Studio is the easiest way to create and deploy these templates by far!!
When I deploy this - in around 15 minutes I have a functional domain controller in my environment.
Next step is the Configuration Manager configuration. Adding all the prerequisite roles is fairly simple using the WindowsFeature DSC resource. You can view the configuration here. I use come more community resources to join the server to the domain (xComputerManagement), configure DNS (xNetworking) and configure the SQL instance (xSQLPs). For the downloads bit I have cheated a little bit - I have downloaded the ADK, CM prerequisite downloads, technical preview bits and an unattended installation file - then zipped them up and added them to a storage account so I can access them during the configuration. I download them from Azure storage using a Script DSC resource - basically this allows me to execute any PowerShell code within my configuration. Each of these is then unpacked using the Archive DSC resource. I also use this resource to create the System Management container and extend the AD schema. Some other notes about the SQL installation - when you use the SQL marketplace image in Azure it will configure a default instance for you however it can only be accessed by a local administrator account. I use the SQL resource to add a new instance and then stop the default instance so I can add my administrator account as a sysadmin.
The overall process for this configuration is: -
- Point the DNS settings to my new domain controller
- Join to the domain
- Install .NET 3.5 (for SQL)
- Install the new SQL instance
- Stop the services for the default instance
- Configure the SQL TCP ports
- Install a whole bunch of features (IIS, RDC, BITS, WSUS etc.)
- Download, unpack and install the ADK
- Download and unpack the CM technical preview binaries
- Download and unpack the CM prerequisites files
- Download the unattended installation file
- Extend the AD schema
- Configure WSUS (post installation)
- Create the System Management container in AD
- Install Configuration Manager using the unattended installation file.
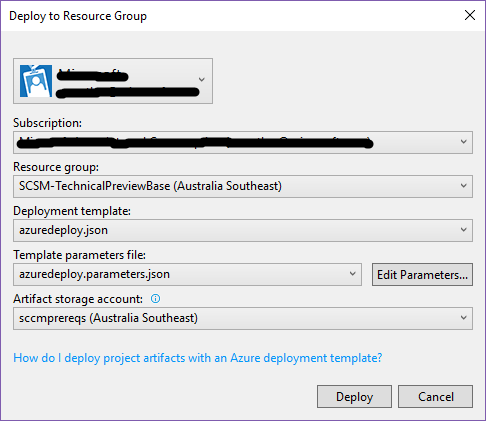
All I do now is ensure the DSC resources are placed in my staging folder for the Visual Studio project - then right click on the project and deploy it. Visual Studio will prompt me for the parameter entries and also for another storage account to store the project and resources during the build. I have to create a resource group to install the machines into as well.
So clone my project - start deploying and feel free to raise any issues via GitHub and I can work on them. Have fun - using templates and DSC is the future of infrastructure!