Note
Access to this page requires authorization. You can try signing in or changing directories.
Access to this page requires authorization. You can try changing directories.
With thousands of new malware released every day, it may not be sufficient to only use signature-based detection to fight against malware. Device Guard on Windows Server 2016 changes from a mode where apps are trusted unless blocked by an antivirus or other security solution, to a mode where the operating system trusts only apps authorized by your enterprise.
In my mind, antivirus software is like the police which catch bad apps if they made their name on the list; whereas Device Guard is like a vault, which allows you to create a secure environment which allows only the apps you trust to enter. We need both mechanisms, depending on how sensitive the information is to be protected.
What is Device Guard
Device Guard can protect software running in Kernel mode and User mode. Under Kernel mode protection, Device Guard ensures the drivers are, at the very least, signed by a known signature (WHQL signed) or you can further restrict the drivers by whitelisting them in the policy. Device Guard will block drivers from loading dynamic code and block any driver that is not on the whitelist. If there is a comprised driver which tries to modify code in memory, it cannot be executed on the machine. Device Guard also provides user mode protection (UMCI), where you can create Code Integrity (CI) policies which defines what’s trusted and authorized to run on individual servers.
For details on Device Guard, here are some good references (not a complete list):
- Introduction to Device Guard
- Requirements for deployment planning for Device Guard
- Code integrity policies
Enhanced Kernel Mode protection using Hypervisor Code Integrity (HVCI)
The core functionality and protection of Device Guard starts at the hardware level. Devices that have processors equipped with SLAT technologies and virtualization extensions, such as Intel VT x and AMD V, will be able to take advantage of a Virtualization Based Security (VBS) environment that dramatically enhances Windows security by isolating critical Windows services from the operating system itself.
Device Guard leverages VBS to isolate its Hypervisor Code Integrity (HVCI) service, which enables Device Guard to help protect kernel mode processes and drivers from vulnerability exploits and zero days. HVCI uses the processor’s functionality to force all software running in kernel mode to safely allocate memory. This means that after memory has been allocated, its state must be changed from writable to read only or execute only. By forcing memory into these states, it helps ensure that attacks are unable to inject malicious code into kernel mode processes and drivers through techniques such as buffer overruns or heap spraying.
To deliver this level of security, Device Guard has the following hardware and software requirements:
- UEFI Secure Boot (optionally with non-Microsoft UEFI CAs removed from the UEFI database)
- Virtualization support enabled by default in the system firmware:
- Virtualization extensions (for example, Intel VT-x, AMD RVI)
- SLAT (for example, Intel EPT, AMD RVI)
- IOMMU (for example, Intel VT-d, AMD-Vi)
- UEFI configured to prevent an unauthorized user from disabling Device Guard–dependent hardware security features (for example, Secure Boot)
- Kernel mode drivers signed and compatible with hypervisor-enforced code integrity
HVCI (a.k.a Virtualization Based Security of Code Integrity) can be deployed using Group Policy. It is recommended to enable HVCI on all the servers running Windows Server 2016. For more details of Group Policy configuration, see here.
Deploy configurable code integrity policy
Historically, most malware has been unsigned. Simply by deploying code integrity policies, organizations can get immediately protection against unsigned malware, which is estimated to be responsible for the majority of current attacks. By using code integrity policies, an enterprise can also select exactly which binaries can run in both user mode and kernel mode. When completely enforced, it will only load specific applications or software with specific signatures. This feature alone fundamentally changes security in an enterprise.
You can run configurable code integrity independent of HVCI, thus making it available to devices that don’t meet the HVCI hardware requirements. There is a downside of not meeting the hardware requirement though, the security enforcement will not be as strong.
Configurable code integrity policy offers a wide range of options which define the level of granularity governing what software to trust on a server, ranging from allowing software signed by reputable publishers (e.g.: Microsoft) to matching the hash of each file.
It is recommended that you always first deploy code integrity policies in audit mode, as it allows you to review the binaries fail to load under the policy. You can then adjust the policy before changing the code integrity policy to enforcement mode.
In this blog, I’d like to illustrate 2 common types of code integrity policies, one for general server usage and another one for locked down servers:
- General server usage: Servers which run a variety of workloads, expected to have new software installed from time to time, flexible in what they are used for.
- Locked down servers: Servers which run a specific, often highly secure and critically in their reliability, such as a Hyper-V host or Domain Controller.
Create code Integrity policy for general server usage
To create the code integrity policy, you can start by building a reference server on their standard hardware, and install all of the software that their servers are known to run. Then, run the following cmdlet:
New-CIPolicy -Level Publisher -Fallback Hash -UserPEs -FilePath C:\CI\Publisher.xml
For details of the level parameter, see here.
This cmdlet creates the policy by scanning the files on the server, and extracts the publisher information from the files and adds it to the policy. The policy is created in auditing mode. Under audit mode, files which is not covered by the CI policy will be able to load, however, they will be logged in the Microsoft\Windows\CodeIntegrity event log channel. Administrators can audit the logs to detect any potential security attacks.
As part of normal operations, they will get software updates, or perhaps add software from the same software providers. Because the "Publisher" remains the same on those updates and software, there is no need to update the code integrity policy.
Same code integrity policy can be deployed to servers in the same category and running the same hardware.
Create code Integrity policy for lockdown server
It is a similar process to create the code integrity policy on this category of servers, but with different level of control on the software you trust. For this type of server, we recommend using FilePublisher, to ensure only whitelisted files can be loaded on the server. To create the Code Integrity policy, run the following cmdlet:
New-CIPolicy -Level FilePublisher -Fallback Hash -UserPEs -FilePath C:\CI\FilePublisher.xml
This cmdlet creates the policy by scanning the files on the server, and whitelist the files by their name, version and publisher info in the policy. Only the files are on the whitelist with matching name, publisher, and version equal or greater is considered as trusted. In the case of software update, the update to the files covered by the policy will have a higher version number, therefore you won’t need to regenerate CI policy. If there are new files added to the server, you will need to scan the new files, and merge it to the existing CI policy.
The cmdlet creates the policy in audit mode, you can validate the policy in the audit mode first, ensure all the files you trust are covered by the CI policy. Once you are comfortable with it, you can run the following cmdlet to change it to enforcement mode:
Set-RuleOptions -FilePath C:\CI\FilePublisher.xml -Option 3 -delete
Deploy code integrity policy
The xml file created by the New-CIPolicy can’t be consumed by the system yet. To deploy the policy, it needs to be converted to binary format, and copied to the CodeIntegrity folder under system32.
Run the following cmdlet to convert the xml file:
ConvertFrom-CIPolicy C:\CI\FilePublisher.xml C:\CI\FilePublisher.bin
Deploy CI policy:
Copy-Item C:\CI\FilePublisher.bin C:\Windows\System32\CodeIntegrity\SiPolicy.p7b
Reboot the server to allow code integrity service to load the policy.
Monitoring
When the code integrity policy is deployed in audit mode, software which is not authorized by the policy can still be loaded, but will leave a trace behind in the event log. Here is an example of the eventlog showing: 
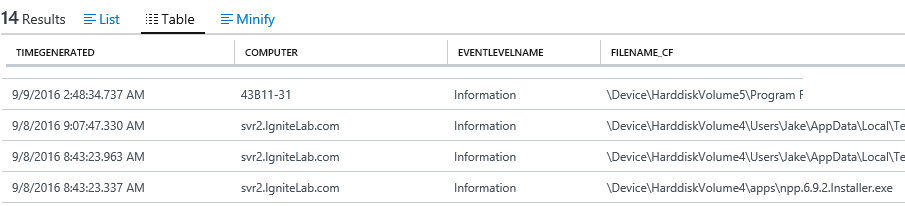
If you have multiple servers to be monitored, you can use the Security information and event management (SIEM) software, to channel the events from each server and build a single pane of glass view of the files executed but not yet authorized in the environment. I have used Microsoft Operations Management Suite (OMS) to monitor the events, here is a sample view for my test servers:
Conclusion
This blogpost illustrated a powerful mechanism to protect Windows Servers in your environment, by giving you the control to define what software is trusted, and block all non-trusted software to execute in the environment. As always, we’d love to hear your feedback. You can reach us by email at ShieldedVMFeedback@microsoft.com or submit and vote on requests through the User Voice web site.