Tutorial: Creating a Social Media Enabled Windows Live Writer Plugin
Taking a little break from your regularly scheduled Cloud Series blog post to bring you an interstitial meta-post about blogging!
I love Windows Live Writer; I mean I really love it. It’s a great piece of software.
One thing I miss is the Twitter Notify plugin, which seems to have stopped working for me after Twitter’s move to OAuth, unless there is a new version out there somewhere. In any case, I also want the ability to post bit.ly links that are trackable through my bit.ly account.
Thusly, a new plugin shall be written! And I will help to walk you through the steps of how I did it.
Download InfoDownload the plugin (plugins.live.com): https://plugins.live.com/writer/detail/bitly-tweeter Source code and bleeding edge builds: https://bitlytweeter.codeplex.com |
Creating the Project
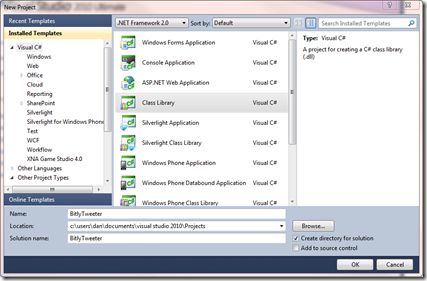
Windows Live Writer plugins can only be .NET 1.1 or .NET 2.0, so we have to make sure we are targeting the 2.0 framework if we are using VS 2010.
Open VS 2010 and go to File | New Project | Class Library. Make sure .NET Framework 2.0 is selected as the target framework.
Go download the TweetSharp library and grab the DLLs from the .NET 2.0 folder in the download. This great library nicely handles the OAuth workflow, which is crazy to understand and worse to implement without a library, but ultimately it’s pretty secure. This also allows us to interface with Twitter in an extremely easy manner.
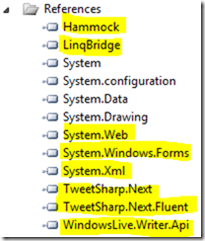
Extract those DLLs and add them as references to your project. With the current release of TweetSharp I have added the highlighted references below (some .NET references for other functionality). The Windows Live Writer API can be found in c:\Program Files (x86)\Windows Live\Writer.
Setting Up the Plugin
First of all, the API documentation for Windows Live Writer is here. Take a peek at it to understand what the heck I’m talking about in the code below.
Rename the Class1.cs class to something else, like BitlyTweeterPlugin.cs. In this file, we are going to define our plugin class. It will derive from WindowsLive.Writer.Api.PublishNotificationHook, which will allow us to do something before or after a post is published.
In Visual Studio, go to Tools | Create GUID. Make yourself a tasty GUID and copy it.
Your main class should be defined like this:
public class BitlyTweeterPlugin : PublishNotificationHookIn order for Writer to recognize your plugin, you’ll want to adorn your BitlyTweeterPlugin class with a WriterPlugin attribute that references the GUID you just created (replace the X’s with your GUID). HasEditableOptions=true will create an Options button in the plugin settings dialog in Live Writer which will allow us to edit settings. The Image Path should point to an embedded resource, or you can leave it out entirely.
 [WriterPlugin("XXXXXXXX-XXXX-XXXX-XXXX-XXXXXXXXXXXX",
        "Bitly Tweeter",
        Description="Allows you to send a tweet with a bit.ly url tied to your account.",
        PublisherUrl="https://bitlytweeter.codeplex.com",
        HasEditableOptions=true,
        ImagePath="thumb.ico")]
    public class BitlyTweeterPlugin : PublishNotificationHook
Override the OnPostPublish method. The implementation gives us a dialog owner, which we pass to dialog box constructors, a collection of properties, a publishing context which gives us the post title, URL, etc., and a bool. Your class, deriving from PublishNotificationHook, has a collection called Options which implements IProperties. Options is a really simple name-value pair construct that allows you to easily get and set options. We’ll come back and implement this method later.
 /// <summary>
/// Occurs after a post is published. Launches the dialogs for this plugin.
/// </summary>
public override void OnPostPublish(IWin32Window dialogOwner, IProperties properties, IPublishingContext publishingContext, bool publish)
{
    base.OnPostPublish(dialogOwner, properties, publishingContext, publish);
}
You’ll also want to override the EditOptions method, which will allow you to launch a settings dialog. We’ll need this to set the user’s bit.ly account info.
 /// <summary>
/// Occurs when the Options button is pressed on this plugin from Live Writer.
/// </summary>
/// <param name="dialogOwner"></param>
public override void EditOptions(IWin32Window dialogOwner)
{
    // TODO: Launch the settings dialog.
}
The shell of our plugin is ready. We’ll come back to wire it all up once the rest of our stuff is built, but this is the skeleton. Aside from the OAuth and Bitly stuff, this is the plugin. The rest of it is actually Windows Forms dialogs which you can instantiate, as well as some settings stuff that is specific to plugins.
Setting Up the Twitter Application
In order for your application to post to Twitter using OAuth, you need to have something on the Twitter end. This step takes all of five minutes.
- Go to dev.twitter.com and create a new app; fill in the information the best you can. Make sure you give it read and write permissions, and you will want to set it up as a client app, not a web app.
- Once you create the app, you can go to its settings and find two very important pieces of information: the consumer key and the consumer secret. Keep this window open so that you can easily copy and paste them. The consumer secret should never be human readable in your application, and really, users don’t need to know either of these pieces of information; they are only used to identify your application to Twitter. The consumer key is basically the app ID. The consumer secret is the password to prove that you are making a request on behalf of that app.
- That’s it on the Twitter side… Extremely easy!
Defining Constants
We need to set some constants, both for property lookup as well as the consumer key and secret. There are also some settings for the default Twitter post text format in here. So, in your project, create a new class file called Constants.cs with the below code. Make sure to substitute your consumer key and consumer secret from Twitter.
Constants.cs
 namespace BitlyTweeter
{
    public class Constants
    {
        // user settings - these are property field lookups
        public const string TWITTER_ACCESS_TOKEN = "twitterAccessToken";
        public const string TWITTER_ACCESS_TOKEN_SECRET = "twitterAccessTokenSecret";
        public const string BITLY_USERNAME = "bitlyUsername";
        public const string BITLY_API_KEY = "bitlyApiKey";
        public const string POST_FORMAT_SETTING = "postFormat";

        // application settings - please set yours here, you can find them on the twitter app page.
        // hard code these if you want
        public const string TWITTER_CONSUMER_KEY = "YOUR_APP_CONSUMER_KEY";
        public const string TWITTER_CONSUMER_SECRET = "YOUR_APP_CONSUMER_SECRET";

        // default values for post tags and format
        public const string TITLE_TAG = "[title]";
        public const string URL_TAG = "[url]";
        public const string DEFAULT_POST_FORMAT = "New blog post: " + TITLE_TAG + " - " + URL_TAG;
    }
}
Interfacing with Bit.ly
Next, we’ll create some helper classes for dealing with the URL shortening service, bit.ly .
IMPORTANT: For this plugin to work at all, you need to have a bit.ly account. It’s free. Go there, create one, and go into Settings to find your API Key.
Creating the Data Contract
Shortening a URL with bit.ly can either give you JSON or XML back. I think XML is a lot easier to deserialize, and this is a .NET 2.0 project so we are better off using what’s already in the framework.
Create a new folder in your project called Bitly. Our bitly helpers will go here.
Add a new class in this folder called BitlyResult.cs and add the following code. This is a concrete class that can be deserialized easily from the XML that bitly gives you in response to requests to its service. See the bit.ly REST API documentation on this topic.
BityResult.cs
 using System;
 using System.Xml;
 using System.Xml.Serialization;

 namespace BitlyTweeter
 {
     /// <summary>
     /// The result class for a Bit.ly request.
     /// </summary>
     [Serializable]
     [XmlRoot("response")]
     public class BitlyResult
     {
         [XmlElement("status_code")]
         public string StatusCode { get; set; }

         [XmlElement("status_txt")]
         public string StatusText { get; set; }

         [XmlElement("data")]
         public BitlyData Data { get; set; }
     }

     /// <summary>
     /// Holds the sub-data for a response from bit.ly.
     /// </summary>
     [Serializable]
     [XmlRoot("data")]
     public class BitlyData
     {
         [XmlElement("url")]
         public string ShortURL { get; set; }

         [XmlElement("hash")]
         public string Hash { get; set; }

         [XmlElement("global_hash")]
         public string GlobalHash { get; set; }

         [XmlElement("long_url")]
         public string LongURL { get; set; }

         [XmlElement("new_hash")]
         public string NewHash { get; set; }
     }
 }
Shortening The URL with Bit.ly
This next part is pretty simple; since we already set up the type for the data contract, this is just an exercise in serialization plus some informed knowledge about the API from the documentation.
Add a new class file called BitlyHelper.cs We’ll use a constant string to define what a request to bit.ly looks like, and we’ll format that string with our own parameters to shorten the URL. This helper class contains a single static method which is responsible for sending the request to the bit.ly API and deserializing the results. The Shorten method takes arguments for the username and the API key, which are set by the plugin user as part of the app settings.
The code for this helper is below.
BitlyHelper.cs
 using System;
 using System.Xml;
 using System.Xml.Serialization;

 namespace BitlyTweeter
 {
     /// <summary>
     /// A class for helping with the basic functions of Bit.ly.
     /// </summary>
     public class BitlyHelper
     {
         /// <summary>
         /// The API URL for Bit.ly. Use string.format to get it right.
         /// </summary>
         const string BITLY_URL = "https://api.bit.ly/v3/shorten?login={0}&apiKey={1}&longUrl={2}&format=xml";

         /// <summary>
         /// Shortens a URL on behalf of a user with an API key.
         /// </summary>
         /// <param name="longUrl">The URL to shorten</param>
         /// <param name="user">User's username</param>
         /// <param name="apiKey">User's API key</param>
         /// <returns>A BitlyResult with the response from the service.</returns>
         public static BitlyResult Shorten(string longUrl, string user, string apiKey)
         {
             XmlTextReader xr = null;
             XmlSerializer xs;

             try
             {
                 string address = string.Format(BITLY_URL, user, apiKey, longUrl);
                 xr = new XmlTextReader(address);
                 xs = new XmlSerializer(typeof(BitlyResult));
                 BitlyResult result = (BitlyResult)xs.Deserialize(xr);
                 return result;
             }
             catch (Exception ex)
             {
                 if (xr != null)
                     throw new Exception("Xml result: " + xr.ReadOuterXml(), ex);
                 else
                     throw ex;
             }
         }
     }
 }
Now, as crazy as it sounds, that’s all we need to do with bit.ly. The Twitter side of things is where it gets a little insane, because of how the OAuth workflow happens. Thankfully there is a great library called TweetSharp that handles all of the nasty OAuth stuff for us. You installed it already earlier in this article, right? ![]()
Plugin Flow
Because we’re using a publish notification hook, our app can do something after the post is published, which is great because that gives us the URL, post title and other good stuff. Without getting too hung up on the code (which you can view at https://bitlytweeter.codeplex.com) I’m going to describe what exactly is happening.
The OnPostPublish method is where everything happens, and the class’s Options property is a nice dictionary of settings that the user has set. The Options collection is where we store and read important user data, such as the bitly username and API key, and the Twitter Access Token and Access Token Secret (both from the OAuth spec).
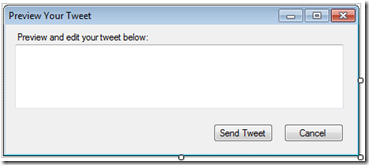
In the OnPostPublish method, we make sure that the required options are set, otherwise we show the settings dialog and make the user enter their info. After those basic checks, we launch a dialog called TweetPreview, which shows what your tweet will look like and allow you to change it. The screenshot is empty because I’m showing you design mode.
At this point in time, we’ve already talked to bit.ly and the resulting URL is shown in that box.
The “Send Tweet” button is where much of the magic happens. When the plugin first runs, this application has no idea who the Twitter user is until the user grants access to the Twitter application and gives the user an Access Token and an Access Token Secret, part of the OAuth handshake. We store those tokens because they are permanent and unique for the user and the application. Once those are stored and in-hand, we don’t have to send the user through the following gauntlet of things.
The user is redirected to a Twitter web page which asks them to log in with their Twitter account and allow or deny the Twitter application to access their account.
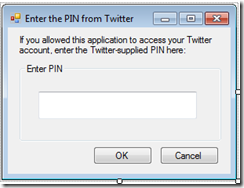
The user clicks Allow, and they are given a PIN code.
They are returned to the application which has popped up this fancy dialog:
Once the user clicks OK, the OAuth process continues and the user is eventually given an access token and an access token secret, which are stored away in the plugin options for future calls to the Twitter API through the TweetSharp library.
Here is the code in TweetPreview.cs which starts and advances the OAuth handshake with Twitter. This method is called from within other surrounding logic to check whether the user already has access.
    1: /// <summary>
    2: /// Starts the OAuth workflow from step one and persists the access token at the end.
    3: /// </summary>
    4: /// <param name="tweet"></param>
    5: private void GetAccessAndTweet(string tweet)
    6: {
    7:     helper = new TwitterHelper();
    8:     OAuthRequestToken requestToken = helper.GetRequestToken();
    9:     helper.LaunchAuthorizationBrowserWindow(requestToken);
   10:     PINEntry pe = new PINEntry();
   11:     if (pe.ShowDialog() == DialogResult.OK)
   12:     {
   13:         string pin = pe.PIN.Trim();
   14:         OAuthAccessToken accessToken = helper.GetAccessToken(requestToken, pin);
   15:         properties[Constants.TWITTER_ACCESS_TOKEN] = accessToken.Token;
   16:         properties[Constants.TWITTER_ACCESS_TOKEN_SECRET] = accessToken.TokenSecret;
   17:
   18:         helper.SendTweet(tweet);
   19:         DialogResult = DialogResult.OK;
   20:     }
   21:     else
   22:     {
   23:         MessageBox.Show("Can't send tweet until you authorize the application.");
   24:         DialogResult = DialogResult.Abort;
   25:     }
   26: }
Line 7 references a component I wont’ talk about very much, called TwitterHelper. The OAuthRequestToken is part of the TweetSharp library. What we are doing here is gently wrapping the TweetSharp library.
Here’s what’s happening in this code:
- A request token is grabbed from Twitter. This is an unauthenticated token that tells Twitter you are about to send a user over.
- The user is sent to the Twitter page to authorize the app, passing along the token that Twitter gave you.
- When the user clicks Allow, Twitter generates a PIN.
- The user enters the PIN in the PINEntry dialog box of our app.
- Our app tells Twitter to give us a permanent access key, because the user said they want one and they entered the PIN to prove it.
- We store away the access token details and authenticate ourselves on behalf of the user.
- We send the tweet and praise the deity of our choice, or eat some waffles.
Here is the TwitterHelper.cs, the wrapper class for the TweetSharp library; this allows us to simplify our code and keep a single instance of the Twitter service running with current credentials. I’m not going to talk much about this; the comments are probably quite self explanatory. The main purpose of this wrapper is to simplify the OAuth handshake and make sure we are always authenticated on behalf of the user (this is done on line 78 when the access token is granted).
Line 10 talks about a TwitterService object which is part of the TweetSharp library. We initialize it with our application’s consumer key and secret so it knows what it’s talking to on the Twitter side, and authenticate later with the user’s access token and secret.
To check the status of the tweet, we can use the TwitterService’s Response.StatusCode property, which is equivalent to a System.Net.HttpStatusCode. If it’s anything but OK, we throw an exception.
    1: using System;
    2: using System.Diagnostics;
    3: using TweetSharp;
    4:
    5: namespace BitlyTweeter
    6: {
    7:     public class TwitterHelper
    8:     {
    9:         // This is the twitter service we'll use from TweetSharp
   10:         private TwitterService service = new TwitterService(Constants.TWITTER_CONSUMER_KEY, Constants.TWITTER_CONSUMER_SECRET);
   11:
   12:         // OAuth stuff
   13:         string accessToken = "";
   14:         string tokenSecret = "";
   15:         string screenName = "";
   16:         int userid = 0;
   17:         bool authenticated = false;
   18:
   19:         // Public OAuth stuff
   20:         public string AccessToken { get { return accessToken; } }
   21:         public string AccessTokenSecret { get { return tokenSecret; } }
   22:         public bool IsAuthenticated { get { return authenticated; } }
   23:
   24:         /// <summary>
   25:         /// Constructor for non-authenticated use (need to launch the browser)
   26:         /// </summary>
   27:         public TwitterHelper()
   28:         {
   29:
   30:         }
   31:
   32:         /// <summary>
   33:         /// Constructor when a token exists
   34:         /// </summary>
   35:         /// <param name="token">The access token</param>
   36:         /// <param name="tSecret">The access token secret</param>
   37:         public TwitterHelper(string token, string tSecret)
   38:         {
   39:             accessToken = token;
   40:             tokenSecret = tSecret;
   41:             service.AuthenticateWith(token, tSecret);
   42:             authenticated = true;
   43:         }
   44:
   45:         /// <summary>
   46:         /// Grabs an unauthenticated request token. Used when the app is not authorized by Twitter
   47:         /// </summary>
   48:         /// <returns></returns>
   49:         public OAuthRequestToken GetRequestToken()
   50:         {
   51:             OAuthRequestToken uToken = service.GetRequestToken();
   52:             return uToken;
   53:         }
   54:
   55:         /// <summary>
   56:         /// Launches the default browser to the location where the user can allow this app to post to Twitter.
   57:         /// </summary>
   58:         /// <param name="token">The unauthenticated request token.</param>
   59:         public void LaunchAuthorizationBrowserWindow(OAuthRequestToken token)
   60:         {
   61:             Uri uri = service.GetAuthorizationUri(token);
   62:             Process.Start(uri.ToString());
   63:         }
   64:
   65:         /// <summary>
   66:         /// Gets the final access token which will be persisted (needs a PIN provided by Twitter)
   67:         /// </summary>
   68:         /// <param name="token">The unauthenticated token</param>
   69:         /// <param name="pin">The pin provided by Twitter and entered by the user</param>
   70:         /// <returns>The access token object</returns>
   71:         public OAuthAccessToken GetAccessToken(OAuthRequestToken token, string pin)
   72:         {
   73:             OAuthAccessToken aToken = service.GetAccessToken(token, pin);
   74:             accessToken = aToken.Token;
   75:             tokenSecret = aToken.TokenSecret;
   76:             screenName = aToken.ScreenName;
   77:             userid = aToken.UserId;
   78:             service.AuthenticateWith(accessToken, tokenSecret);
   79:             authenticated = true;
   80:             return aToken;
   81:         }
   82:
   83:         /// <summary>
   84:         /// Attempts to send a tweet. Throws an exception if there was an authentication error.
   85:         /// </summary>
   86:         /// <param name="tweet">The text to send</param>
   87:         public void SendTweet(string tweet)
   88:         {
   89:             service.SendTweet(tweet);
   90:             if (service.Response.StatusCode != System.Net.HttpStatusCode.OK)
   91:             {
   92:                 throw new Exception("Couldn't send tweet: " + service.Response.StatusDescription);
   93:             }
   94:         }
   95:     }
   96: }
Storing User Settings
The hard part is done; most of what I didn’t cover just has to do with general program logic and error handling.
Obviously we want these settings to be persistent; nobody wants to have to type in API keys and such every single time, or do the OAuth handshake, so we need a way to persist the data.
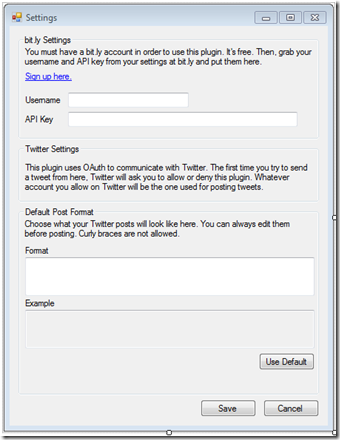
This is the Settings WinForm (again, design mode, sorry)
This form gives the user an easy way to store their bit.ly key as well as modify the default appearance of their twitter post using tags in square brackets like [url] and [title]. This is done through the magic of string.Format(…).
Launching the Settings Form
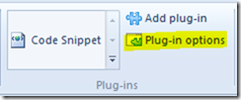
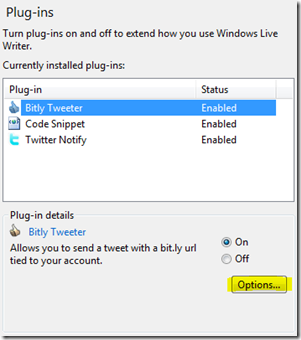
There are two cases where the Settings form is launched: once explicitly when the user hasn’t entered bit.ly account information, and in an on-demand sense from the Windows Live Writer plugin options menu available here:
The plugin-specific Options button is ONLY available when you have the HasEditableOptions parameter set to true in the main class’s WriterPlugin attribute (this line of code):
 [WriterPlugin("C3B906E1-0847-4DAA-9ECA-F4442B2FB0AC",
    "Bitly Tweeter",
    Description="Allows you to send a tweet with a bit.ly url tied to your account.",
    PublisherUrl="https://bitlytweeter.codeplex.com
    HasEditableOptions=true,
    ImagePath="thumb.ico")]
The way to launch the Settings dialog when this button is pressed is by overriding the EditOptions method of the main class and passing the dialog owner to the ShowDialog method of the settings class:
 /// <summary>
/// Occurs when the Options button is pressed on this plugin from Live Writer.
/// </summary>
/// <param name="dialogOwner"></param>
public override void EditOptions(IWin32Window dialogOwner)
{
    // Launch the settings dialog.
    Settings settings = new Settings(Options);
    settings.ShowDialog(dialogOwner);
}
As for the Settings dialog itself, it functions just like any other WinForms dialog and persists its options to the key-value dictionary passed to it in the constructor (Options).
And We’re Done
Or, at least, I am ![]() If you have any questions about the code please have a look at it at https://bitlytweeter.codeplex.com. Hopefully the main bits are useful!
If you have any questions about the code please have a look at it at https://bitlytweeter.codeplex.com. Hopefully the main bits are useful!
