Note
Access to this page requires authorization. You can try signing in or changing directories.
Access to this page requires authorization. You can try changing directories.
Recently I had worked with one of our customer, who was looking for OU level filtering to import selected users from On-Premises active directory to Office365.
Thought of writing the step-by-step process, which might be helpful for some of you.
Note: -
a. You can install ADFS and DirSync on the same box, IT IS NOT RECOMMENDED BY MICROSOFT
b. You can’t install DirSync on a Domain Controller.
Installing and activating DirSync for your Office365 Portal.
1. Login to your Office365 Portal with Tenant admin credentials. (The username and password which you provided while provisioned your Office365 Portal)
2. On the Admin page, in the left pane, under Management, click Users, and then click setup next to Active Directory® synchronization.
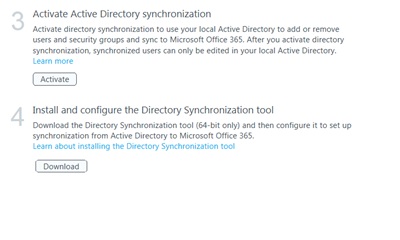
3. Scroll down to step 3 and 4, as shown below in the screen capture.
i. Activate DirSync for your Office365 Portal from step 3 (This might take a while to get activated)
ii. Download DirSync 64 Bit from step 4
4. Run the downloaded DirSync.exe
5. Click on Next button in welcome screen
6. Accept the License Terms and Click Next
7. Click next on the “Select Installation Folder” if you don’t want change the location.
8. This Installs DirSync in your local machine
9. Click Next to start the DirSync Configuration wizard.
a. Ensure the “Start Configuration Wizard now” is checked.
10. Click Next on the “Welcome Configuration wizard”
11. Enter your Office365 Tenant admin account and password and click next.
12. Enter your local Active Directory account who is part of enterprise admin group.
13. If you have Exchange Server on-Premise and planning to implement a hybrid configuration, then select “Enable rich coexistence” and click next.
i. Nothing to worry if it is greyed out for you, which means you don’t have on Exchange On-Premises deployed.
14. Uncheck the Synchronize directories now from the DirSync Finish window and click Next.

Configure OU level filtering for Office365 directory synchronization.
1. Logged in to your Domain controller
2. Created an OU (Organisational Unit) from your AD (Active Directory)
a. In my case I named it “DirSync”
3. Move all those users you want to sync, to that DirSync OU.
4. From your DirSync Server navigate to <Drive>\Program Files\Microsoft Online Directory Sync\SYNCBUS\Synchronization Service\UIShell
5. Double click on miisclient.exe
6. This opens a console something similar to the below screen capture

7. In Identity Manager, click Management Agents, and then double-click SourceAD.
8. Click Configure Directory Partitions, and then click Containers, as shown in the below screen capture.

9. When prompted, enter your domain credentials for the on-premises Active Directory forest.
10. In the Select Containers dialog box, clear the OUs that you want skip from syncing to Office365, and then click OK. Something similar to below screen capture.

11. Click OK on the SourceAD Properties page.
12. Perform a full sync: on the Management Agent tab, right-click SourceAD, click Run, click Full Import Full Sync, and then click OK.
If you would like to know more about DirSync filtering refer the TechNet article here
13. You can also force run DirSync using the following PowerShell command.
i. From your dirsync server open PowerShell console as Administrator
ii. Navigate to “C:\Program Files\Microsoft Online Directory Sync”
iii. Run .\DirSyncConfigShell.psc1
iv . Now execute Start-OnlineCoexistenceSync commendlet.
14. To confirm the sync job, open your event log and look for Event ID’s 1 & 2.
v. Event ID 1 says If configuration Import started
vi. Event ID 2 says if configuration Import has completed.
15. To verify from Office365 Portal
vii. Login to your Office365 Portal with Tenant admin credentials. (The username and password which you provided while provisioned your Office365 Portal)
viii . On the Admin page, in the left pane, navigate to Users.
ix . And you can verify the Last Synced status next to Active Directory® synchronization as shown below

16. Verify only the Filtered users are populated to Office365 from office365 user management.
Note:-
Filtering configurations applied to your directory synchronization instance aren’t saved when you install or upgrade to a newer version. If you are upgrading to a newer version of directory synchronization, you must re-apply filtering configurations after you upgrade, but before you run the first synchronization cycle.
Comments
Anonymous
June 14, 2013
Superb Article!!Written Really well..Thanks BuddyAnonymous
June 19, 2013
Your image in step #6 shows only one successful sync, I found this page looking up dirsync errors. :(Anonymous
June 25, 2013
What if we already have setup and have been running dirsync without filtering and want to clean things up a bit. Is there a correct process by which to turn on filtering and remove the excess synced accounts without messing up the links between the accounts we actually want synced?Anonymous
June 27, 2013
yes - support.microsoft.com/.../2709902Anonymous
July 01, 2013
Grumpy, sorry for the delay here. If you still have have this issue, can you please share the error screen capture, drop me an email at kanna.ganesh@hotmail.comAnonymous
July 01, 2013
Hi PS, guess Sheldon's point answerd your quesion..Anonymous
July 01, 2013
Hi PS, Hope Sheldon answerd your question, please let me know, if you still any questions.Anonymous
July 01, 2013
Hello Sheldon, thank you for answeing.Anonymous
November 19, 2013
Very good article. I'm not 100% sure but does this process fall into the category of unsupported operations? The below quote is from a page which was written after this article: technet.microsoft.com/.../jj710171.aspx Microsoft does not support modification or operation of the Directory Sync tool outside of those actions formally documented. Unsupported actions include:Opening the underlying FIM Sync Engine to modify Connector configuration
Anonymous
February 27, 2014
hi, how do I change the Azure/365 account used during sync / update the password of the account?Anonymous
March 06, 2014
The DirSync tool available at go.microsoft.com/fwlink installs the miisclient.exe at :Program FilesWindows Azure Active Directory SyncSYNCBUSSynchronization ServiceUIShellAnonymous
April 27, 2014
Do you have instructions, or advice for removing synced accounts from 0365 but not from AD? ThanksAnonymous
May 12, 2014
Hi! There are different management agent names now, maybe new miisclient since your post. Windows Azure Active Directory Connector Active Directory Connector How to do this on is first run Active Directory Connector, full import full sync, and then run Windows Azure Active Directory Connector EXPORT. Then finally you will have all your users which you chose from this guide. A question though. Will this go automatically from now on, or is it just manual each time? Usually DirSync updates every three hours, but not sure when it's done like this.Anonymous
March 01, 2015
Hi, I added a DirSync Containers in this tool. The tool ask me to do a full import / full sync for first after the change. But for the second step (before the export), I currently do it with 'Windows Azure Active Directory connector Delpta Import / Delta Sync'. Is I do : 1/ Active Directory Connectof : Full Import / Full Sync 2/ Windows Azure Active Directory connector : Delta Import / Delta Sync 3/ Windows Azure Active Directory connector : Export Or 1/ Active Directory Connectof : Full Import / Full Sync 2/ Windows Azure Active Directory connector : Full Import / Full Sync 3/ Windows Azure Active Directory connector : Export Or something else?Anonymous
August 19, 2015
i had an installed dirsync in my enviroment without the password sync and now, for the time being i want to start password sync but for the test user only,i am looking to create the test OU in the AD and choos it as the container in the dir sync, did the active user will be effected or the change will effect the password for the test userAnonymous
October 18, 2015
thanks a lot for the so well-written article!Anonymous
December 17, 2015
Thanks for the time spent on this article. one point that I've found worth metioning is to tell users to make sure to run the IDfix tool before running the DirSync because some users do not have the right UPN setup or not even the Email account in the General tab for their active directory users. so it is worth mentioning this as a disclaimer ( Before you attempt to do this we are assuming that you have already cleared up the UPN by federating your domain) and that IDFix returns no errors) Thanks again. link to IDFix: support.office.com/.../Install-and-run-the-Office-365-IdFix-tool-f4bd2439-3e41-4169-99f6-3fabdfa326acAnonymous
January 11, 2016
An external Link I found very useful for step by stepL blog.ciaops.com/.../windows-azure-active-directory-sync.html