Creating a site to site (S2S) VPN to Azure with RRAS, one physical NIC and a NAT gateway
OK. You have a home lab and you are eager to have a play and create a S2S VPN into Azure with RRAS and you've probably read guidance requiring you to have two network adapters, one for internet facing traffic and the other for internal facing traffic. You may have also read that you must assign a static public IP address on the Internet facing network adapter as you cannot NAT the traffic. While this is definitely the recommendation you would want to follow for a production environment, its sometimes not the easiest thing to accomplish in your home lab.
In this blog I will show you how to configure a S2S VPN to Azure with RRAS, Hyper-V, a Physical NIC and a router that supports 1:1 NAT (sometimes known as DMZ or gaming mode). It assumes you have knowledge of Hyper-V, Azure and RRAS.
Sound good? Great… Let's get started!
Pre - Requisite check!
Firstly ensure that your ISP does not block the ports required to establish an IKEv2 tunnel. There is plenty of information here on which ports are required. Also please ensure you know how to create a VM in Hyper-V and Azure, how to assign virtual NICs (vNICs) and finally have some working knowledge of RRAS and to be honest, if you don't this article may be hard to follow.
Lab Setup
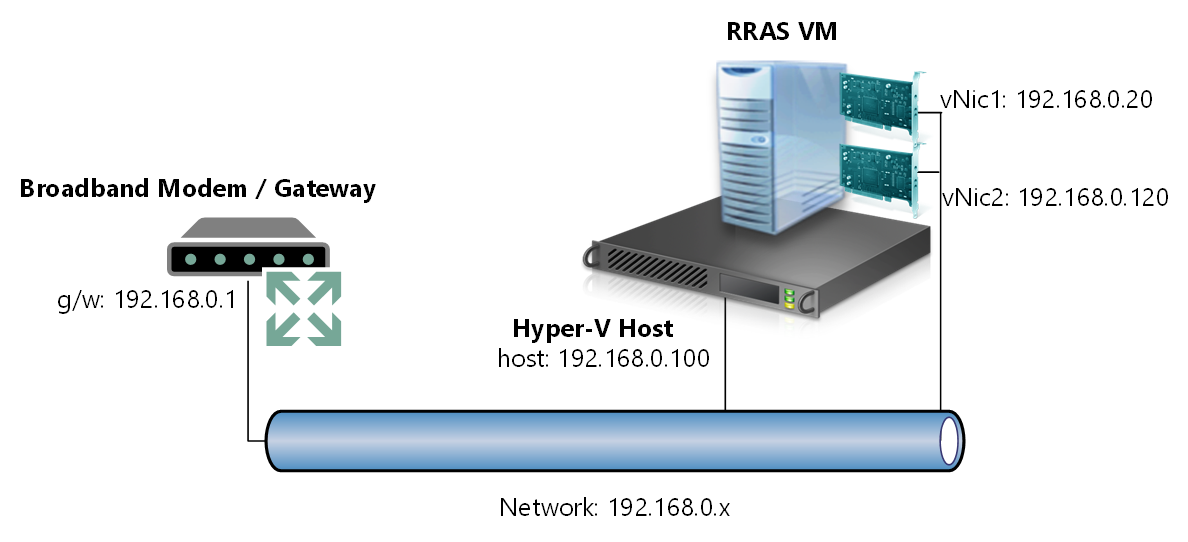
I have a physical workstation with one physical network card which connects directly to my broadband modem. I have installed Hyper-V 2012 R2 and created a Hyper-V Virtual Switch which connects to this physical network card. My VM virtual NICs (vNICs) will connect to this virtual switch so they can access my physical network. I will be using a private IP range of 192.168.0.x to assign IP addresses to my vNICs, of course you can assign IP addresses in a private range of your choice, just make sure it does not overlap with the private range you will assign in Azure. The logical diagram below serves to illustrate the setup.
Configuring the RRAS VM
Create yourself a Hyper-V Virtual Machine with two network adapters. Both of these adapters should connect to your external virtual switch and sit on your private physical network, (192.168.0.x network in my case) and then deploy Windows Server 2012 R2.
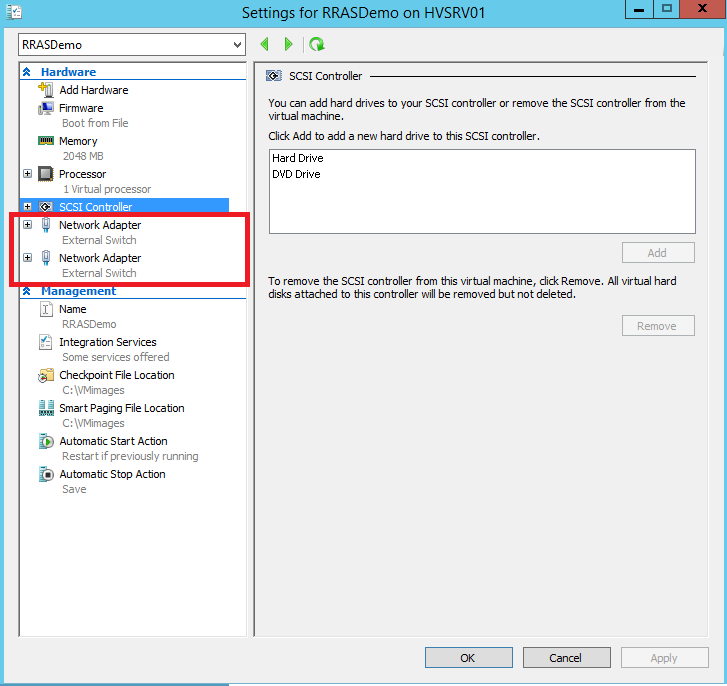
Ensure that you allocate a private IP address to each vNIC and label them so you can easily identify which vNIC will be used for "internal" traffic and which one will have "external" traffic forwarded to it. I've labeled mine "internal" and "external" as per the picture.

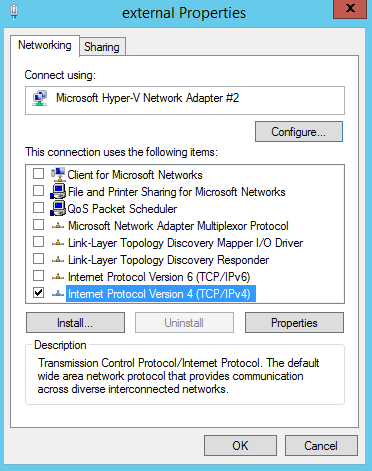
Now we need to fine tune the adapter properties of the "external" vNIC. Uncheck all the items as per the picture below and leave only TCP/IP v4 selected. Also ensure that you only have the gateway IP address for your modem set on your "external" vNIC. Ensure you remove it from your "internal" vNIC.
Configuring the Modem for 1:1 NAT
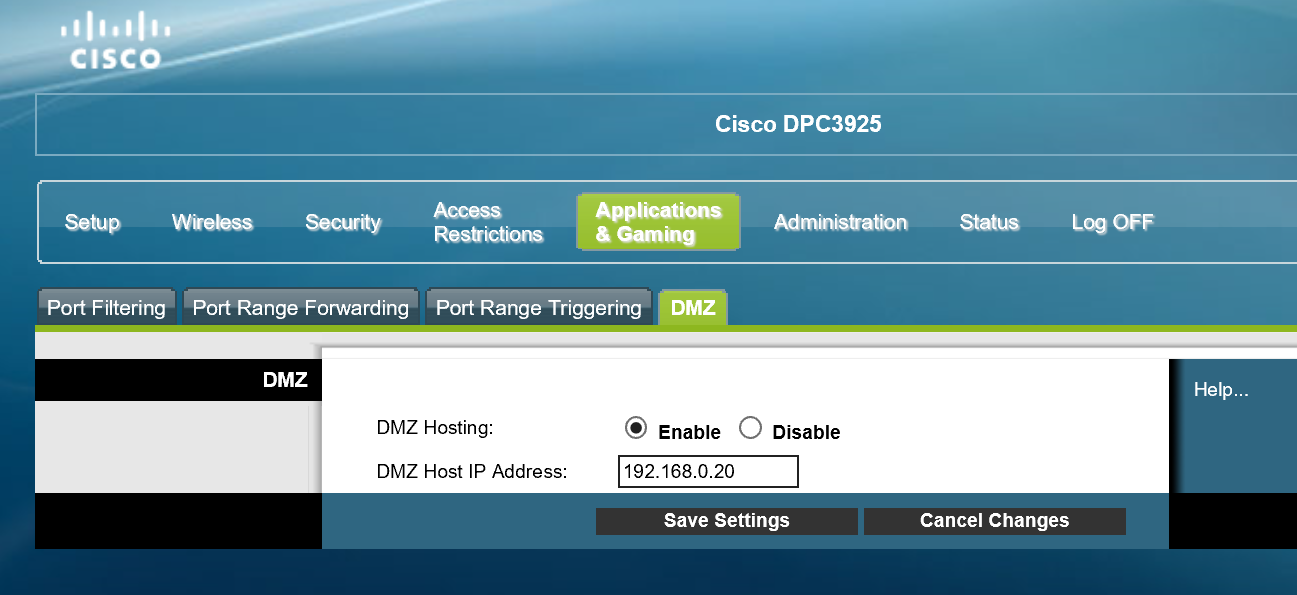
Now, these steps differ for different modems but essentially you need to do some form of Port Forwarding for incoming traffic. In my case I have a mode called DMZ which will forward all ports from the internet to a private IP address of my choosing. I am forwarding to 192.168.0.20 which has been allocated to the RRAS VM vNIC I have labeled as "external".
Configuring the Azure Virtual Network
In any scenario it is usually recommended practice to define your Azure Virtual Network before you start provisioning virtual infrastructure. Very much as in the physical world, planning your network is paramount before rolling out services.
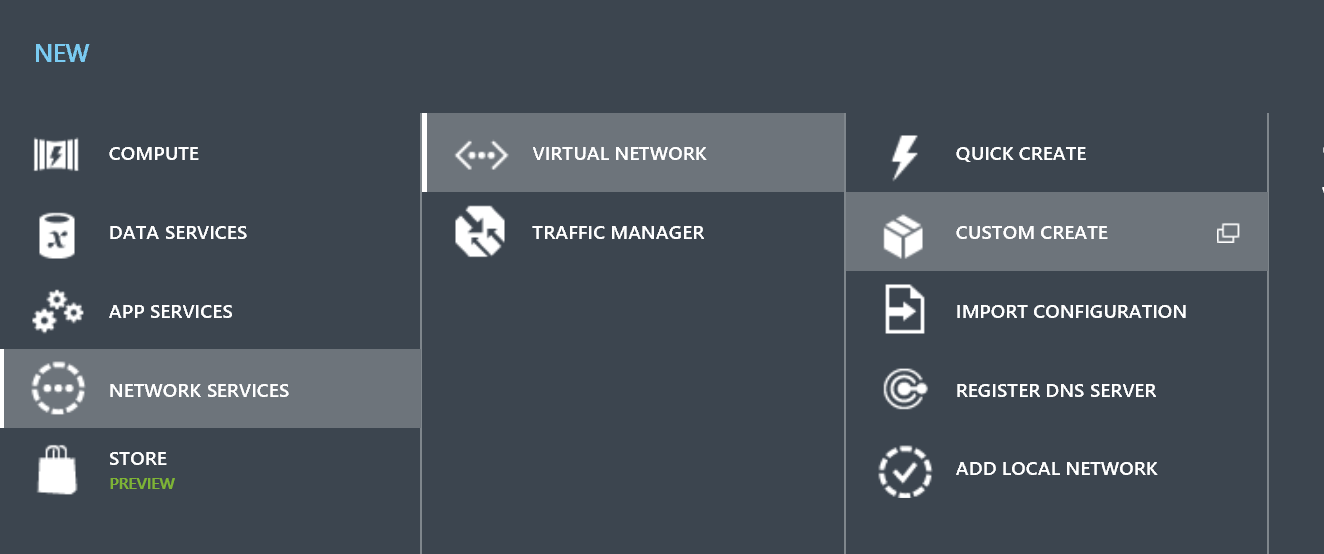
In this case we are going to create a simple Virtual Network. Let's head over to the Azure Portal. In the Azure Portal lets Custom Create a new Virtual Network.
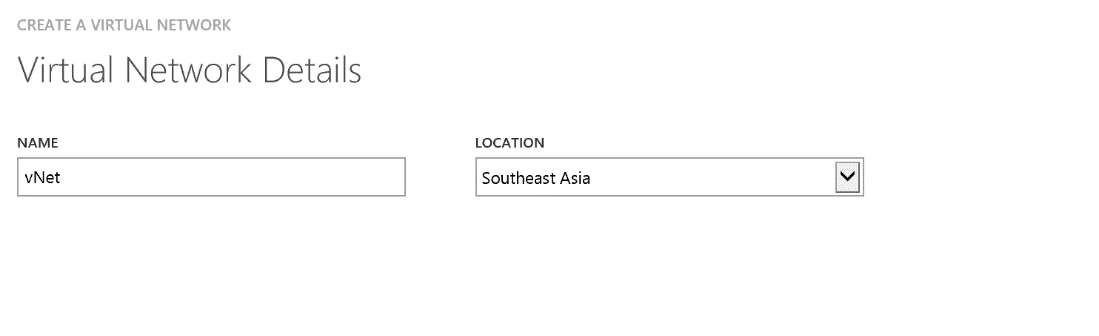
Give it a name of your choice and select your closest region
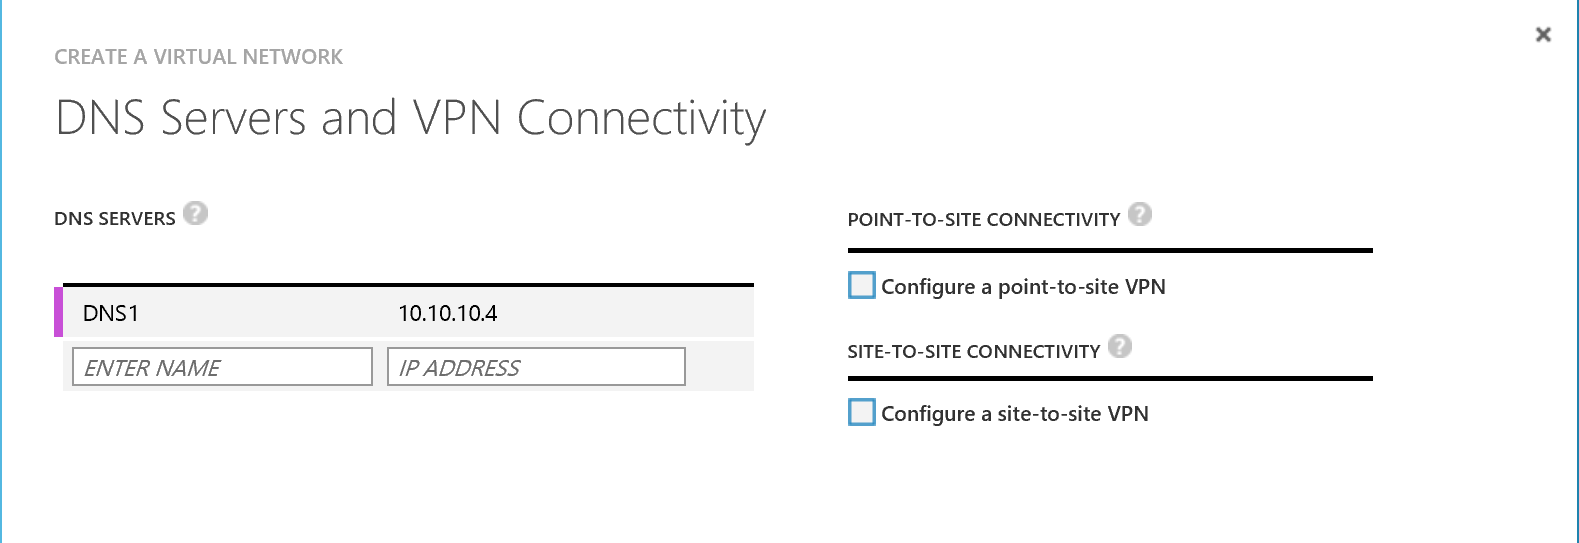
Now in this section I have specified a DNS server IP address as I am going to spin up a Domain Controller VM in Azure on this network to do our connectivity test. You can however leave this blank as its optional. I am not going to select to configure a S2S VPN at this stage so leave it unchecked.
Note: I will not be showing you have to create a VM in Azure.
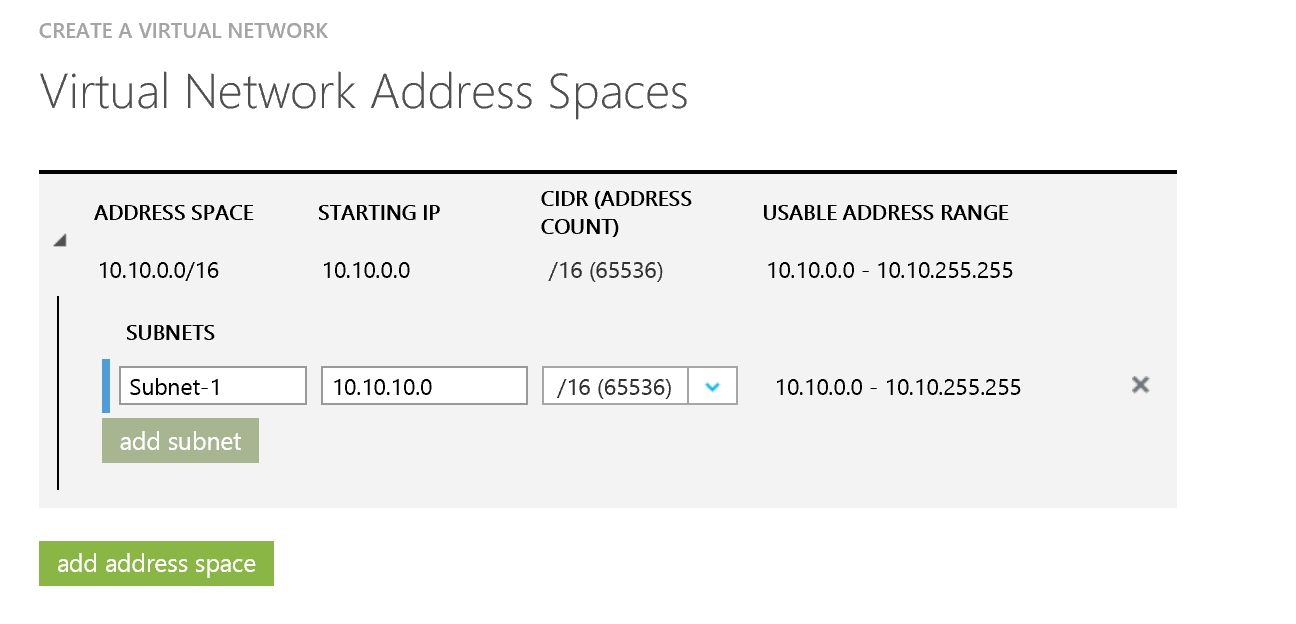
This next step is important. We need to define our private address space in Azure. You need to ensure this does not overlap with the range you defined in your home lab. As I am using the 192.168.0.x at home I will used the 10.0.x.x range in Azure. On the screen shot below you can see how I have defined the address space and then sub divided this range into multiple subnets. This provides a nice level of flexibility.
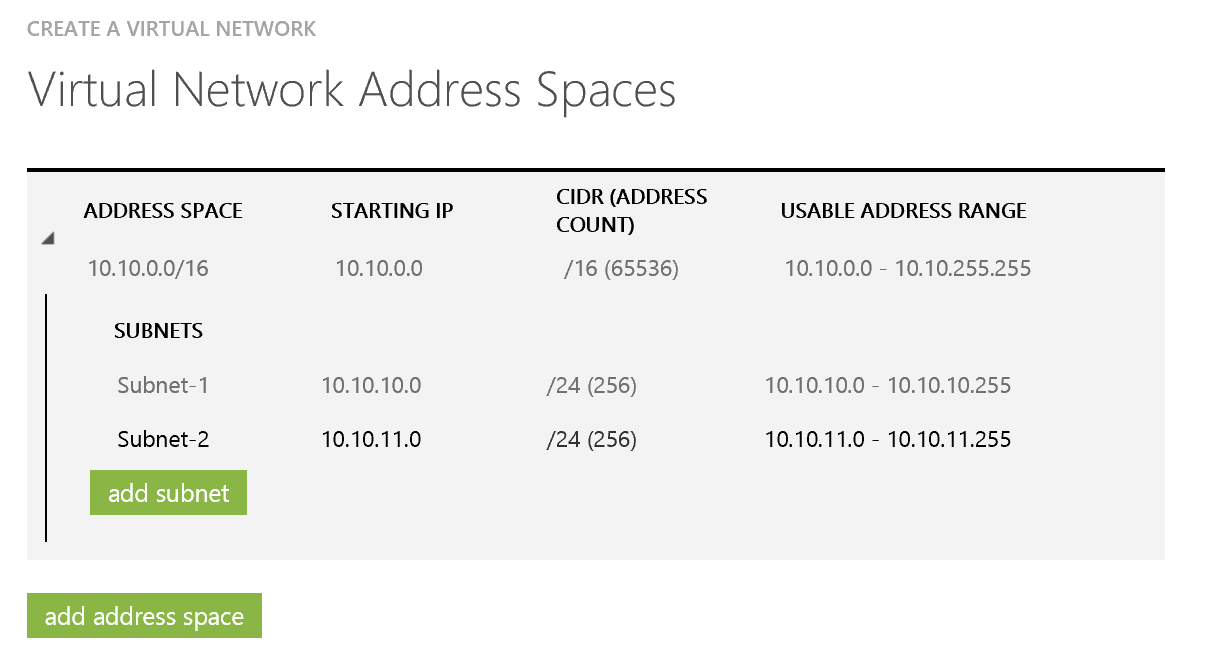
You can however choose to consume the entire space as a single subnet if you wish.
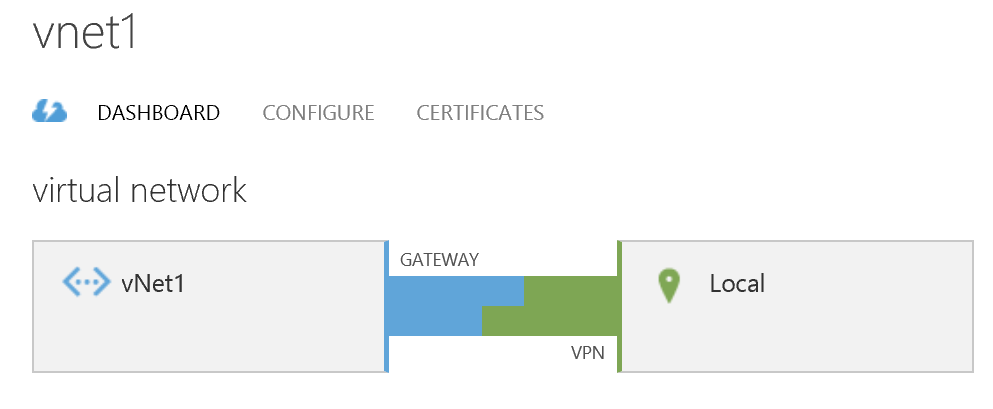
Once you finish the Wizard you will see a new virtual network created under Networks. Time to configure our Local Network so Azure understands how to route traffic between the environments. Click on Local Network.
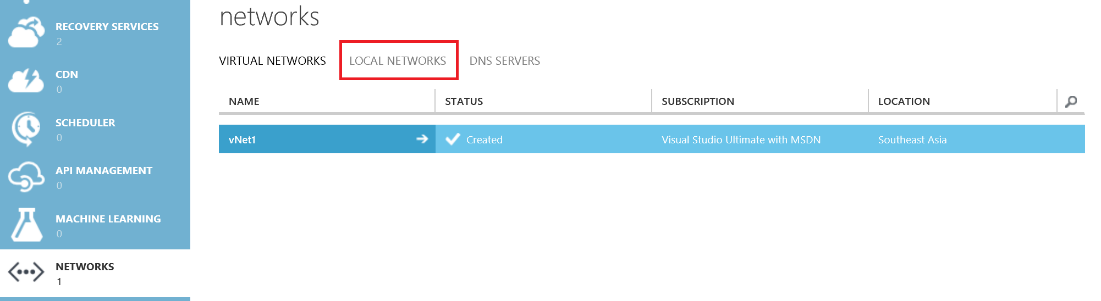
Now go ahead and Add A Local Network

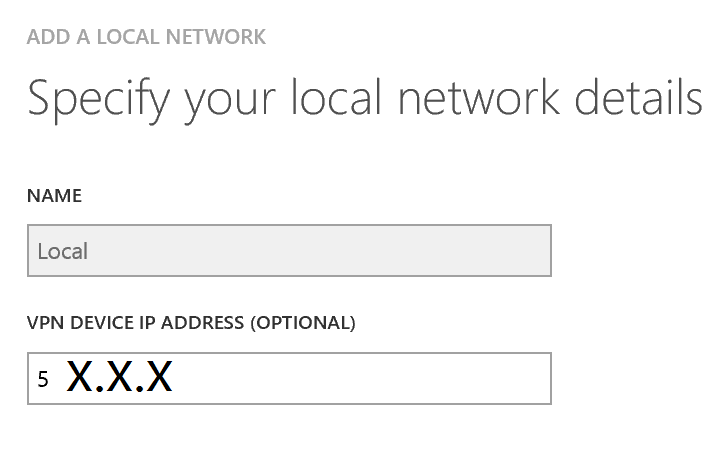
Provide a Name, I've called mine "Local" and then provide the Public IP address of your broadband modem under the VPN Device IP Address. If you're not sure… Ask Bing :) https://www.bing.com/search?q=whats+my+ip+address
Note: If your ISP provides you with a DHCP IP Address, the VPN Device IP Address may need to be changed periodically.
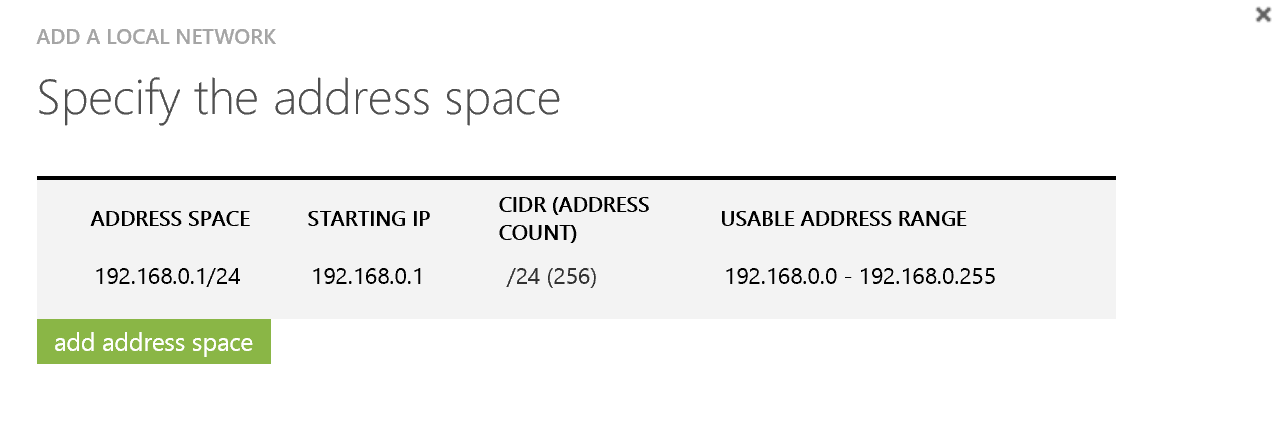
On the next page, specify the address space for your home network. In my case it is 192.168.0.x and I'm using a /24 mask to tell Azure that everything from 192.168.0.0 to 192.168.0.255 should be routed across the VPN to my home lab.
Done.
Configuring the Azure S2S VPN and Gateway
Now that you have defined your Local Network in Azure lets create our site to site VPN in Azure.
Head over to the Configure section of your Virtual Network and scroll down to select the Connect to the local network option under Site-To-Site connectivity. Also ensure the your "Local" network is selected in the Local Network drop down box. Azure will now automatically add an additional subnet in your Azure network address space for the Gateway and it's worth noting that IP addresses between x.x.x.0 and x.x.x.3 in each Azure subnet will be reserved for services such as the Gateway.
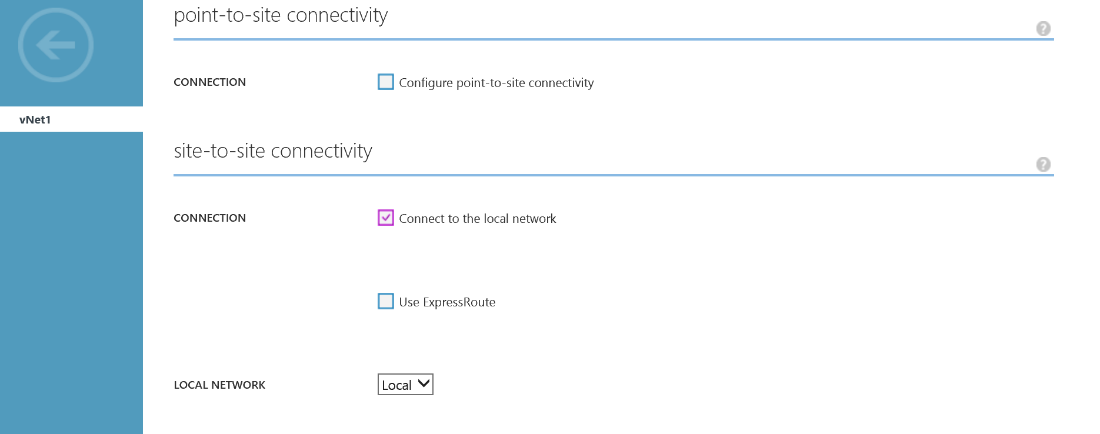
When you're done click Save down the bottom of the page and return to the dashboard view of your Virtual Network. Go ahead and create the actual gateway device by clicking Create Gateway at the bottom of the page and select Dynamic routing. If dynamic routing does not show as an option, you probably have point to site connectivity enabled.
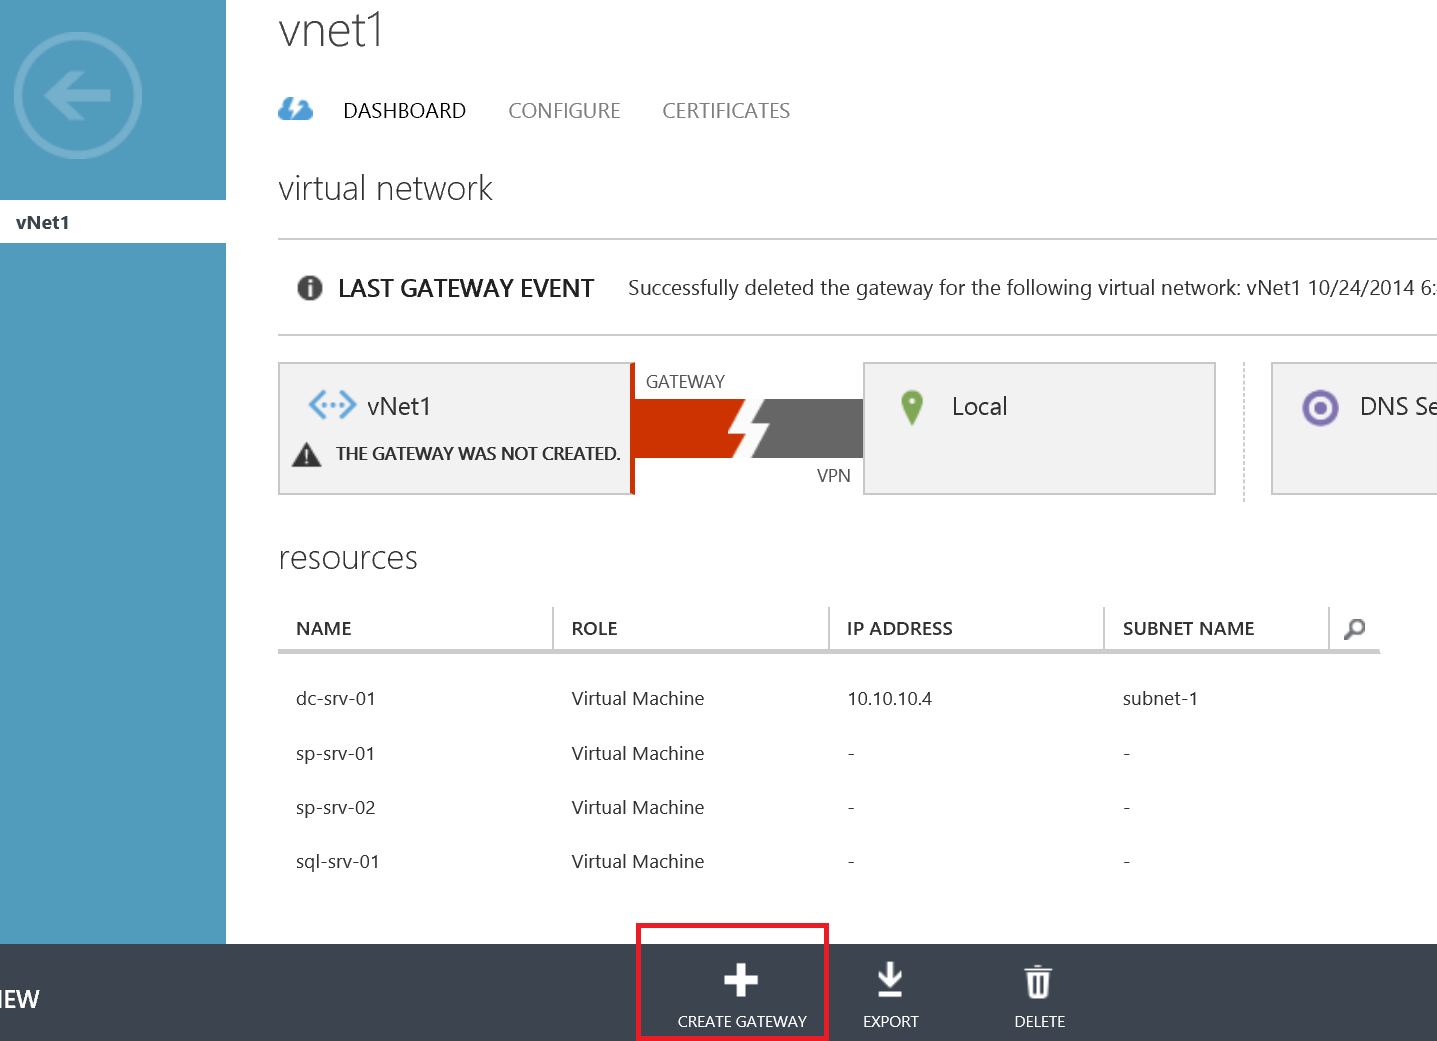
Azure will now spin up a couple of gateways for you. This will take 15 minutes, so go grab a coffee.
Configuring the home lab RRAS Server
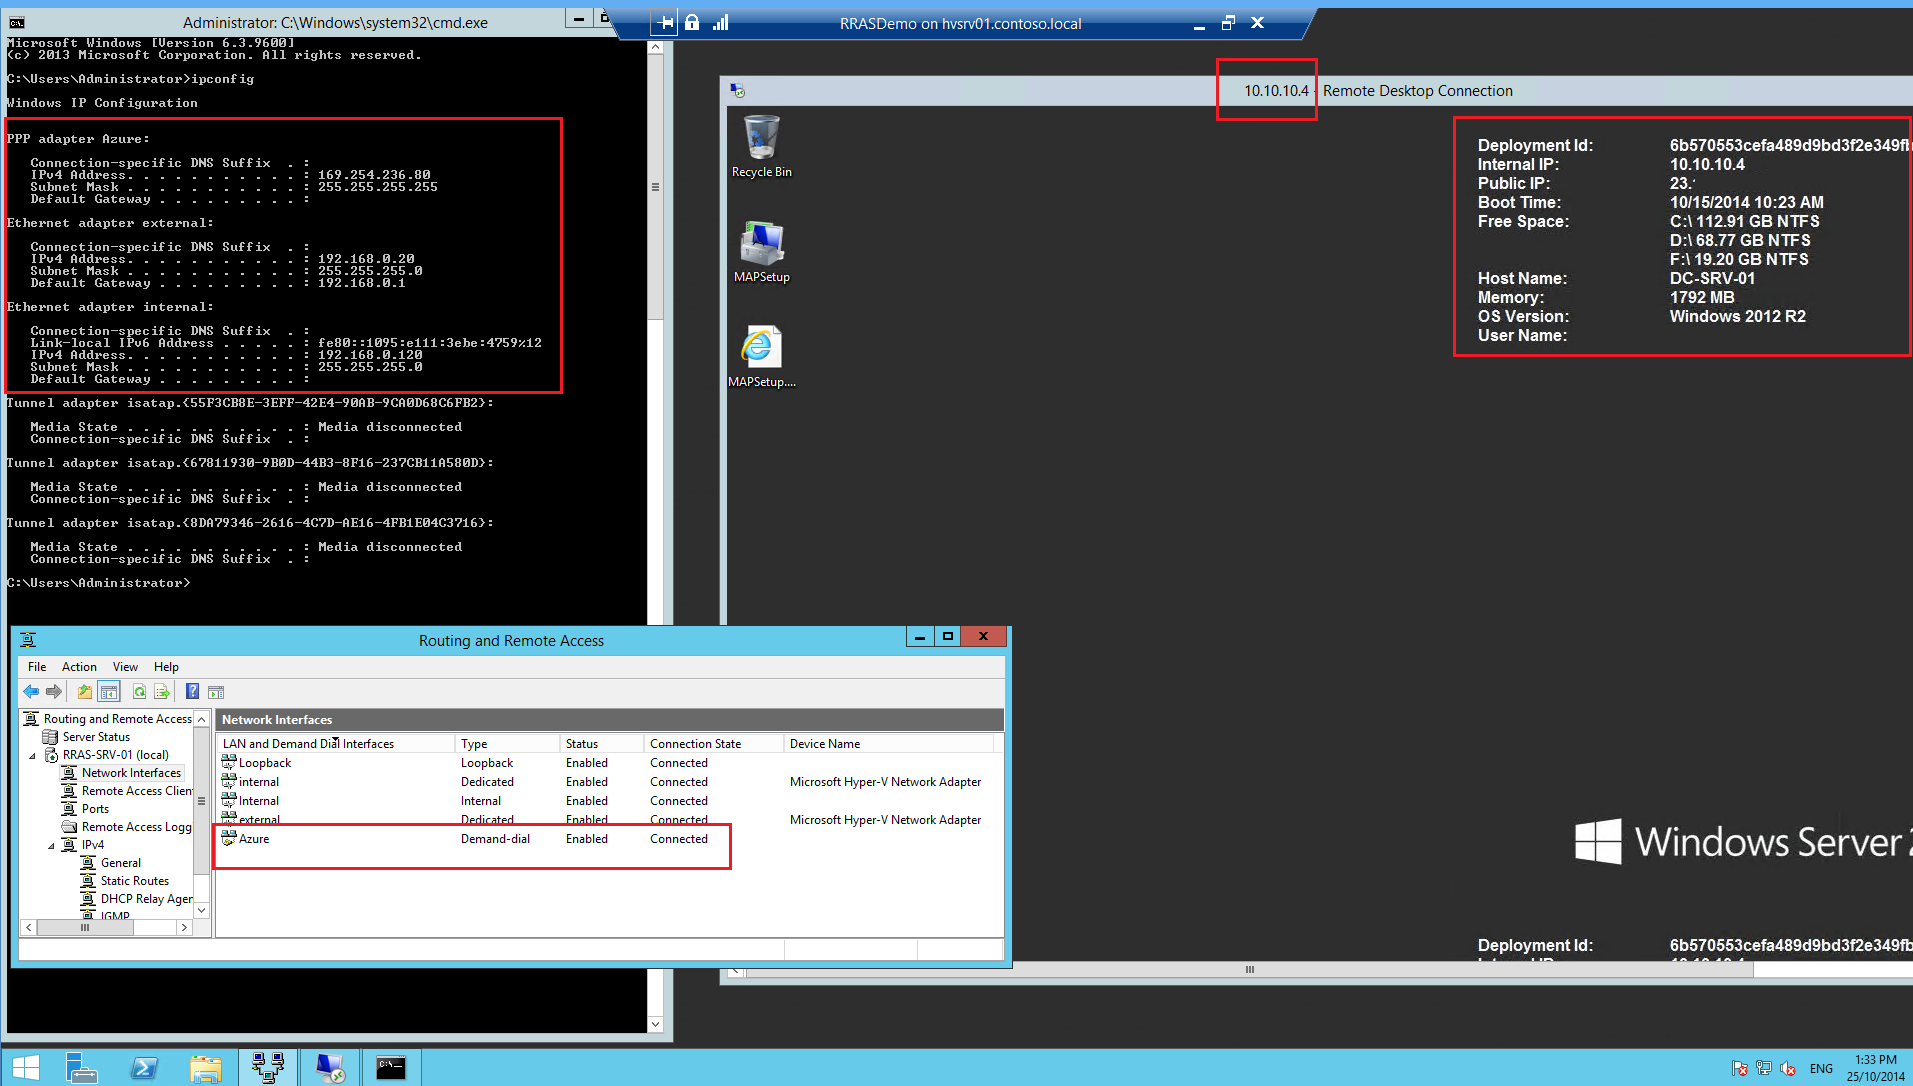
Head back to your home lab RRAS VM. Add the Routing and Remote Access role from Server Manager. Once installed lets open up the Routing and Remote Access console to configure our VPN server.
Right Click your server and select Configure and Enable Routing and Remote Access.
Choose to create a Custom Configuration and then Select VPN access and LAN routing from the list.
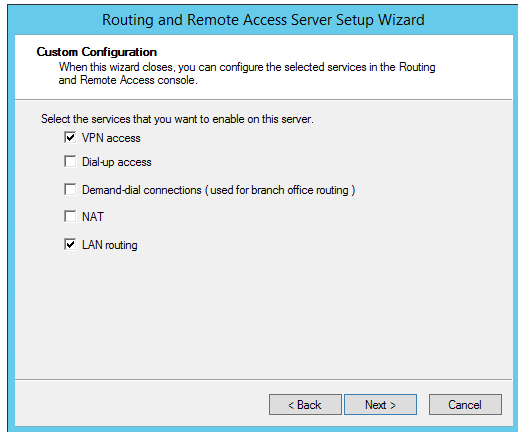
Once the Wizard completes you will be prompted to start RRAS. Start the service.
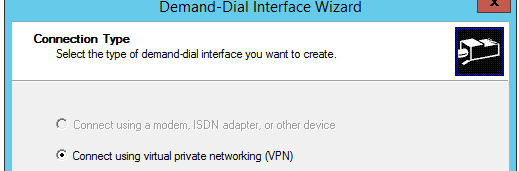
Next step is to click Network Interfaces and right click to create a Demand-Dial Interface. Give it a recognizable name. I named mine Azure.
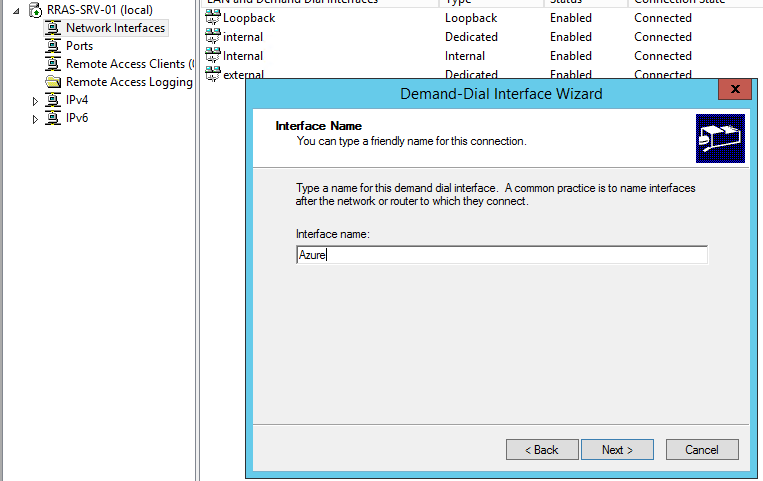
Continue the Wizard. Choose to connect using a VPN.
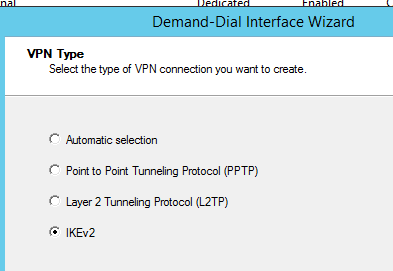
Ensure you select IKEv2 as the type of VPN
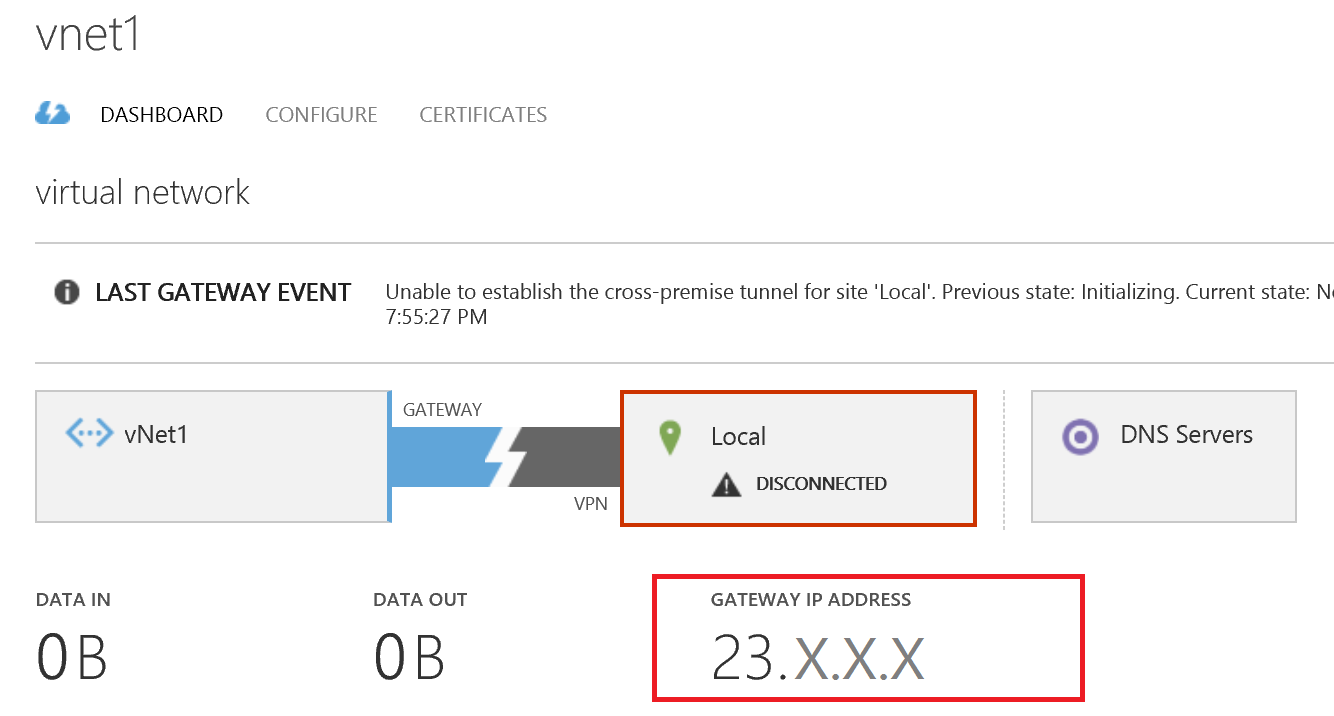
On the next screen you will be prompted to enter a Destination Address. Enter the Azure Gateway IP Address located on the Azure virtual network dashboard.
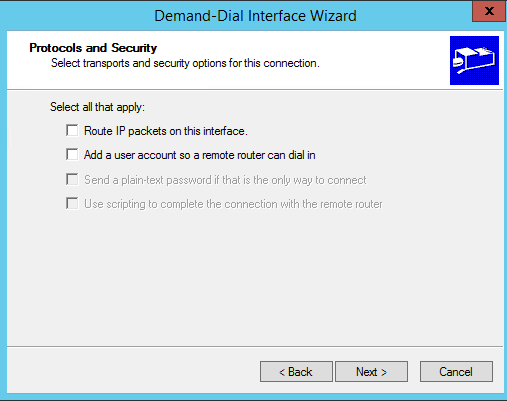
On the next screen ensure you have NOT selected to Route IP packets on this interface. I will show you how to do this later in the case you want to add other routes. Ensure everything else is unselected.
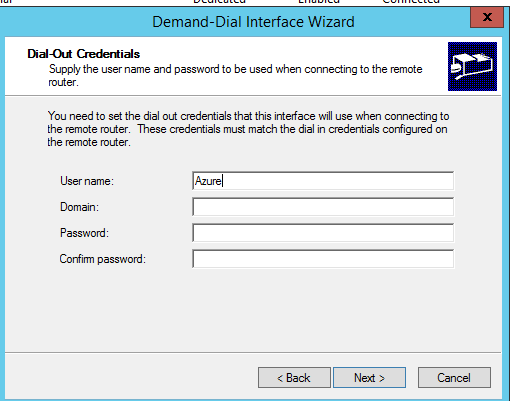
You will be prompted to enter credentials on the following page, however we will be using a pre-shared key so just put in any username to activate the Next button and complete the wizard.
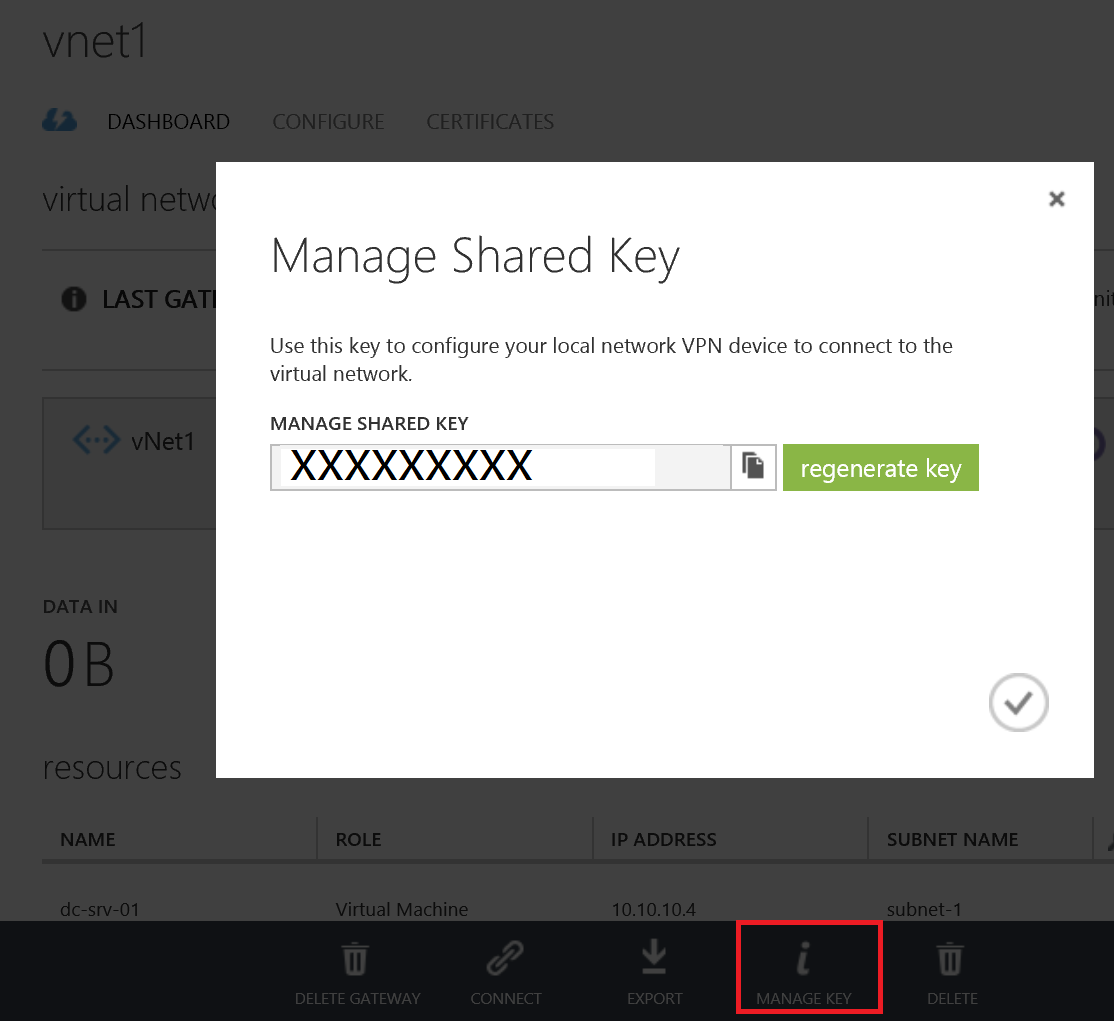
Now we need to obtain our pre-shared key from the Azure Portal. Head over to the portal and go to your Virtual Network Dashboard. At the bottom of the page you will have a Manage Key icon which will pop up the window below. Copy this pre-shared key.
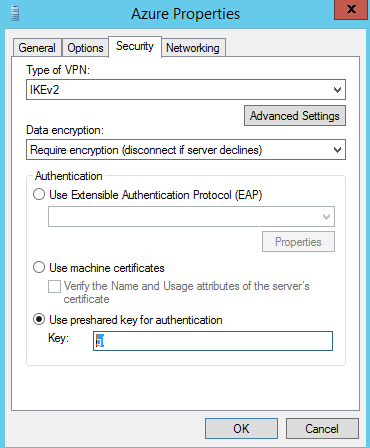
Back on your home lab RRAS VM, right click your new Demand Dial interface and select Properties. Under Security, enter your pre-shared key.
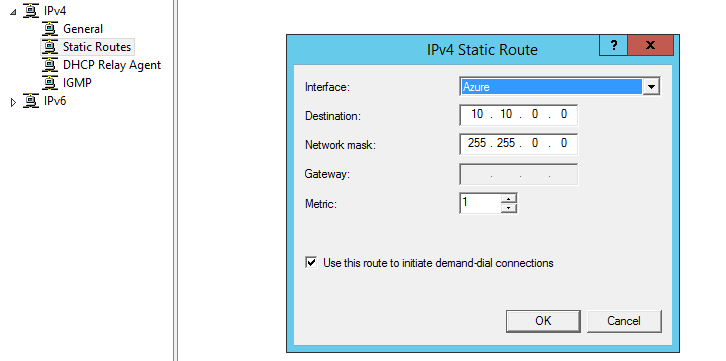
We now need to add a static route so RRAS understands what traffic to route to Azure. We could of added this through the Wizard as mentioned earlier but I prefer to do it manually. Under the IPv4 node right click Static Route and select New Static Route. Ensure your "Azure" interface is selected and specify the network. In my case I have added the 10.10.x.x network and given it a metric of 1 to ensure highest routing priority.
Once this is done go ahead and Connect your interface by right clicking your interface and selecting Connect!

After you confirm your interface is connected in RRAS head over to the Azure dashboard to confirm the same.
Note: if you receive an error from RRAS when connecting to the Azure VPN ensure that your public IP address is still the same as what you specified when creating the Local Network which we did earlier.
Testing connection across the VPN
There's a few ways to test that your connectivity is functioning. Some people use ping, but you need to ensure firewalls are configured appropriately. As I mentioned at the beginning of the article I have spun up a VM in Azure with an IP address of 10.10.10.4. My test will be to open up an RDP session from my home lab RRAS VM to my Azure VM.
BAM! Success
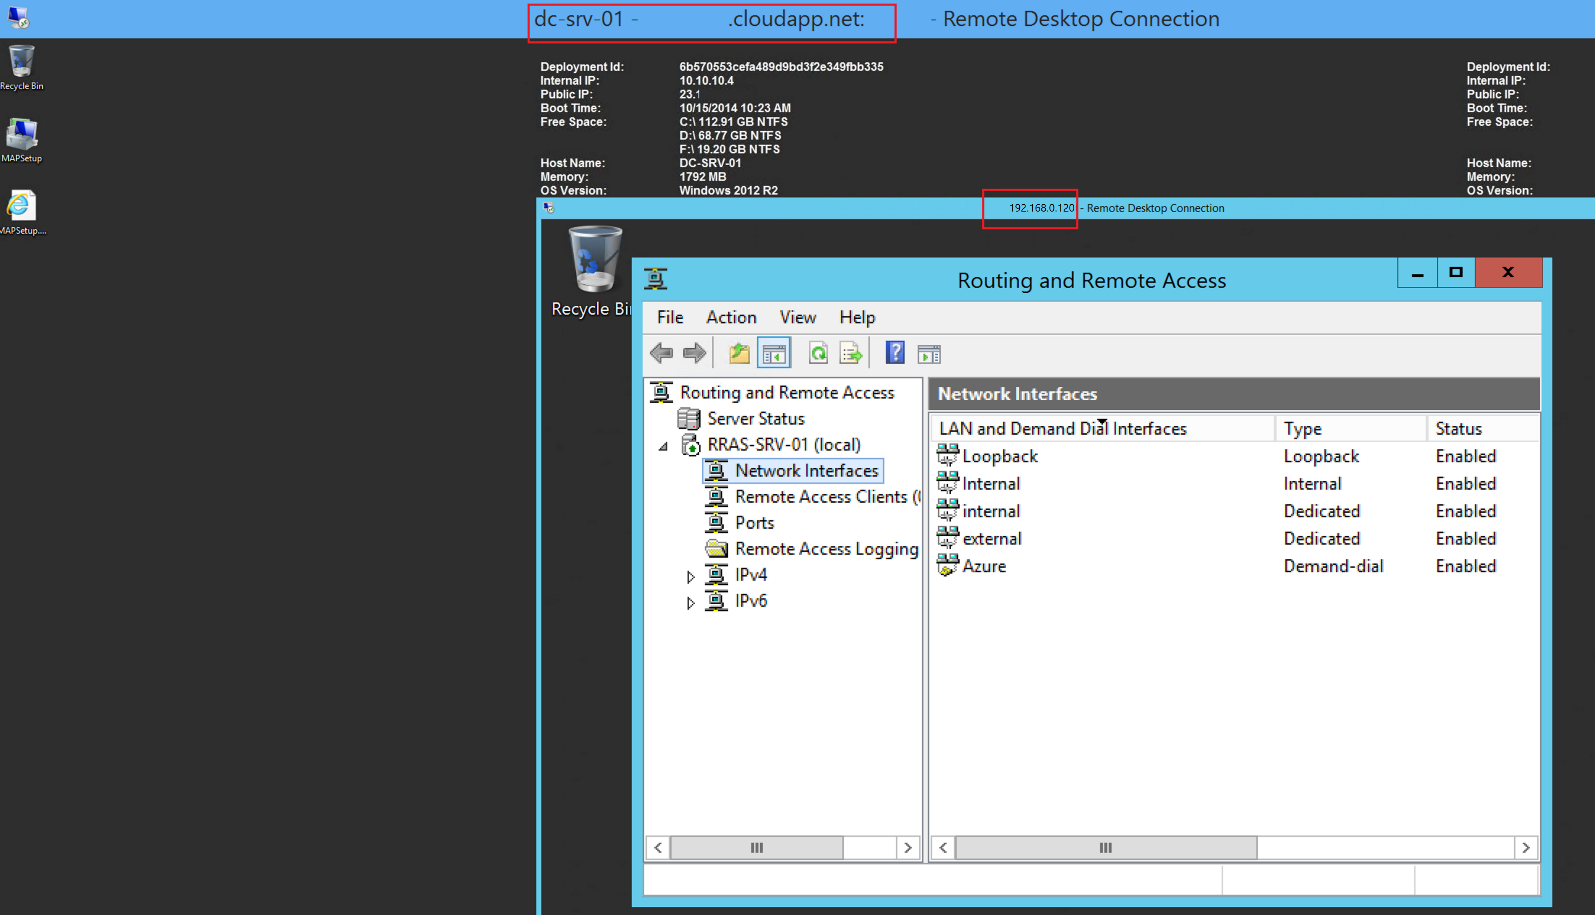
Now let's RDP from the Azure VM to my on-premises RRAS VM. Note I am connecting via the "internal" interface - 192.168.0.120
BAM!
Hope this has been helpful!
Thanks to Matt Hitchcock for reviewing the blog. Matt is a Microsoft Consultant as well as an MVP for Powershell. You can catch his blogs over here: https://sgitpro.com