Note
Access to this page requires authorization. You can try signing in or changing directories.
Access to this page requires authorization. You can try changing directories.
Recently, I have across a scenario where the requirement is to fetch token from "IssuedToken*" active ADFS endpoints. Once application has the token from "IssuedToken*" endpoint, it would have to present the token to backend WCF service application operation invokes.
We went through a lot of hardship to figure out the right binding and ADFS configuration in order to find right solution. Since there is not much public documentation around it, it was a tough goal to achieve.
So, I am just sharing the steps and sample for everyone's benefit.
The whole next set of steps are written with the assumption that application and RP Trust endpoints would be part of same domain. Towards the end, I would clarify for the two domain scenario.
Steps for WCF Service Application
- Launch VS 2012 as an administrator, and create a "WCF Service Application".
- Make your service ready with business logic.
- Right click on the project/ go to Properties/ go to Web tab/ Create virtual directory/ Deploy to IIS.
- Ensure the WCF service is accessible over https.
- Right click on the project, and go to "Identity and Access tool".
- Point to ADFS metadata URL and APP ID URL.
- Let's go to "web.config"
- Ensure to have the following configuration under System.IdentityModel.
 <system.identityModel>
   <identityConfiguration saveBootstrapContext="true">
   <audienceUris>
       <add value="https://aadconnect.contoso.com/Issuedtokenmixedasymmetricbasic256WcfService1/Service1.svc" />
       <add value="https://test1.com/"/>
   </audienceUris>
   <issuerNameRegistry type="System.IdentityModel.Tokens.ValidatingIssuerNameRegistry, System.IdentityModel.Tokens.ValidatingIssuerNameRegistry">
       <authority name="adfs.contoso.com/adfs/services/trust">
           <keys>
               <add thumbprint="567845870C8A0D9BA17503B3B14EC604B95F41AF" />
           </keys>
           <validIssuers>
                <add name="adfs.contoso.com/adfs/services/trust" />
           </validIssuers>
       </authority>
   </issuerNameRegistry>
   <!--certificationValidationMode set to "None" by the the Identity and Access Tool for Visual Studio. For development purposes.-->
   <certificateValidation certificateValidationMode="None" />
</identityConfiguration>
</system.identityModel>
- Update the System.ServiceModel section with "ws2007FederationHttpBinding" for the WCF service endpoint.
 <system.serviceModel>
    <behaviors>
        <serviceBehaviors>
            <behavior>
                <!-- To avoid disclosing metadata information, set the values below to false before deployment -->
                <serviceMetadata httpGetEnabled="true" httpsGetEnabled="true" />
                <!-- To receive exception details in faults for debugging purposes, set the value below to true. Set to false before deployment to avoid disclosing exception information -->
                <serviceDebug includeExceptionDetailInFaults="false" />
                <serviceCredentials useIdentityConfiguration="true">
                     <!--Certificate added by Identity and Access Tool for Visual Studio.-->
                     <serviceCertificate findValue="CN=localhost" storeLocation="LocalMachine" storeName="My" x509FindType="FindBySubjectDistinguishedName" />
                </serviceCredentials>
            </behavior>
        </serviceBehaviors>
     </behaviors>
     <protocolMapping>
          <add scheme="https" binding="ws2007FederationHttpBinding" />
     </protocolMapping>
     <serviceHostingEnvironment aspNetCompatibilityEnabled="true" multipleSiteBindingsEnabled="true" />
     <bindings>
      <ws2007FederationHttpBinding>
        <binding>
          <security mode="TransportWithMessageCredential">
            <message issuedKeyType="BearerKey">
              <issuerMetadata address="https://adfs.contoso.com/adfs/services/trust/mex" />
            </message>
          </security>
        </binding>
      </ws2007FederationHttpBinding>
     </bindings>
</system.serviceModel>
- Ensure WCF service URL is accessible over browser, and https.
Steps for ADFS Provisioning
1)
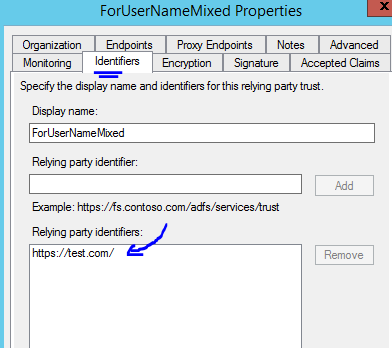
Set up RP Trust with a custom identifier to map the ADFS endpoint '/adfs/services/trust/13/usernamemixed'.
Since it is an active authentication call, there is no need to set up for passive endpoint.
Ensure you use your "ADFS encryption certificate" to encrypt the payload.
Set up the claim rule to fetch info from "Active Directory".
2)
Set up RP Trust with a custom identifier to map the ADFS endpoint '/adfs/services/trust/13/issuedToken*******'.
Since it is an active authentication call, there is no need to set up for passive endpoint.
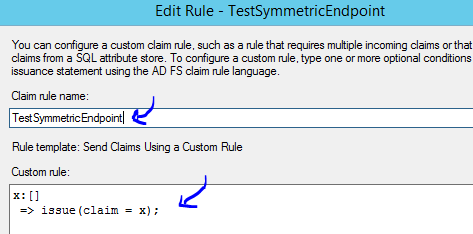
Set up the claim rule as the following:
3)
Set up RP Trust for the WCF service endpoint address.
Since it is an active authentication call, there is no need to set up for passive endpoint.
Set the "Encryption" certificate, to help encrypt the payload from the RP Trust endpoint. The certificate used in this case would be the same "localhost" certificate used on the web server, where WCF service application was hosted. I used a self-signed certificate in my case.
Set up the claim rule like the following for the ADFS RP Trust endpoint.
Steps for Active client application
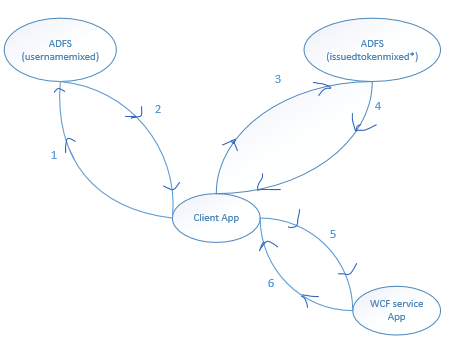
Broadly, we have to perform the following steps (in sequence) on the client application:
- Using "UserNameWSTrustBinding", client gets token from "usernamemixed" ADFS endpoint.
- Using "IssuedTokenWSTrustBinding", client presents the above token to "issuedtokenmixedsymmetricbasic256" ADFS endpoint, and gets a token in response.
- Using "WS2007FederationHttpBinding", the token is presented during the WCF service operation call.
So, on the application side, we need to write the following code.
- Create a console application.
- "Add service reference" to your WCF service endpoint.
- Update your "App.config" with the following appSettings.
 <appSettings>
    <add key="usernamemixedEP" value="https://adfs.contoso.com/adfs/services/trust/13/usernamemixed"/>
    <add key="usernamemixedAppliesTo" value="https://Test.com/"/>
    <!-- You can enable any of the following issuedToken based ADFS endpoints. -->
    <!-- https://adfs.contoso.com/adfs/services/trust/13/issuedtokenmixedsymmetricbasic256 -->
    <!-- https://adfs.contoso.com/adfs/services/trust/13/issuedtokenmixedsymmetricbasic256sha256 -->
    <!-- https://adfs.contoso.com/adfs/services/trust/13/issuedtokenmixedasymmetricbasic256 -->
    <!-- https://adfs.contoso.com/adfs/services/trust/13/issuedtokenmixedasymmetricbasic256sha256 -->
    <add key="issuedtokenEP" value="https://adfs.contoso.com/adfs/services/trust/13/issuedtokenmixedasymmetricbasic256"/>
    <add key="issuedtokenAppliesTo" value="https://test1.com/"/>
    <!-- Set false if SAML 2.0 Assertion expected. Otherwise, let it be true. -->
    <add key="saml10TokenType" value="false"/>
    <add key="username" value="JohnAdmin@contoso.com"/>
    <add key="password" value="Password01!"/>
    <add key="serviceEpAddress" value="https://aadconnect.contoso.com/Issuedtokenmixedasymmetricbasic256WcfService1/Service1.svc"/>
</appSettings>
- The program should be updated with the following source code.
             class Program
           {
               static void Main(string[] args)
             {
                   var tokenType = ConfigurationManager.AppSettings["saml10TokenType"].ToString();
                 bool isSAML10Token;
                 Boolean.TryParse(tokenType, out isSAML10Token);
                 if (isSAML10Token)
                  {
                       tokenType = "urn:oasis:names:tc:SAML:1.0:assertion";
                    }
                   else
                    {
                       tokenType = "urn:oasis:names:tc:SAML:2.0:assertion";
                    }

                    var usernameToken = GetIdentityProviderToken(tokenType);

                    var issuedToken = GetRSTSToken(usernameToken, tokenType);

                    var serviceResponse = CallService_IssuedToken(issuedToken);

                    Console.WriteLine(serviceResponse);
                 Console.ReadLine();
                        }

                private static SecurityToken GetIdentityProviderToken(string tokenType)
             {
                   var binding = new UserNameWSTrustBinding(SecurityMode.TransportWithMessageCredential);

                    var factory = new WSTrustChannelFactory(binding, ConfigurationManager.AppSettings["usernamemixedEP"].ToString())
                    {
                       TrustVersion = TrustVersion.WSTrust13
                   };

                    factory.Credentials.UserName.Password = ConfigurationManager.AppSettings["password"].ToString();
                    factory.Credentials.UserName.UserName = ConfigurationManager.AppSettings["username"].ToString();
                    factory.Credentials.SupportInteractive = false;
                 factory.Credentials.UseIdentityConfiguration = true;

                    var rst = new RequestSecurityToken
                   {
                       RequestType = "docs.oasis-open.org/ws-sx/ws-trust/200512/Issue",
                     AppliesTo = new EndpointReference(ConfigurationManager.AppSettings["usernamemixedAppliesTo"].ToString()),
                       KeyType = "docs.oasis-open.org/ws-sx/ws-trust/200512/SymmetricKey",
                      TokenType = tokenType
                   };

                    var channel = factory.CreateChannel();
                  return channel.Issue(rst);
              }

                   private static SecurityToken GetRSTSToken(SecurityToken token, string tokenType)
                {
                   var binding = new IssuedTokenWSTrustBinding();
                    binding.SecurityMode = SecurityMode.TransportWithMessageCredential;

                    var issuredTokenEP = ConfigurationManager.AppSettings["issuedtokenEP"].ToString();
                  if (issuredTokenEP.ToLower().EndsWith("issuedtokenmixedasymmetricbasic256sha256")
                       || issuredTokenEP.ToLower().EndsWith("issuedtokenmixedsymmetricbasic256sha256"))
                    {
                       binding.AlgorithmSuite = SecurityAlgorithmSuite.Basic256Sha256;
                 }

                    var factory = new WSTrustChannelFactory(binding, issuredTokenEP);
                   factory.TrustVersion = TrustVersion.WSTrust13;
                  factory.Credentials.SupportInteractive = false;
                 factory.Credentials.UseIdentityConfiguration = true;

                    var rst = new RequestSecurityToken
                   {
                       RequestType = "docs.oasis-open.org/ws-sx/ws-trust/200512/Issue",
                     AppliesTo = new EndpointReference(ConfigurationManager.AppSettings["issuedtokenAppliesTo"].ToString()),
                     KeyType = "docs.oasis-open.org/ws-sx/ws-trust/200512/Bearer",
                        TokenType = tokenType,
                  };

                    var channel = factory.CreateChannelWithIssuedToken(token);

                    return channel.Issue(rst);
              }

             private static string CallService_IssuedToken(SecurityToken token)
              {
                   // Creating the channel and calling it
                  var binding = new WS2007FederationHttpBinding(WSFederationHttpSecurityMode.TransportWithMessageCredential);
                  binding.Security.Message.IssuedKeyType = SecurityKeyType.BearerKey;

                    var serviceEpAddress = ConfigurationManager.AppSettings["serviceEpAddress"].ToString();
                 var factory = new ChannelFactory(binding, new EndpointAddress(serviceEpAddress));

                    // Create a channel
                 IService1 client = factory.CreateChannelWithIssuedToken(token);

                    // Invoke the service operation
                 var response = client.GetData(12);
                  ((IClientChannel)client).Close();

                    return response;
                }
                     }
- The bindings such as UserNameWSTrustBinding and IssuedTokenWSTrustBinding are part of WIF V1, i.e. Microsoft.IdentityModel. So, the trick is to port the old code in your application explicitly.
- To keep safe of length of this document, I am not putting the whole code. I would attach the whole source code on OneDrive for reference.
Note
It is just configurable. Change the "appSettings" for appropriate keys to make the code functional.
Two-domain ADFS configuration
Before you create the claims provider trust, you’ll need the following from the IDP:
- Federation service identifier. This is also known as the Issuer or entity-Id
- Public key of the token signing certificate
Next,
1. In the ADFS management console, right click on Claims Provider Trusts then click Add Claims Provider Trust
2. At the Welcome page, click Start
3. At the Select Data Source page, select Enter claims provider trust data manually
4. Click Next
5. At the Specify Display Name page, in the Display name enter a name
6. Click Next
7. At the Configure URL page, in the WS-Federation Passive URL enter any URL as long as it’s https.
8. Click Next
9. At the Configure Identifier page, in the Claims provider trust identifier field enter the Identifier (aka entity-ID) of the identity provider (aka claims provider)
10. Click Next
11. At the Configure Certificates page, click Add
12. Select the token signing certificate from the identity provider
13. Click Next
14. At the Ready to Add Trust page, click Next
15. Click Close
16. Set your claim rules. This can be done now or later
The full sample application is available on OneDrive, and also on GitHub (welcome to clone it and play around).
I hope this helps!


