Note
Access to this page requires authorization. You can try signing in or changing directories.
Access to this page requires authorization. You can try changing directories.
This blog post assumes you are using Visual Studio 2010. However, most of the information is relevant to Visual Studio Team System 2008 Database Edition GDR.
We get a lot of questions from customers for which we answer; use multiple projects (database and/or server). The following canonical examples represent the majority of what customers ask about
Define SQL instance level objects |
For example, define Logins or Linked Servers. |
Organize my code by SQL schema |
For example, one project contains the objects bound to the HumanResources schema and another project contains the objects bound to the Sales schema. |
Organize my code by SQL object type |
For example, one project has all you tables and another project has all of your stored procedures. |
Re-use the code implemented in one project in multiple database designs |
For example you have some diagnostics functionality that you re-use in each of your database designs. |
An important point is that in each of these cases the developer needs to use two part names when referring to objects declared in another project. A similar sounding but very different question is how to use multiple database projects when the developer wants to use three part names or four part names. That is the topic of another blog post. :)
The good news is that Data Dude makes it easy to implement the T-SQL code for the examples I’ve described above. If you implement C# or VB.NET code in Visual Studio you will find that the mechanics of setting up your solution are analogous to referencing assemblies. Customers seem to get confused with two areas
- Creating the initial projects with the objects they want and then defining the references between the various projects
- Deploying multiple projects to a single database.
Before continuing I recommend that you first read this blog post: The pros and cons of Partial Projects and Database Project References for some important background information.
Organize my code by SQL schema
In this walk through I am going to break the AdventureWorks2008 database into projects representing each schema: HumanResources, Person, Production, etc. While it may seem pedantic to do a detailed walk through I find that many developers get stuck at one point or another. So it should be nice to have a relatively complex example that actually works in the end. If you would a walk through of putting together a new, simple database design I suggest you read this White Paper: Collaborative Development with Team System 2008 Database Edition.
These are the steps to the process we’re going to go through
- Create the Visual Studio solution
- Import the database definition into the solution
- Move the schema specific code into each of the projects while leaving any code that refers to multiple schemas in the main project
- Configure the deployment settings in each project and Deploy
Create the Visual Studio solution
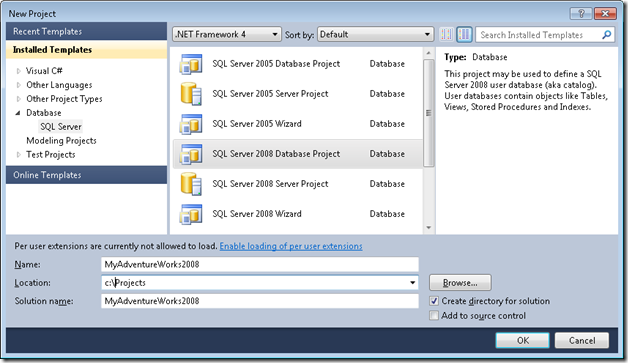
- Create the Visual Studio solution by creating a new SQL Server 2008 Database Project. Name the project and the solution MyAdventureWorks2008.
- Next add the projects to the solution for each of the schema in AdventureWorks2008: HumanResources, Person, Production, Purchasing and Sales
- From the Solution Explorer context menu choose Add \ New Project…
- Provide the project name and click OK
Import the database definition into the solution
There are several ways to do this
- Import the entire database design into one project then move the source files around using Import Script
- Import the entire database design into one project then move the source files around using Add Existing Item…
- Import only the objects we want into the individual projects using Schema Compare
I think the first option is quicker than using Schema Compare so that’s what I’ll use. In future blog posts I’ll use the alternative methods so you can see how the different approaches compare. Throughout this process I’m going to make changes, resolve any errors in the solution, then make the next change. It’s an incremental “get clean, stay clean” sort of approach.
Move source files into the appropriate projects
The key point to understand here is that we are only moving objects that do not refer to other schema into the individual projects. If an object depends on the HumanResources and Person schemas then we leave that object definition in the MyAdventureWorks2008 project. Foreign keys are the most common example of this sort of object definition.
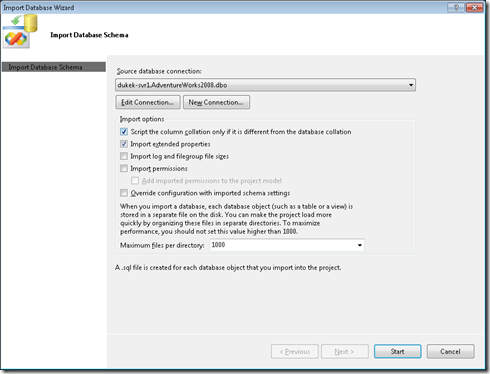
- Import the entire database design into the MyAdventureWorks2008 project
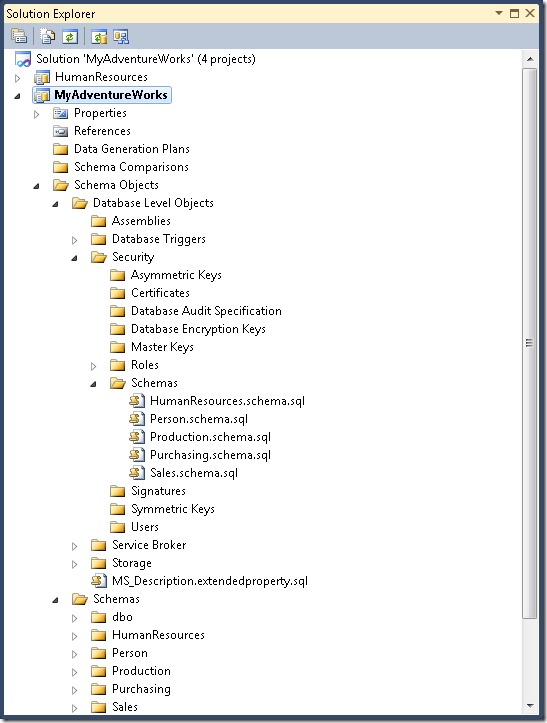
As you can see from the following screenshot the import database process persists the .sql scripts into folders and files with the name of the schema. We want to move the objects in each of the schema that have no relationships with other schema into their respective project.
2. Move the objects bound to the HumanResources schema from the MyAdventureWorks2008 project into the HumanResources project
-
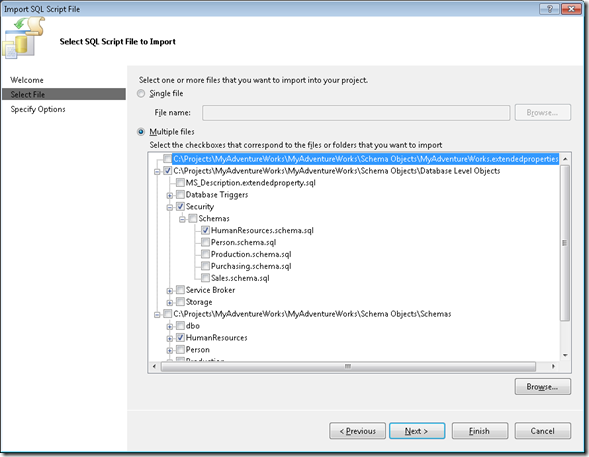
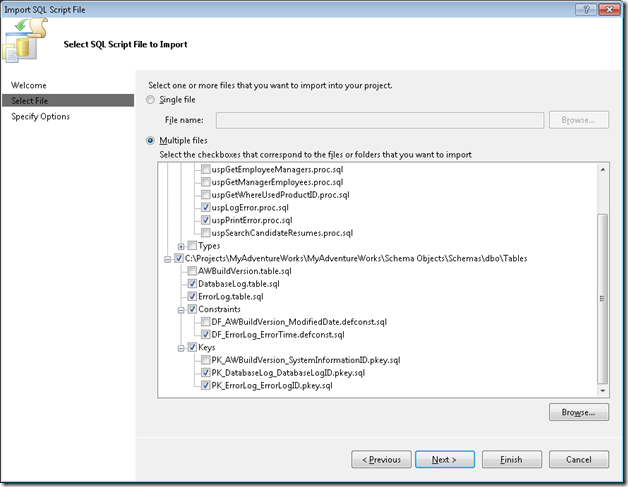
- Right-click the HumanResources project in Solution Explorer and choose Import Script…
- Choose Multiple Files and navigate to the Schema Objects folder of the MyAdventureWorks2008 project.
- Choose the file …\Schema Objects\Database Level Objects\Security\Schemas\HumanResources.schema.sql and everything under …\Schema Objects\Schemas\HumanResources. Click Finish.
Now take a look at the long list of errors in the error list. Yikes, what have we done?
3. Let’s fix the unresolved references to Sql Types first.
-
- Add another project to your solution named SqlTypes
- Using Import Script import the contents of …\Schema Objects\Schemas\dbo\Programmability\Types from your MyAdventureWorks2008 project into your SqlTypes project
- Build the SqlTypes project. It should build successfully.
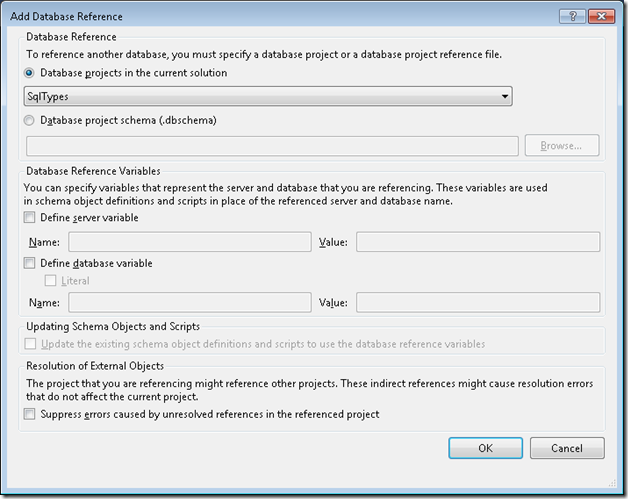
- In your HumanResources project add a Database Reference to the SqlTypes project
- From the project’s context menu select Add Database Reference…
- Select the SqlTypes project
- Click OK
4. Now let’s fix the errors caused by references to objects in other schema. We need to delete these scripts from the HumanResources project. Remove the following files
-
- FK_Employee_Person_BusinessEntityID.fkey.sql
- JobCandidate.fulltextindex.sql
- vEmployee.view.sql
- vEmployeeDepartment.view.sql
- vEmployeeDepartmentHistory.view.sql
At this point all of the errors in the HumanResources project are resolved. We still have a few warnings, however.
5. Add another project to the solution named Diagnostics
6. Using Import Script import the following files from the MyAdventureWorks2008 project into the Diagnostics project. Then build the Diagnostics project. It should build successfully.
-
- uspLogError.proc.sql
- uspPrintError.proc.sql
- DatabaseLog.table.sql
- ErrorLog.table.sql
- DF_ErrorLog_ErrorTime.defconst.sql
- PK_DatabaseLog_DatabaseLogID.pkey.sql
- PK_ErrorLog_ErrorLogID.pkey.sql
7. Now add a Database Reference from the HumanResources project to the Diagnostics project. At this point you should not have any errors or warnings. Sweet!
8. Now add a Database References from the MyAdventureWorks2008 project to the HumanResources, SqlTypes and Diagnostics projects. You should see a bunch of errors. All of these are because all the objects that we moved to the other project are still defined in the MyAdventureWorks2008 project. Fixing this is basically a search and destroy effort. Look at the errors in the error list and remove each file from the MyAdventureWorks2008 project. When you have no errors you are done. :)
9. Repeat the previous steps for the remainder of the schemas.
When you move the objects bound to the [Sales] schema into the Sales project you will find that the function [dbo].[ufnLeadingZeros] is only used in one place – [Sales].[Customer]. Since it is only used in here I chose to move the function into the [Sales] schema. Arguably it belongs in a utility project with the rest of the functions defined in [dbo] so I can reuse the code in other database designs.
-
- In Schema View navigate to the MyAdventureWorks2008 \ Schemas \ dbo \ Programmability \ Functions \ ufnLeadingZeros node
- Select Refactor \ Move to Schema… from the context menu
- Select the [Sales] schema
10. At this point I checked the solution into Source Code Control. That was a lot of work!
Configure the deployment settings in each project
In order to actually deploy our database we need to configure a few settings in each project.
From Solution Explorer
- In the MyAdventureWorks2008 project, open the Database.sqldeployment property file and clear the checkboxes for the DropConstraintsNotInSource and DropIndexesNotInSource settings. We don’t want the constraints and indexes defined in the other projects to be removed when the MyAdventureWorks project is deployed.

- In each project, with the exception of the MyAdventureWorks2008 project, open the Database.sqldeployment file located under the Properties node for the project and clear the Deploy database properties checkbox. There is no reason for each project to cause the database settings to be changed.
- In each project double-click on the Properties node to open the project properties. In the Deploy tab
- Set the Deploy action setting to Create a deployment script (.sql) and deploy to the database.
- Set the Target connection setting to the SQL server instance you will deploy the database to
- Set the Target database name setting to MyAdventureWorks2008.
Deploy
Now attempt to deploy the solution – select Deploy Solution from the solution’s context menu in Solution Explorer. Notice that the Production project fails to deploy and displays the following error in the output window
c:\Projects\MyAdventureWorks\Production\sql\debug\Production.sql(328,0): Error SQL01268: .Net SqlClient Data Provider: Msg 1969, Level 16, State 1, Line 1 Default FILESTREAM filegroup is not available in database 'MyAdventureWorks2008'.
Unfortunately the Data Dude validation engine doesn’t catch this problem at design time. If it had we would have seen an error in the error list. To fix this we have some more code refactoring to do. We’re going to move the definition of the FILESTREAM filegroup and associated file from the MyAdventureWorks project to the Production project.
- Using the same Import Script technique we used previously, import the following files from MyAdventureWorks2008 into the Production project
- …\Schema Objects\Database Level Objects\ Storage\Filegroups\DocumentFileStreamGroup.filegroup.sql
- …\Schema Objects\Database Level Objects\Storage\Files\FileStreamDocuments.sqlfile.sql
- Remove the files from the MyAdventureWorks2008 project. You will get an error because the Default filestream filegroup is set in the Database.sqlsettings file. Fix the error
- Open the Database.sqlsettings file for the MyAdventureWorks2008 project
- For the Default filestream filegroup choose the empty value from the dropdown.
- Now we have to set the Default filestream filegroup for the Production project.
- Open the Database.sqlsettings file for the Production project
- For the Default filestream filegroup choose the value DocumentFilestreamGroup from the dropdown.
Now try to deploy again. It should succeed.
Conclusion
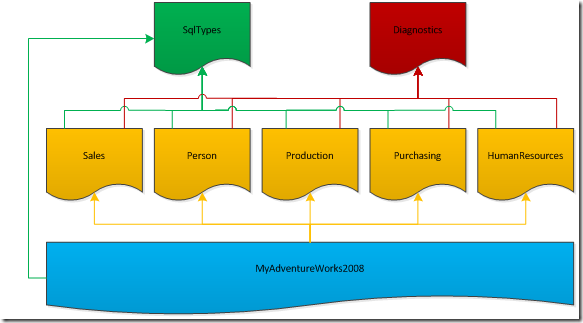
The diagram below describes the solution we have created. The primary purpose of the MyAdventureWorks2008 project is to define referential integrity between tables in the various schema and any application level views that do joins across tables in the various schema. In theory each of the projects other than the MyAdventureWorks project could be re-used in other database designs.
