Charran eHome for 2012 and Beyond
Hi all. It's been some time since I've thought about documenting what has changed in my eHome implementation. Technologies have changed, brought new capabilities and I've changed some techniques since having written my original article about the Charran eHome. The basis of my strategy for accessing media, storing documents and photos as well as being able to access and stream content both inside and outside the home hasn't changed.
In addition, while products have changed, the basis of the architecture remains the same as my original post. What I've done below is to update the diagrams from my first article to include what I do today, including the technologies, interactions between components and how my family and I consume media.
Continued Vision
The basis of vision for my eHome hasn't changed. The underpinning of my vision surrounds a reduction in pain for both me and my wife around how we consume media. I wanted a system that is simple for anyone to consume, responsive, and had a high spousal acceptance factor. Note that by eHome in this article and the last, I refer to digital entertainment systems and purposefully exclude home automation and monitoring systems (simply because I haven't found a good solution for all that yet).
Ubiquitous Access
I really wanted to be able to easily and quickly access high definition audio and music files from anywhere in the house. I didn't want to have long loading or wait times when videos were selected, and I wanted to be able to do everything with a remote control. This includes finding, searching and interacting with video both on the internet and local within the house. I wanted something that my wife and eventually my kids could work with ease and not receive "help me, how do I turn on Toy Story for the kids" calls from my wife while I'm traveling on business.
Elimination of Physical Media
Secondly, I still dislike physical media. Even though it's all digital, its physical which means that in addition to visiting a retail location and picking up a disc, it has the capacity to get lost or damaged. The media is trapped on the disc which means that if I want to consume the media from a centralized location that it will be extremely difficult (for my tastes anyway). Fingerprints, food and toddlers are the enemy of physical media, so I try to eliminate it as much as possible.
Since my last article, I've really taken a componentized view of the infrastructure in the house. As documented below. If we start analyzing the implementation from a bottoms up perspective, you'll get a clear picture of my infrastructure that hosts components like my home server and then transition into how that translates to what my family sees in the living room, or what I am able to do and see on a Windows 8 slate device.
Home Server Hardware Architecture
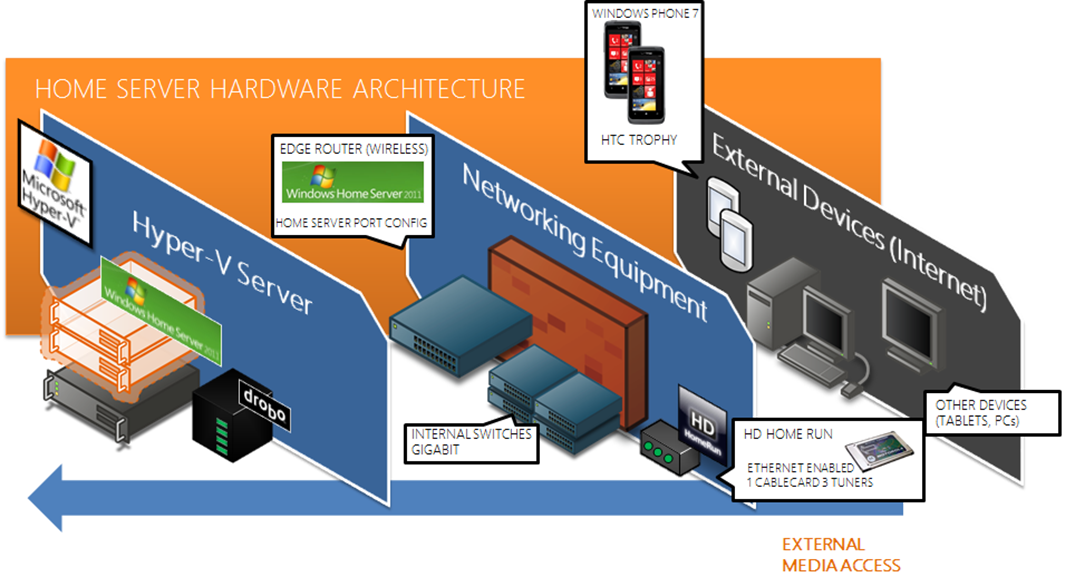
The diagram below describes the basis of my eHome capabilities. I run Windows Home Server 2011 (WHS) from a virtual machine. I used to have a physical machine dedicated to WHS and it continually ran into trouble as a separately physical infrastructure. This included it being prone to power outages, consuming power on its own, requiring a spot on my already crowded UPS, and all the other considerations of a separate physical machine. Using Hyper-V on Windows I was able to consolidate many physical machines that I used to run separately into a single virtual host, allowing me to realize the benefit of physical to virtual consolidation.
From a platform perspective, Windows Home Server has continued to provide me with a wealth of capabilities beyond a simple giant file share where I can stick stuff. Certainly that is a large component of what makes my strategy work, but there are additional elements of functionality that make the scheme work that much better.
As many know. The drive extender capability that enabled JBOD (Just a Bunch of Disks) was removed from Home Server in 2011. As a result, many folks (including myself) were left with pondering the best method of maintaining storage redundancy while upgrading from the previous version. I began to evaluate complex alternatives such as RAID arrays and various vendors that used modified variants thereof. May of those were expensive, or lacked the simple flexibility that I wanted in a redundant array of disks. I also evaluated the various software-driven approaches to recreating the removed drive extender functionality and found that I longed for a simplistic approach that didn't require me to worry about the stability of a software-based disk redundancy scheme.
This is how I settled on the Drobo. Some time ago, this would have been arguably seen as a Home Server competitor in the file storage and redundancy space. However, now, it is a nice supplement that meets all my needs. Drobo does disk redundancy using a RAID variant that was tolerable for me. I'll talk more later about my Drobo configuration when I address the Home Server's disk capacity as I have it configured. The simplistic setup I have now is that the Drobo connects into the Windows Home Server and looks like a giant single drive. The Drobo handles redundancy for me without worry or visibility, which I like. This also is much better from a power consumption perspective for me. To achieve the storage capacity I had with the JBOD approach, I had several independent and independently manufactured USB hard drives, snaked all over the place with separate power supplies, power strips and USB hubs to tie them into my virtual host. I was able to eliminate this with the small Drobo unit.
As depicted above, the Home Server runs in Hyper-V. The Drobo unit is connected physically to the Hyper-V host via USB. In the host, it appears as an unmounted storage volume. Using Hyper-V, I mapped the Drobo disk to the Home Server virtual machine (guest). The Home Server now sees it as a local disk, and I can use the Drobo dashboard to monitor on the Hyper-V host and manage the Drobo, giving me the best of both worlds. Home Server has configured the edge router to allow for the access of the Home Server from outside. Externally I can access the Home Server through the Internet on several device types, including Windows Phone 7 which has an application for using the Home Server (the Home Server also has a mobile-friendly view of the console). This way, I can use the Home Server console to stream photos, music and Recorded TV and movies outside my home to authenticated users on the Internet. It's great when I am in a hotel room and want to watch a show that was recorded at home maybe an hour before.
In addition to the edge router and various internal networking switches that comprise the internal network, I also have an HD Homerun. This is a handy device that allows me to broadcast cable internally across the network through the use of a CableCard. The device has three tuners, which enable me to record up to three programs simultaneously, or have three devices view live HD TV through the device. Because it's using a CableCard, I can see encrypted channels, including HBO, Comedy Central, etc. I'll discuss this at length later in this post.
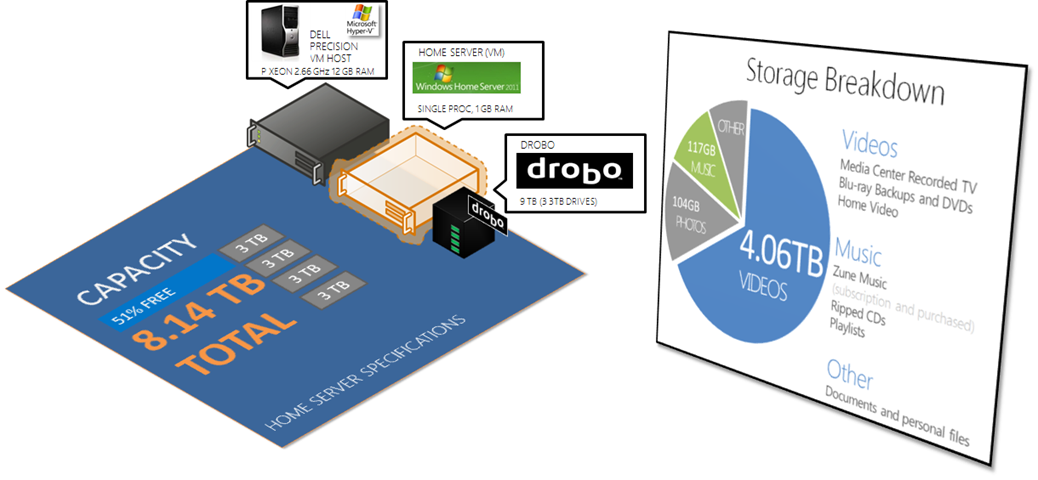
The following diagram is a storage breakdown of the Home Server architecture, with some details about the physical host that I use as my Hyper-V machine as well as how I configured the Windows Home Server guest OS. Note that the processor and RAM allocation is more than sufficient to service the needs that I articulate later in the article. In addition, if I ever need to increase RAM, or change a physical attribute about the Home Server, I can simply make the adjustment through Hyper-V. No crawling around the insides of a physical machine, ordering RAM from an Internet supplier, etc. I can add more RAM from a slate device via remote desktop (if I had really small fingers, but you get the picture)
The Drobo is configured with three 3 TB drives, providing me with a total capacity of 8.14 TB of data and allowing me to expand storage up to 12TB if needed. The great thing is that when I am ready to scale up, I snap in a new drive, and the Drobo does its thing and the Home Server is none the wiser (except it now has more storage to put stuff). Currently I have 51% of that storage free, so I have plenty of room to grow.
Because I have chosen to continue my march towards a non-physical media existence, A large portion of my home storage usage is dedicated to video. This includes recorded TV, and Blu-ray/DVD backups and recorded home video from our cameras, phones and other devices. Note that these are my favorite movies that I have purchased on physical media. The photos and music, while considerable in number (photos are around 15K for example) are only a fraction of my video collection. This is due to the fact that a 1080p video is approximately 8GB (movie only) in .m2ts/ac3 format. I keep our family's favorite movies and TV shows (complete series) on the Home Server.
Movies that we watch/rent and choose not to buy are not part of this storage. When we choose to do streaming (Netflix, Zune or Amazon) we usually do that either on the XBOX or the PC that is connected to the TV. The "other" category includes any software ISOs, installables, purchased software and documents that we store there so we can transition between devices in the house without worrying where we put stuff. This is also supplemented with technologies like SkyDrive.
Consuming Digital Media
So now that you have an understanding of the underpinning architecture for storage and access of the eHome, let's look at the methods we consume services from consuming devices.
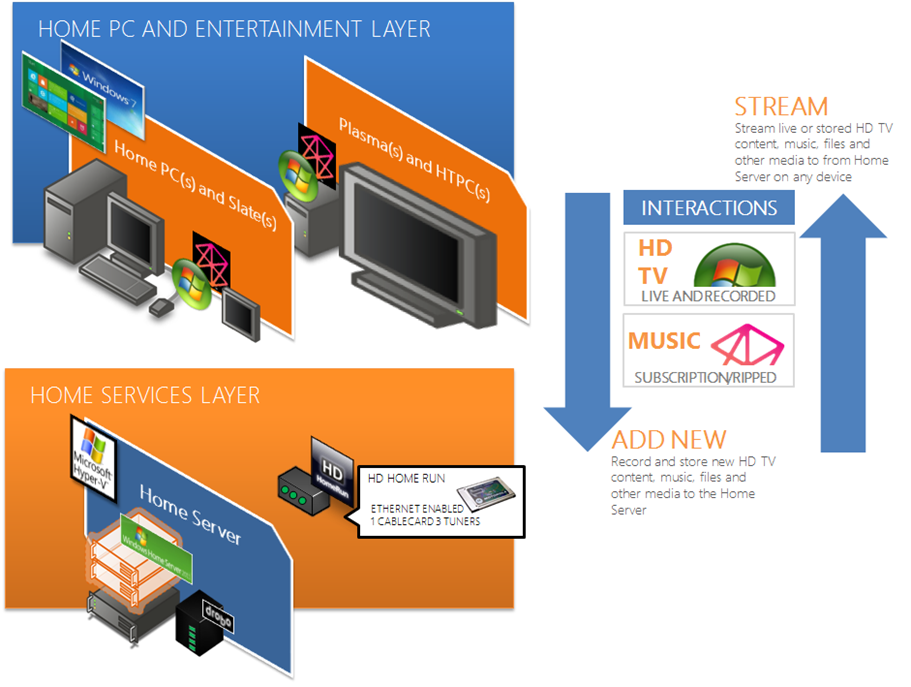
We can divide the eHome into two architectural layers. The consumer layer (blue above) is where the machines and devices reside that rely on and interact with the home services layer (orange above). The home services layer contains the Home Server, infrastructure components and services (i.e., the HD HomeRun) that provide media services to the consuming machines in the consumer layer which my family uses. The consumer layer contains both traditional PCs and laptops that can consume services from the home services layer, as well as home theater PCs (HTPCs) that are attached to large central TVs in my family room and sitting/living room.
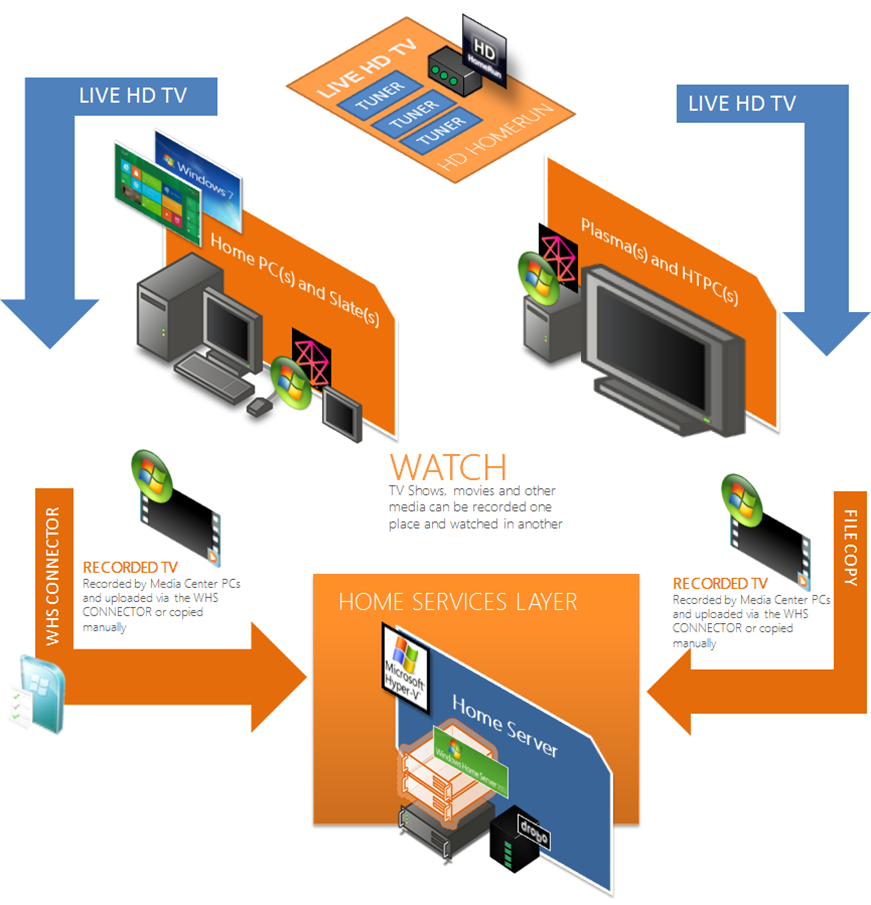
The HTPCs, like their traditional PC and tablet/slate brethren run Windows 7 or Windows 8 and are fully capable PCs. They can view and record live TV, and stream movies, music and photos from the home services layer. For live TV, (including encrypted programing from premium cable channels). Each PC that uses the home services layer has the ability to record from the HD HomeRun and then upload that content manually or automatically using the Windows Home Server Connector.
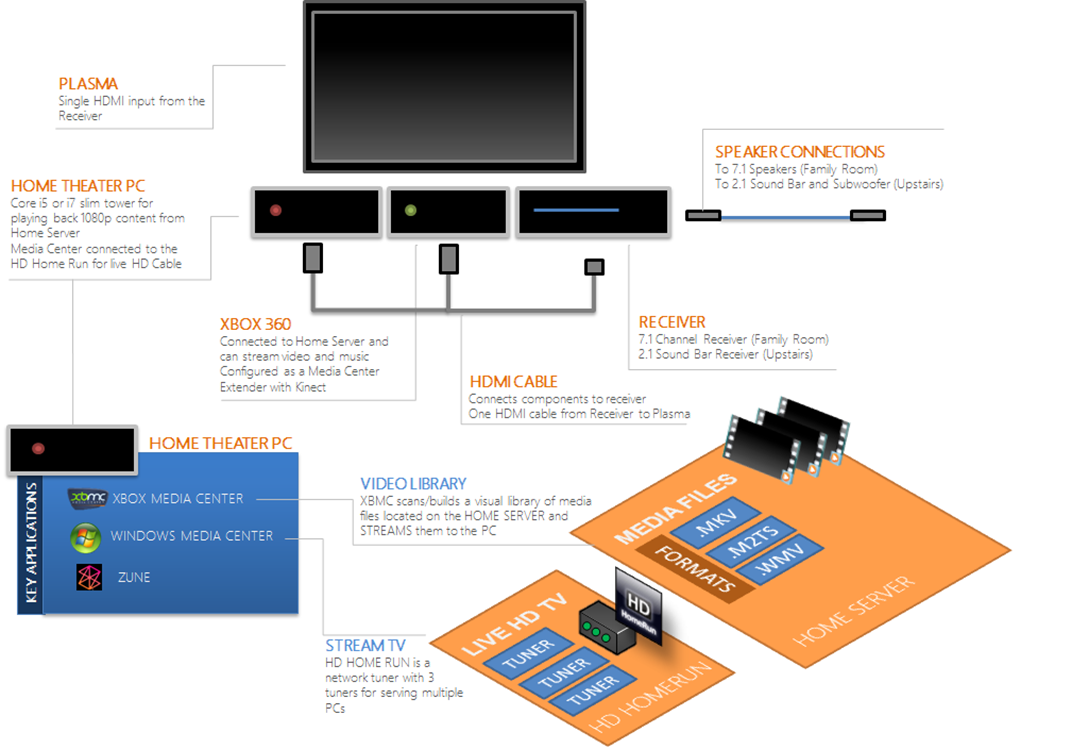
So the configuration of the centerpiece of the home theater is depicted below. Note that with this configuration, I was able to comfortably eliminate my cable boxes/DVRs. The only thing I lose in this process is the ability to consume the cable provider's OnDemand and rental services. I supplement this by renting (if I don't buy and back up the Blu-ray) from online services such as Zune Video, Amazon or others. The HTPC gives me this option of choosing between multiple on demand providers, including even You Tube. I am not a big fan of streaming however. I have found through different devices (even XBOX) that sometimes the initial connection negotiated with the streaming server is nowhere near HD quality and its very difficult to convince the server that you actually do have the bandwidth and deserve to watch it in HD.
As depicted above, the most complicated setup for integrating an HTPC with the family room's entertainment hardware and making it useful is actually quite simple. I used to have a mess of coaxial cables , optical audio wire and power cables snaking behind the entertainment center. After I upgraded my receiver, I was able to reduce that mess to 3 HDMI wires. The key to the setup is acquiring a HTPC that can play 1080p video through the receiver which is connected to the TV via a single HDMI cable (Many stores will try to sell you "high fidelity" HDMI cables, but these cables don't really offer any additional fidelity over the ones you can find on Amazon for super cheap). After trying out several slim and quiet PCs with Atom processors (like the Dell Zinio), I found that if you don't have the perfect balance of drivers, hardware decoder boards and other configurations the machine will cause playback stutter just at the moment your entire family wants to watch a movie. The worst is when you are already watching a moving and a task spins up in the background causing the movie to jitter.
Thus, the configuration of the HTPC depicted above has to be powerful enough so that I won't have to worry about the processor not being able to keep up with the demands of the video playback. The HTPC runs XBMC, Windows Media Center (for recording and displaying live HD TV) and Zune for music. I used to try to run only Windows Media Center for all needs, but the formats that I use, plus the metadata and library capabilities of XBMC currently surpass Media Center. Thus, I use XMBC for browsing and viewing TV shows and movies from the Home Server. I use Media Center for watching and recording TV as it integrates the Home Server's recorded TV library into the interface. This means that any TV recorded by any PC in the house is visible in Windows Media Center any PC. In the diagram below, the process by which live HD TV is recorded and uploaded to the media center is depicted.
The PCs in the house are connected to the HD HomeRun via client component software provided by the manufacturer. These components register the PC with the HD Homerun and allow it to "subscribe" to the tuner. The HD HomeRun is visible on the network so that the PC Windows Media Center software can see the tuner as a virtual cable card. After running through the CableCard registration and configuration process in Windows Media Center, the HTPC is ready to go.
When each PC has recorded a TV program, the Windows Home Server connector uploads the show to the Recorded TV share on the Home Server automatically, or I manually copy the file (for machines that I don't have registered with the Home Server).
Transcoding and Storage of Media
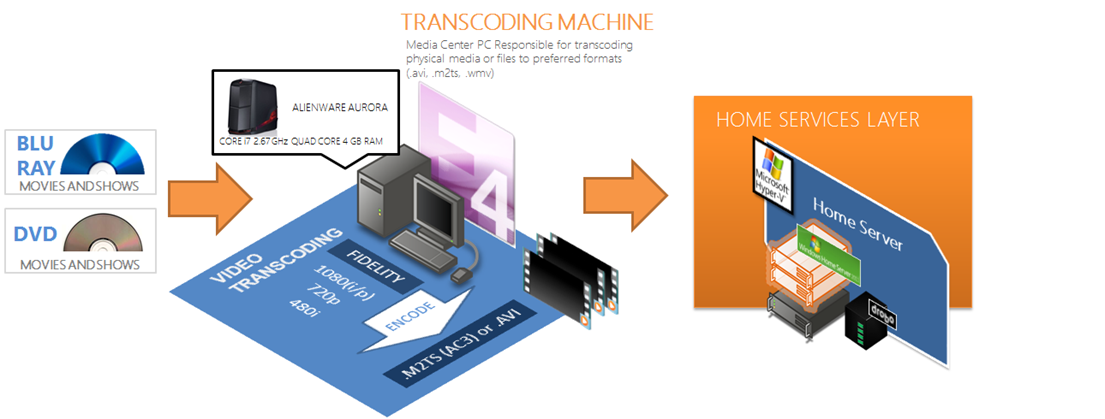
In the previous diagram above, the file formats are represented as some of the most commonly used and stored media types. The next step is to document the process by which the media gets into that format and up to the Home Server for the client PCs to consume.
Below is the process by which that happens.
So the frontline in my war against physical media is a high powered transcoding PC. This is my primary desktop and by design is a high powered machine that happens to be perfect for the processor intensive nature of video transcoding. One this machine, in addition to recording live HD TV, I transcode DVD and Blu-ray movies into formats that can easily be rendered in Windows with ease. These files can then be indexed by Windows Media Center and XBMC for simple viewing. I can also take these files with me on laptops or other devices for viewing away from home (like on a plane or trip).
I use Expression Encoder 4 among other programs to take the video and audio streams and combine them into a single file container. This is a processor intensive activity and some movies can take time to do. Encoder's batch processing model works extremely well for this. I then use a simple Robocopy to move the file sup to the Home Server.
Remote Control
For the system to be successful, I couldn't have a gang of remotes laying about. Thus, to control the system, I usually have a single remote control that can address everything. For the remote control to work, I purchased two Harmony remotes. These remotes allow for the creation of "macros" and provide a web-based programming interface to establish unique and meaningful menu choices like "Watch TV", "Watch a Movie", or "Play XBOX". The following outlines what each of those do in my setup. For this to work I had to have a USB tuner for Windows Media Center attached to each HTPC.
Macro |
Actions |
| Watch TV | Turns on the receiver Turns on the TV Sets the receiver to PC input Launches Windows Media Center |
| Watch a Movie | Turns on the receiver Turns on the TV Sets the receiver to PC input Launches XBMC (future, right now its always running) |
| Play XBOX | Turns on the receiver Turns on the TV Turns on the XBOX |
The remote is smart enough to understand the state of the devices and make corrections if necessary. For example, if someone turned the TV off manually and the remote was unaware, you just have to hit the "help" button and it guides you through a wizard of what might not be working. This works amazingly well.
In addition to the remote, when you absolutely need to have deeper input interaction with the HTPC (it is a PC after all) I have a Bluetooth or wireless keyboard and mouse positioned nearby. In my family room, its beneath an end table and we rarely take it out, unless we are watching something through a browser which is rarely.
Backup Strategies
There was a time where I lost some photos once and I swore never to let it happen again. In addition to my own private cloud in my house, I attempt to use the public cloud wherever possible and affordable. Lets face it. My house, even though it has centralized redundant storage is not a data center. As such, I want a level of comfort that my most valuable assets, in addition to being available locally, are available and stored off site.
Photos
For my photos, I use Windows Live Photo Gallery to connect to the photos directory on the Home Server and upload them to a Flickr pro account. With unlimited storage and now providing support for video, its an easy choice. It’s a manual process though, which means I have to keep on top of it as I get photos from the cameras or our phones.
Our phones automatically back up any picture taken to SkyDrive, in addition to copying them over on a sync with a desktop into the photos collection which ultimately winds up on the Home Server and then migrates naturally to Flickr.
Documents
For our documents, I push the family to at a minimum use the documents share on the Home Server. This is also a good place to store documents that I'm not comfortable storing on a consumer-based public cloud. This includes files like my financial management software database and other scanned documents like tax returns, etc. I have a folder there for each user. However, the best place to put our documents is on SkyDrive. We have ready access for all document types via Mesh and the web interface as well as the ability to pull down and modify the documents via Windows Phone.
The Future
So that's the current state of things. I would love to see the next step be a nicely integrated framework for home automation and control. I'm still doing research in this area before I commit to choosing a technology. I would also eventually like to integrate a web cam monitoring network into a single interface.
Till next time!
