Note
Access to this page requires authorization. You can try signing in or changing directories.
Access to this page requires authorization. You can try changing directories.
When I was first learning game programming, I remember alpha blending being a bit of a mystery. I wanted to use alpha blending to make transparent particles for some cool explosions. Sounds simple enough – but as anyone who’s tried it before can tell you, it’s not as simple as just enabling alpha blending and then just trusting things to draw “correctly.” I’m going to try to explain a little bit about how alpha blending and the depth buffer work, and why you should care about the depth buffer at all. This'll be aimed towards XNA programmers, but the concepts I'm explaining hold true for DirectX and OpenGL as well. (After all, they're all talking to the same hardware.)
I’m assuming that most people doing 2D games are going to be using SpriteBatch, which takes care of a lot of this for you. For those people, this explanation won’t really be that immediately useful, but it’s always nice to know what’s going on under the hood. It’s important to know why you should depth-sort the sprites you draw using SpriteBatch, too.
First off, let’s see what the graphics card is actually doing. When most people think alpha blending, they think transparency, but the hardware is actually capable of more than just that. Let’s say we’ve just cleared our frame buffer to black with 1 alpha, so every pixel is currently set to the RGBA value (0, 0, 0, 1). Now I’m drawing something on top of that, let’s say it’s a white pixel with ¾ alpha (1, 1, 1, .75). How does the graphics card combine those two pixels? If alpha blending is turned on, the hardware uses the blend function to blend the two pixels together, resulting in the final pixel. There’s several blend functions to choose from, but here’s the most common one:
FinalColor = (SourceColor * SourceBlend) + (DestinationColor * DestinationBlend)
What’s all this craziness? FinalColor is the color that’s going to end up in the frame buffer. SourceColor is the pixel that needs to blended – in our case that’s the white one. DestinationColor is the pixel that’s currently in the frame buffer – that’s the black one. SourceBlend and DestinationBlend, the two left over, are things the programmer gets to tweak. This equation is actually done for every color component (R,G,B,A) separately, so really it’s more like:
FinalColorR = (SourceColorR * SourceBlendR) + (DestinationColorR * DestinationBlendR)
FinalColorG = (SourceColorG * SourceBlendG) + (DestinationColorG * DestinationBlendG)
FinalColorB = (SourceColorB * SourceBlendB) + (DestinationColorB * DestinationBlendB)
FinalColorA = (SourceColorA * SourceBlendA) + (DestinationColorA * DestinationBlendA)
For both the colors in our example, though, the RGB values are all the same. This way, I can get away with explaining using the simplified version.
The different options for SourceBlend and DestinationBlend are available on GraphicsDevice.RenderState.SourceBlend and GraphicsDevice.RenderState.DestinationBlend, and there are a slew of different options. The most common setup is setting SourceBlend to SourceAlpha, and DestinationBlend to InverseSourceAlpha. This gives you the “transparent” effect that everyone thinks of when they hear alpha. Let’s insert those into that magic equation for our white and black pixels and see how it works.
FinalColor = (SourceColor * SourceBlend) + (DestinationColor * DestinationBlend)
FinalColor = (SourceColor * SourceAlpha) + (DestinationColor * InverseSourceAlpha)
FinalColor = (White * SourceAlpha) + (Black * (1 – SourceAlpha))
FinalColor = (White * .75) + (Black * (1 - .75))
FinalColor = (White * .75) + (Black * .25)
FinalColor = (1 * .75) + (0 * .25)
FinalColor = .75
Using those parameters, as SourceAlpha increases, SourceColor becomes more and more “important” when determining the final color. DestinationColor becomes less and less important. If source alpha is .25, 25% of the resulting color comes from source color, and 75% comes from what’s already been drawn. This setup is intuitive, which is why it’s the most popular. It’s pretty easy to wrap your head around alpha meaning opacity, though the alpha values for any number of other things.
Unfortunately, getting alpha blending working right is more complicated than just setting up the correct source and destination blend values. To see why, you’ll need to understand a bit about how the depth buffer works. Here’s an excerpt from the Wikipedia page that explains it pretty well:
“When an object is rendered by a 3D graphics card, the depth of a generated pixel (z coordinate) is stored in a buffer (the z-buffer or depth buffer). This buffer is usually arranged as a two-dimensional array (x-y) with one element for each screen pixel. If another object of the scene must be rendered in the same pixel, the graphics card compares the two depths and chooses the one closer to the observer. The chosen depth is then saved to the z-buffer, replacing the old one. In the end, the z-buffer will allow the graphics card to correctly reproduce the usual depth perception: a close object hides a farther one. This is called z-culling.”
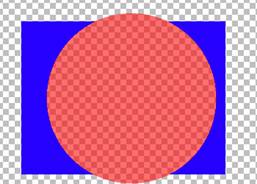
Why is the depth buffer important? Let’s say I have two objects I want to draw: a transparent circle, and an opaque rectangle. The circle is in front of the rectangle (closer to the camera.) The “correct” result would be the rectangle showing through the circle, since the circle is transparent:

Think about what happens when I draw the circle first, then the rectangle, though. When the circle is drawn, its depth value is written into the depth buffer. Then, when I draw the rectangle, it’ll fail the depth test, since it is behind the circle. The final result would come out looking like this:
This is the trickiest thing about getting alpha blending right. Making “transparent” objects isn’t just as simple as turning on alpha blending; in order to always get the right result, you need your program to have some control over the order in which things are drawn. First, you draw all your opaque objects. Next, you sort all your transparent objects based on how far away from the camera they are. Once they are sorted, draw them in order, back to front. That way, transparent objects can’t obscure anything that they shouldn’t, like the circle did the rectangle in the example above. For those of you using SpriteBatch to draw transparent sprites, this is why you should call SpriteBatch.Begin with the SpriteSortMode BackToFront, and use the overloads of SpriteBatch.Draw that take the layerDepth parameter. (Note that you only want to do BackToFront when you're actually drawing transparent sprites; there's no reason to make SpriteBatch sort all your sprites if you're not doing transparency!)
So, I think I’m going to stop here for now. I want to write more, but this’ll probably be easier to digest in separate parts. Next time I want to write some more about different tricks you can do to avoid depth sorting your objects. I'll also try to write about some of the other blend functions, and the different effects you can get with different and source and destination blend parameters.
Comments
Anonymous
December 07, 2006
PingBack from http://sharky.bluecog.co.nz/?p=103Anonymous
December 12, 2006
good job! keep 'em coming!Anonymous
May 30, 2007
So today while I was riding the MAX to and from work I was reading some great articles from the CornflowerAnonymous
February 20, 2008
转自:http://blogs.msdn.com/etayrien/archive/2006/12/07/alpha-blending-part-3.aspx Ok,inthispostI'...