Note
Access to this page requires authorization. You can try signing in or changing directories.
Access to this page requires authorization. You can try changing directories.
This post is the second part of a series of posts chronicling my (mis)adventures learning Python and Django, and using them to integrate with Office 365. This extends the sample app from Part 1 to add CRUD operations with the Contacts API.
When I left off in Part 1, I had a working Python/Django app that was able to retrieve an OAuth2 access token from Azure AD. Now it's time to take that token and do something interesting with it! In this post, I tackle calling the Contacts API.
Fixing the view
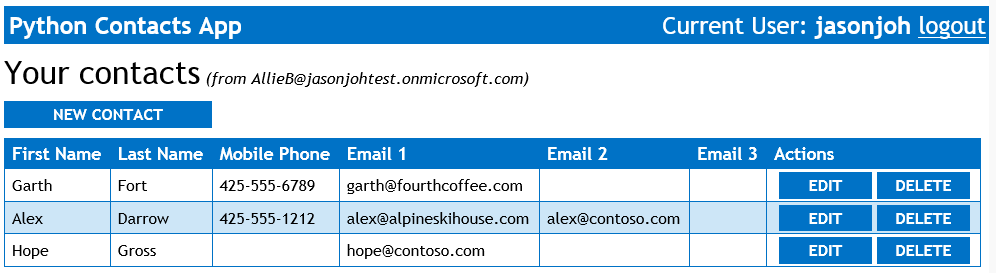
The index view from Part 1 just showed the access token in base64 format. That's not what we want, so we need to do a bit of work on the index view. The end goal is to show something along these lines:
Instead of just passing the access token, we want to pass a list of contacts. So the first thing was to define a DisplayContact class (in models.py) to represent the bits of the contacts that we're going to work with:
class DisplayContact:
given_name = ''
last_name = ''
mobile_phone = ''
email1_address = ''
email1_name = ''
email2_address = ''
email2_name = ''
email3_address = ''
email3_name = ''
id = ''
I also added a function (load_json) to that class to initialize itself from the JSON returned from the Contacts API, and another function (get_json) to generate the JSON that the Contacts API expects when creating or updating a contact.
Now the app needs to actually get that JSON. In o365service.py, I added a function called get_contacts. The version on GitHub has a lot of logging added, but here's a stripped down version without logging, so you can see how straightforward this really is:
def get_contacts(contact_endpoint, token, parameters):
headers = { 'Authorization' : 'Bearer {0}'.format(token),
'Accept' : 'application/json' }
get_contacts = '{0}/Me/Contacts'.format(contact_endpoint)
if (not parameters is None):
get_contacts = '{0}{1}'.format(get_contacts, parameters)
r = requests.get(get_contacts, headers = headers)
if (r.status_code == requests.codes.unauthorized):
return None
return r.json()
You may have noticed the "parameters" parameter to the function, and maybe you're wondering what that's for. That is an optional parameter used to specify OData query parameters. When I call this function from the index view in views.py, I actually pass "?$select=GivenName,Surname,MobilePhone1,EmailAddresses". If you compare with the fields in the DisplayContact class, you'll notice that they match up. By using the $select parameter, I'm asking the server only to send me the fields I care about, and reducing the size of the response payload.
Doing more than just read
So now the app can get all the contacts from the server and display them. Time to move on to the other operations: Create, Update, and Delete.
Delete
To implement delete, I created a "delete" action in views.py that takes the contact ID as a parameter. I then created a delete_contact function in o365service.py which is very similar to the get_contacts function. Using the Django template language I added a Delete button to each contact entry in the table, with a link to the "delete" action that includes the contact's ID as a parameter.
Edit
To implement edit, I followed a similar pattern. I created an "update" action in views.py, and an update_contact function in o365service.py. I also added an Edit button to each contact in the table. The one difference was that for edit, we need to actually display a new UI to show all the fields and allow the user to change them. For that, I added an "edit" view in views.py and a get_contact_by_id function in o365service.py. This view calls the get_contact_by_id method to load the contact, then renders the details.html template, which is basically an HTML form. The submit action on the form calls the "update" action.
Create
Create follows a similar pattern as Edit. There's a view called "new", and an action called "create", both in views.py. The "new" view renders the same template (details.html) as the "edit" view. Through the magic of the Django template language, the submit action for the form changes to the "create" action when the template is rendered with a null DisplayContact. The "create" action calls the create_contact function in o365service.py.
Modifying the EmailAddresses property
I found some interesting "quirks" when working with the EmailAddresses property. If you've looked at a JSON response, you may have noticed that the EmailAddresses property is an array of 3 Microsoft.OutlookServices.EmailAddress objects. These correspond to the "Email", "Email 2", and "Email 3" entries on Outlook Web App, in order. Empty entries will come back as "null" in the response. When you're writing to this property, the null entries matter!
When you're updating the property, you'll want to be careful to achieve the desired result. For example, if there currently exists just one entry, and you want to add a second entry, you need to update the property with the original entry, followed by the new entry, followed by null. If you just send the new entry, it will overwrite the old one!
However, when you're creating a new contact, you cannot include null entries. Doing so will result in a 500 HTTP error. This means you can't create a contact with "Email" blank and "Email 2" filled in, if that's your goal. You can however update the contact to move "Email" to "Email 2", if you really want to.
Get the code
The updated code is posted on GitHub. As always, I'd love to hear your feedback in the comments or on Twitter (@JasonJohMSFT).