Developing Business Central Extensions (part 5) - YAML
This is part 5 of a blog post series. Part 1 contains all the prerequisites, part 2 is about cloning the project and get your sandbox environment up running, part 3 is about build agents, and building your project in Azure DevOps and part 4 is about branch policies and working with VSCode and Git.
YAML, or not YAML, that's the question!
In part 3 of this blog post series, we created a build pipeline based on a file called CI.yml. This file is using YAML to describe the build pipeline and is actually very easy to read if you open it in VS Code.
I actually did not start out using YAML, I started out using the visual designer to create and work on my build pipeline and for some time, I was arguing with myself which approach would be the best. The Visual Designer has some obvious advantages for newbies like me, but YAML seemed to be the right way when I want to have the build pipeline saved as part of the repo (as code) and be able to transfer this to other repositories.
There are other reasons why one would need to use the Visual Designer, so it is really up to you whether you want to go with YAML or the Visual Designer.
I have included a few reasons for and reasons against using YAML, then you can decide for yourself. In this blog post I will also describe how you within 15 minutes can convert the CI YAML pipeline to a Visual Designer Pipeline - it is really just a lot of Copy/Paste work.
Reasons for using YAML
- You like code and markup editing over visual designer editing (wysiwyg)
- Pipeline is checked in as a file in code and follows branching and forking
- Changes to code and changes to pipeline can be checked in together as part of a pull request
- I have not found a good way to reuse a build pipeline created using the visual designer across projects
- The export format from the Visual Designer (.json) is very much tied to the repository and the branch and doesn't seem suited to be used as a template
- Saving the pipeline as a template also doesn't make the template available in other projects
Reasons against using YAML
- You like visual designer editing (wysiwyg) over code and hate markup editing
- If your source code isn't stored in Azure DevOps (could be GitHub, Subversion, Bitbucket or external Git), then you cannot use Yaml
- If a change to the code requires a change in the pipeline, you will have to hand-carry the change into the repo
- Steep learning curve creating your first YAML pipeline (if you don't have the sample from the template repo)
Whether you use the Visual Designer or YAML, you can save the pipeline as a template and reuse it, but it is still not reusable in other repositories.
YAML isn't YAML
As I wrote earlier, I started out using the Visual Designer and switched to YAML.
I thought conversion would be as easy as clicking View YAML on my Visual Designer pipeline but when things sounds to good to be true,. they usually are. There seem to be a bug (or maybe it is only when using PowerShell tasks). The YAML I got out of my Visual pipeline couldn't be imported later. Instead of waiting for somebody to fix the bug, I did a manual conversion and now my master is in YAML.
A full description of the YAML format is available here:
very very helpful when converting and coding in YAML.
CI.yml
While writing this blog post, the CI.yml file looks like this:
 resources:
- repo: self

steps:
- task: PowerShell@2
  displayName: 'Defaulting container version'
  inputs:
    errorActionPreference: silentlyContinue
    targetType: inline
    script: 'if ("$(version)" -eq "")  { Write-Host "Version not defined, using current container version"; Write-Host "##vso[task.setvariable variable=version]current" } else { Write-Host "Using $(version) container version" }'

- task: PowerShell@2
  displayName: 'Login to bcinsider repository'
  condition: and(succeeded(),or(eq(variables['version'],'nextminor'),eq(variables['version'],'nextmajor')))
  inputs:
    targetType: inline
    script: 'docker login "bcinsider.azurecr.io" -u "$(bcInsiderUsername)" -p "$(bcinsiderPassword)"'

- task: PowerShell@2
  displayName: 'Install NavContainerHelper'
  inputs:
    targetType: filePath
    filePath: 'scripts\Install-NavContainerHelper.ps1'

- task: PowerShell@2
  displayName: 'Create Build Container'
  inputs:
    targetType: filePath
    filePath: 'scripts\Create-Container.ps1'
    arguments: '-version "$(version)" -credential ([PSCredential]::new("$(Username)", (ConvertTo-SecureString -String "$(Password)" -AsPlainText -Force))) -licenseFile "$(LicenseFile)"'

- task: PowerShell@2
  displayName: 'Compile App'
  inputs:
    targetType: filePath
    filePath: 'scripts\Compile-App.ps1'
    arguments: '-version "$(version)" -credential ([PSCredential]::new("$(Username)", (ConvertTo-SecureString -String "$(Password)" -AsPlainText -Force))) -buildProjectFolder "$(Build.Repository.LocalPath)" -buildArtifactFolder "$(Build.ArtifactStagingDirectory)" -appFolders @("app")'
    failOnStderr: true

- task: PowerShell@2
  displayName: 'Sign App'
  condition: and(succeeded(),ne(variables['CodeSignPfxFile'],''),ne(variables['CodeSignPfxPassword'],''))
  inputs:
    targetType: filePath
    filePath: 'scripts\Sign-App.ps1'
    arguments: '-version "$(version)" -credential ([PSCredential]::new("$(Username)", (ConvertTo-SecureString -String "$(Password)" -AsPlainText -Force))) -buildArtifactFolder "$(Build.ArtifactStagingDirectory)" -appFolders @("app") -PfxFile (ConvertTo-SecureString -String "$(CodeSignPfxFile)" -AsPlainText -Force) -PfxPassword (ConvertTo-SecureString -String "$(CodeSignPfxPassword)" -AsPlainText -Force)'

- task: PowerShell@2
  displayName: 'Publish App'
  inputs:
    targetType: filePath
    filePath: 'scripts\Publish-App.ps1'
    arguments: '-version "$(version)" -credential ([PSCredential]::new("$(Username)", (ConvertTo-SecureString -String "$(Password)" -AsPlainText -Force))) -buildArtifactFolder "$(Build.ArtifactStagingDirectory)" -appFolders @("app") -skipVerification:("$(CodeSignPfxFile)$(CodeSignPfxPassword)" -eq "")'

- task: PowerShell@2
  displayName: 'Import TestToolkit'
  inputs:
    targetType: filePath
    filePath: 'scripts\Import-TestToolkit.ps1'
    arguments: '-version "$(version)" -credential ([PSCredential]::new("$(Username)", (ConvertTo-SecureString -String "$(Password)" -AsPlainText -Force)))'

- task: PowerShell@2
  displayName: 'Compile Test App'
  inputs:
    targetType: filePath
    filePath: 'scripts\Compile-App.ps1'
    arguments: '-version "$(version)" -credential ([PSCredential]::new("$(Username)", (ConvertTo-SecureString -String "$(Password)" -AsPlainText -Force))) -buildProjectFolder "$(Build.Repository.LocalPath)" -buildArtifactFolder "$(Build.ArtifactStagingDirectory)" -appFolders @("test")'
    failOnStderr: true

- task: PowerShell@2
  displayName: 'Publish Test App'
  inputs:
    targetType: filePath
    filePath: 'scripts\Publish-App.ps1'
    arguments: '-version "$(version)" -credential ([PSCredential]::new("$(Username)", (ConvertTo-SecureString -String "$(Password)" -AsPlainText -Force))) -buildArtifactFolder "$(Build.ArtifactStagingDirectory)" -appFolders @("test") -skipVerification'

- task: PowerShell@2
  displayName: 'Run Tests'
  inputs:
    targetType: filePath
    filePath: 'scripts\Run-Tests.ps1'
    arguments: '-version "$(version)" -credential ([PSCredential]::new("$(Username)", (ConvertTo-SecureString -String "$(Password)" -AsPlainText -Force))) -TestResultsFile (Join-Path "$(System.DefaultWorkingDirectory)" "TestResults.xml") -test "unittests"'

- task: PublishTestResults@2
  displayName: 'Publish Test Results'
  inputs:
    testResultsFormat: XUnit
    testResultsFiles: TestResults.xml

- task: PublishBuildArtifacts@1
  displayName: 'Publish Artifact: app'
  inputs:
    PathtoPublish: '$(Build.ArtifactStagingDirectory)\app'
    ArtifactName: app

- task: PowerShell@2
  displayName: 'Remove Build Container'
  condition: always()
  inputs:
    targetType: filePath
    filePath: 'scripts\Remove-Container.ps1'
    arguments: '-version "$(version)" -credential ([PSCredential]::new("$(Username)", (ConvertTo-SecureString -String "$(Password)" -AsPlainText -Force)))'
Very straightforward. As you can see, the YAML file consists of a series of tasks.
Every task has a type, a version, a display name, conditions and a number of properties.
If the Task is a PowerShell task, then it can be an inline script, meaning that it contains the PowerShell code directly or it can be a filePath, where it references a PowerShell script in the repository. If you are using filePath, you can specify a number of parameters to transfer to the script.
The script will have to have a Param section, matching the parameters from the build pipeline.
Example, the Param section of the Create-Container script looks like:
 Param(
    [ValidateSet('AzureDevOps','Local')]
    [string] $run = "AzureDevOps",
    [ValidateSet('current','nextminor','nextmajor')]
    [string] $version = "current",
    [ValidateSet('bld','dev')]
    [string] $type = "bld",
    [Parameter(Mandatory=$true)]
    [pscredential] $credential,
    [String] $licenseFile = ""
)
Matching the parameters transferred in CI.yml:
 -version "$(version)"
-credential ([PSCredential]::new("$(Username)", (ConvertTo-SecureString -String "$(Password)" -AsPlainText -Force)))
-licenseFile "$(LicenseFile)"'
It is possible to run things in parallel, but in our case, the pipeline is really a single threaded thing, which cannot be parallelized.
Multiple Apps
If your project consists of multiple apps, which have dependencies, the idea is to catch these dependencies in the build pipeline. We might at a later time add functionality to automatically detect and build dependencies but for now, you will have to capture these in the pipeline.
You can transfer several app folders to the Compile App tasks (if the apps are not inter-dependent) or you can have multiple Compile App steps if the apps depend on other apps, which then have to be published (much like the App and the Test App).
No, it is not ideal, but it is possible.
"Converting" CI.yml to a pipeline in the Visual Designer
It isn't really converting, it is creating a new pipeline using the visual designer and copying the information from the YAML file.
I have decided NOT to include a CI.json (pipeline export format) in the template repository, instead you will have to create a new empty pipeline using the visual designer, link the Azure Key Vault variable group and add a number of tasks to the pipeline.
The first step
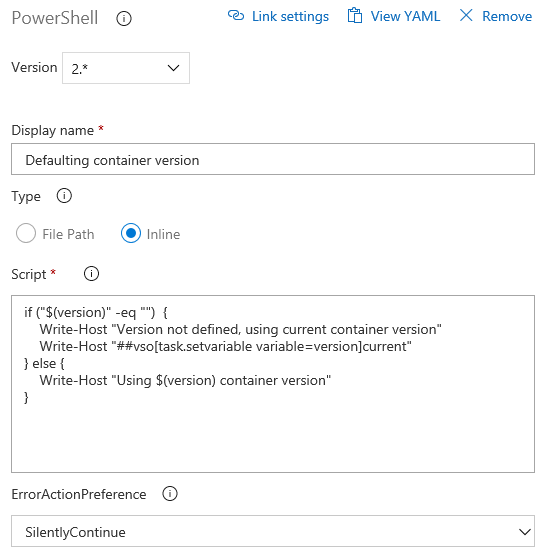
Let's have a look at the very first step in the pipeline, which task is to set the version pipeline variable to current, if it hasn't been set already:
 - task: PowerShell@2
  displayName: 'Defaulting container version'
  inputs:
    errorActionPreference: silentlyContinue
    targetType: inline
    script: 'if ("$(version)" -eq "")  { Write-Host "Version not defined, using current container version"; Write-Host "##vso[task.setvariable variable=version]current" } else { Write-Host "Using $(version) container version" }'
In the Visual Designer you add a Task to the Agent Job and search for PowerShell (not Azure PowerShell, not Service Fabric PowerShell, not PowerShell on Target Machines - just PowerShell). Add this task and fill out the properties:
- The number after PowerShell in the - task line determines the version of PowerShell (here 2)
- The displayName goes into Display Name
- errorActionPreference (defaults to stop) goes into ErrorActionPreference
- If targettype is inline, type inline is selected and the script goes into the scripts editor.
The above step in the Visual Designer will look something like this:
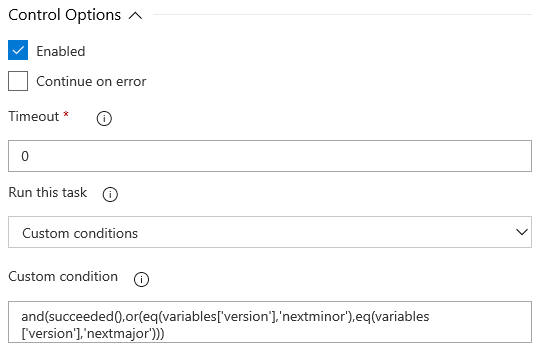
Conditions
The second step in the pipeline is logging into the bcinsider repo, if you are building against nextminor or nextmajor. It looks like
 - task: PowerShell@2
  displayName: 'Login to bcinsider repository'
  condition: and(succeeded(),or(eq(variables['version'],'nextminor'),eq(variables['version'],'nextmajor')))
  inputs:
    targetType: inline
    script: 'docker login "bcinsider.azurecr.io" -u "$(bcInsiderUsername)" -p "$(bcinsiderPassword)"'
This task is also a PowerShell task and the only difference to the first step is that this step only executes if the conditions are met.
The conditions here are:
- If all previous steps succeeded and version is either nextminor or nextmajor.
Then we want to login to the bcinsider registry using the username and password from the key vault.
In the Visual Designer, you find the conditions under Control Options:
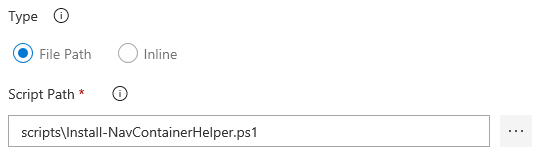
Script Path
The third step in the pipeline will install the NavContainerHelper module if not already installed. It looks like
 - task: PowerShell@2
  displayName: 'Install NavContainerHelper'
  inputs:
    targetType: filePath
    filePath: 'scripts\Install-NavContainerHelper.ps1'
Again, a PowerShell task, but in this case, it is not an inline script, instead the targetType is a filePath and the FilePath refers to a script in the script folder. The conditions are default, meaning that all previous tasks have to succeed before this task is run.
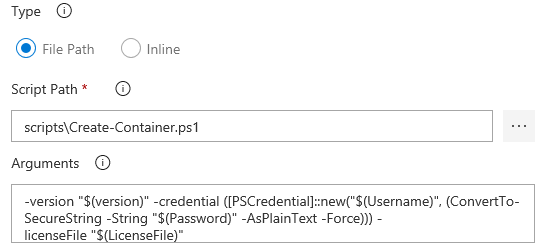
Arguments
The forth step in the pipeline is creating the build container. This also uses a filePath but this one comes with arguments:
 - task: PowerShell@2
  displayName: 'Create Build Container'
  inputs:
    targetType: filePath
    filePath: 'scripts\Create-Container.ps1'
    arguments: '-version "$(version)" -credential ([PSCredential]::new("$(Username)", (ConvertTo-SecureString -String "$(Password)" -AsPlainText -Force))) -licenseFile "$(LicenseFile)"'
The arguments are using the exact same syntax as the aguments in the Visual Designer, just remove the '.
Other properties
For the remaining tasks, a few other properties are used, but these maps easily into the Visual Designer as well (like FailOnStderr -> Fail on Standard Error under Advanced).
Note that the Remove Build Container task is using always() in conditions, meaning that it will run even if a previous task has failed, even if the build was cancelled.
Publishing Test Results
After running the tests, the tests results needs to be published. As the run tests task will store the test results in XUnit format in the file TestResults.xml, the task for publishing the tests looks like:
 - task: PublishTestResults@2
  displayName: 'Publish Test Results'
  inputs:
    testResultsFormat: XUnit
    testResultsFiles: TestResults.xml
In the Visual Designer, it is really just as simple

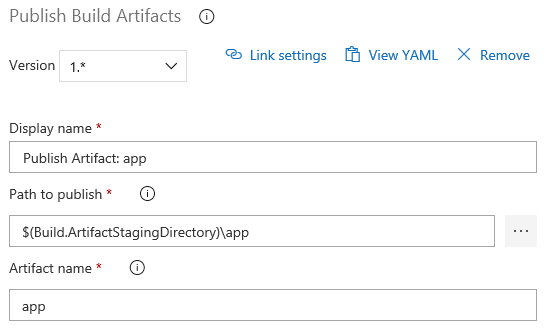
Publishing Build Artifact
If everything succeeded, we need to publish the build artifact (our app) where it can be accessed after the build. For that we use the Publish Build Artifact task
 - task: PublishBuildArtifacts@1
  displayName: 'Publish Artifact: app'
  inputs:
    PathtoPublish: '$(Build.ArtifactStagingDirectory)\app'
    ArtifactName: app
Like when publishing tests results, the Visual Designer task is just as easy
What's next
This blog post really didn't get us any further in the process of setting up CI/CD, but it does explain why I selected YAML as the format of pipelines and when we get to create integration builds with minor or major builds of Business Central a little later, these things should be clear.
In the next post, I will cover how to automatically deploy the daily build of your extension to an Azure VM, where you can demo or test the latest version at all times.
Enjoy
Freddy Kristiansen
Technical Evangelist