Note
Access to this page requires authorization. You can try signing in or changing directories.
Access to this page requires authorization. You can try changing directories.
The XNAExtras.Border class provides a general border mechanism for UI elements. While currently only the XNAExtras.TextBox class makes use of it, future releases of XNAExtras will include Menus and perhaps some other elements that will be built on top of Borders.
When creating borders, you can use the default border graphics (e.g., those that come with the TextBox demo) or you can create your own custom graphics. This post describes what you need to do to create and use your own custom borders.
As an example, we'll make use of one of the borders included in the TextBoxDemo sample project. This project is part of the XNAExtras package, which you can download from here if you don't already have it.
The border image that we'll be examining is "border.png" - a simple 25x33 image that contains a single border. It's located in the "XNA Samples\TextBoxDemo\Content" folder and is shown in the following figure (with some markup denoting the different regions of the border image):
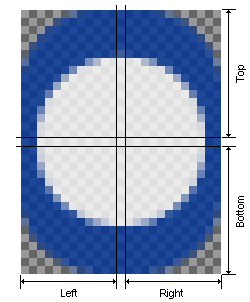 |
When designing a border image, you should think of it as 9 separate regions that need to blend together smoothly: the four corners, four edges and the center.
- The four corners are typically the largest and most distinctive part of any border. The corners are never stretched or scaled when they are drawn.
- The edges are drawn between two neighboring corners and stretch vertically or horizontally to make the border the correct size. As can be seen in "border.png", the edges do not need to be more than a single pixel wide or high.
- The center is typically a single pixel that defines the background color for the border. The center is stretched both horizontally and vertically to match the border size.
So, now that you have a border image, what do you do with it? You can use the following code to create and display your border.
First, set up your project. This process is the same for all XNA projects that use XNAExtras.
- Create a new "Windows Game (XNA)" project and add all of the XNAExtras source files to it.
- Add a reference to System.Xml. To do this, right-click on the References folder in the Solution Explorer for your project. Select "Add Reference...". From the ".NET" tab, select "System.Xml" and then click the "Add" button.
- Add "using XNAExtras;" to the top of your source files with the other using statements.
Now you can start adding code to the main game class. Add the following member variable to your game class:
private XSpriteManager m_sprites;
Add the following initialization code:
// create a sprite manager to manage the drawing
m_sprites = new XSpriteManager();
// load the texture that contains the border
m_sprites.AddTexture("tx_border", "border.png", 25, 33);
// define a border type from the texture
// (use the default settings to init the border)
m_sprites.DefineBorder("border_def", "tx_border");
// instantiate the border and set its size
Border b = m_sprites.AddBorder("border test", "border_def");
b.SetDestRect(50,50,100,100);
Add the following initialization code after the call to InitializeComponent (or place it wherever you handle device resets):
m_sprites.Reset(graphics.GraphicsDevice);
And finally, add the following to your Draw routine (between your BeginScene and your EndScene):
m_sprites.Draw();
Compile and run and you'll see a empty border on your screen. You'll need to have copied the "border.png" file into the same directory as the EXE or else the texture won't be found.
Note that the code given above uses the default parameters to define the border, which works in this example because the texture contained only this one border sprite. The left, top, right and bottom values for the border were also automatically determined by taking the image size and dividing it in half and assuming that the center was 1x1 pixels in size.
To have more control over the border creation parameters, you need to define the border using a Border.CreationParameters struct:
Border.CreationParameters bcp = new Border.CreationParameters();
bcp.strTexName = "tx_border";// name of texture with border
bcp.SetLocation(0, 0); // location of border image in texture
bcp.SetSize(25, 33); // size of border image
bcp.SetEdges(12, 16, 12, 16);// size of LTRB edges in texture
bcp.SetOrigin(4, 8); // border position adjustment
m_sprites.DefineBorder("border_def", bcp);
As a final comment about borders, note the SetOrigin line in the above example. This parameter is used to adjust the position of the border around the rectangle. Compare the borders in the next image:
 |
The left column shows the border and the right column shows the same border with the content rectangle blanked out to make it easier to see. All of the rectangles are 100x100, but the bottom row used the SetOrigin method shown above to pull the border closer to the rectangle.
Comments
- Anonymous
September 17, 2006
In the previous post, I talked about creating border art and using it in your game. One problem with... - Anonymous
May 31, 2009
PingBack from http://outdoorceilingfansite.info/story.php?id=5475