Start Building an International Application for Windows Phone 7 (Part 1)
Most of you may have experience developing applications which can support different UI languages for different language speakers. For this topic, I am going to demonstrate how to create a simple international application for Windows Phone 7 by separating localizable resources from code to create language-specific resource files and also show how the culture fallback mechanism works in this international application. You will see the application loads different string resources defined for English and Italian based on Display language setting in region & language on Windows Phone 7.
There are 3 sections for this demonstration - Create the application, Build and run the application, and Try culture fallback mechanism. In this Part I post, we will only cover the first section and will cover the rest of the 2 sections in the Part II post.
Before starting creating this application, be sure to download your Windows Phone Developer Tools.
Let’s start creating our first international application for Windows Phone 7.
· Creating the application
1. Create a new project and add the controls.
1) Launch Visual Studio and select Visual C# | Silverlight Windows Phone | Windows Phone Application to create a new C# Windows Phone Application and name it IntlWinPhoneApp.
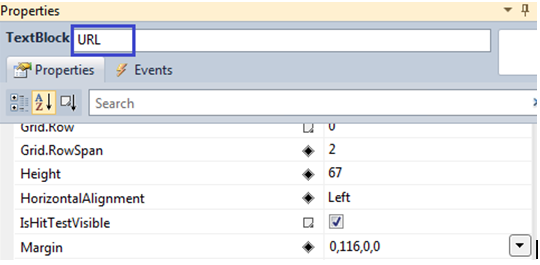
2) In Design mode, drag-drop a TextBlockfrom Toolbox onto MainPage.xaml, and rename it to URL in Properties window as shown in Screen 1.
Screen 1
|
3) In Design mode, drag-drop a Button from Toolbox onto MainPage.xaml, rename it to OK and change Content property to OK in Properties window.
4) In Design mode, drag-drop a WebBrowser from Toolbox onto MainPage.xaml.
5) In Design mode, select the TextBlock control, PageTitle , to change its FontSize property 40 in Properties window. Please refer to screen 1 to find the TextBlock control whose name is PageTitle.
2. Create resource files.
1) In Solution Explorer, right-click on the project, IntlWinPhoneApp, and select Add | New Item then select Resources File to add a resource file. Give this resource file a name, AppResx.resx.
2) Double-click on AppResx.resx in Solution Explorer.
3) Add the 4 strings and give them names/values which will be used as the string resources in this application as shown below. Also, it’s optional to add the comments in Comment column but to make it easier for you to understand, we add the comments here.
Name |
Value |
Comment |
apptitle |
Resource culture locale: en-US |
used by the TextBlock, named ApplicationTitle |
pagetitle |
English MSDN (en-US) |
used by the TextBlock, named PageTitle |
okmessage |
You will be directed to English MSDN page |
passed to the message box as a parameter |
url |
used by the TextBlock, named URL |
4) Select Public in Access Modifier list box then save and close AppResx.resx.
5) Save and close AppResx.resx.
6) In Solution Explorer, right-click on the project, IntlWinPhoneApp, and select Add | New Item then select Resources File to add a resource file. Give this resource file a name, AppResx.it-IT.resx.
7) Double-click on AppResx.it-IT.resx in Solution Explorer.
8) Add the 4 strings and give them names/values as shown below. Adding the comments for Comment column is optional.
Name |
Value |
Comment |
apptitle |
Resource culture locale: it-IT |
used by the TextBlock, named ApplicationTitle |
pagetitle |
Italian MSDN (it-IT) |
used by the TextBlock, named PageTitle |
okmessage |
You will be directed to Italian MSDN page |
passed to the message box as a parameter |
url |
used by the TextBlock, named URL |
9) Save and close AppResx.it-IT.resx.
10) In Solution Explorer, right-click on the project, IntlWinPhoneApp, and select Add | New Item then select Resources File to add a resource file. Give this resource file a name, AppResx.it.resx.
11) Double-click on AppResx.it.resx in Solution Explorer.
12) Add the 4 strings and give them names/values as shown below. Adding the comments for Comment column is optional.
Name |
Value |
Comment |
apptitle |
Resource culture locale: it |
used by the TextBlock, named ApplicationTitle |
pagetitle |
Italian MSDN (it) |
used by the TextBlock, named PageTitle |
okmessage |
You will be directed to Italian MSDN page |
passed to the message box as a parameter |
url |
used by the TextBlock, named URL |
13) Save and close AppResx.it.resx.
3. Set the default culture.
1) In Solution Explorer, right-click on the project name, IntlWinPhoneApp and select Properties in the context menu.
2) Press Assemblies Information…. Button.
3) Select English (United States) in Neutral Language drop-down list and then click OK button
4. Create a class with property that points to the resource files.
1) In Solution Explore, right-click on the project name, IntlWinPhoneApp and select Add | New Item then select Class. Give this class a name, LocalizedResx.cs.
2) Double-click on LocalizedResx.cs in Solution Explorer and add the following code to this class file to define the class that points to the resource files. You can add more than one property to this single class to return multiple resource files if there are more than one resource file.
public LocalizedResx()
{ }
private static IntlWinPhoneApp.AppResx mylocalizedresx = new IntlWinPhoneApp.AppResx();
public IntlWinPhoneApp.AppResx MyLocalizedResx
{
get{ return mylocalizedresx;}
}
3) Save and build the application
5. Edit App.xaml to specify the namespace, IntlWinPhoneApp that contains the class, LocalizedResx that returns your resource file(s).
1) Double-click on App.xaml in Solution Explorer.
2) Add the following code and then save it.
<Application.Resources>
<local:LocalizedResx xmlns:local ="clr-namespace:IntlWinPhoneApp" x:Key="LocalizedResx"/>
</Application.Resources>
6. Edit MainPage.xaml to bind the resource files to the controls through LocalizedResx class.
1) In Design mode, select the TextBlock control, ApplicationTitle and right-click on it to select View XAML.
2) Replace the hard-coded string for Text property with the new value.
Old Value |
New Value |
Text="MY APPLICATION" |
Text="{Binding Path=MyLocalizedResx.apptitle, Source={StaticResource LocalizedResx}}" |
3) In Design mode, select the TextBlock control, PageTitle and right-click on it to select View XAML.
4) Replace the hard-coded string for Text property with the new value.
Old Value |
New Value |
Text="page name" |
Text="{Binding Path=MyLocalizedResx.pagetitle, Source={StaticResource LocalizedResx}}" |
5) In Design mode, select the TextBlock control, URL and right-click on it to select View XAML.
6) Replace the hard-coded string for Text property with the new value.
Old Value |
New Value |
Text="TextBlock” |
Text="{Binding Path=MyLocalizedResx.url, Source={StaticResource LocalizedResx}}" |
7. Edit MainPage.cs to add the click event for OK button
1) In Design mode, double-click on thebutton control, OK.
2) Add the following code to the click event where the value of okmessage defined in the resource files is passed to Message.Show() as a parameter.
private void OK_Click(object sender, RoutedEventArgs e)
{
MessageBox.Show(IntlWinPhoneApp.AppResx.okmessage);
string site = URL.Text;
webBrowser1.Navigate(new Uri(site, UriKind.RelativeOrAbsolute));
}
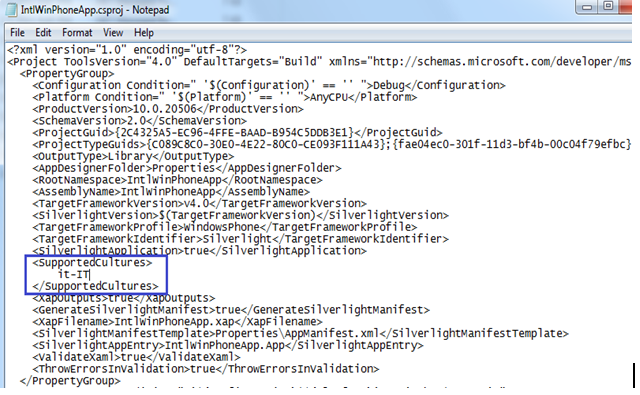
8. Edit IntlWinPhoneApp.csproj
1) Save the application and close it.
2) Go to the location of this application and then open up IntlWinPhoneApp.csproj with notepad.
3) Add the following code to add the supported culture as shown in Screen 2and save it then close it.
<SupportedCultures>
it-IT
</SupportedCultures>
Screen2
|
We finish creating the new application in the Part I post and will cover the rest of the 2 sections for this demonstration, Build and run the application, and Try culture fallback in the Part II post which is published here.
Comments
- Anonymous
January 18, 2011
Very good information. Thanks!