Note
Access to this page requires authorization. You can try signing in or changing directories.
Access to this page requires authorization. You can try changing directories.
In these article series I'm going to talk about configuring web performance tests for common content management and collaboration SharePoint-scenarios. You should have basic knowledge about creating web/load tests since I'll skip the basics and focus on specific subjects.
First we'll see how data sources can be used. For load testing it is not that necessary to create complex test scripts. All we need to do is create load to the system. Easiest way to do this is to give a web test a data source with fixed URLs to most used pages in the tested SharePoint-environment. Front page and section front pages usually have a lot of web parts that lift content like news or latest documents to the front page for easy access, so these are good candidates. Bombard these URLs with your load test and you will get relatively realistic results.
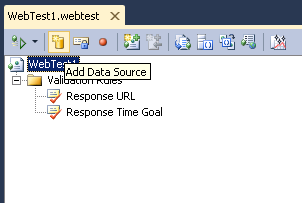
Adding Data Source to Web Test
Using data sources with web tests comes pretty handy when you want to maintain requested URLs in seperate configuration files instead of making web test recordings. They are especially good when you need to do authenticated requests to web applications like intranets.
We have different options to use as a data source for web performance tests. These are Database, CSV- and XML-file. In this article I will only cover CSV- and XML-files.
CSV
We can add URLs for testing using CSV (Comma Seperated Values)-file. All we need to do is put each URL in a seperate line in a text file and save the file as .csv.
E.g.
http://internet.contoso.com/AboutCompany
http://internet.contoso.com/Contact
If you need credentials to access the URLs defined in the CSV-file, you should add the credentials after the URL seperated by commas.
E.g.
http://intranet.contoso.com/,contoso\user1,password1
http://intranet.contoso.com/News,contoso\user1,password1
http://intranet.contoso.com/HR,contoso\user1,password1
XML
XML-file are a bit more complicated but very easy nevertheless. One of the benefits of using XML-file is that you can create seperate tables and group your requests. The term table can be a bit misleading when talking about XML-files, but basically a table means all the nodes under the root node that have the same name.
Here is an example of XML-file data source that is grouped to anonymous and autheticated requests:
<?xml version="1.0" encoding="utf-8" ?>
<Pages>
<AnonymousPage>
<Url>http://internet.contoso.com/</Url>
</AnonymousPage>
<AnonymousPage>
<Url>http://internet.contoso.com/AboutCompany</Url>
</AnonymousPage>
<AnonymousPage>
<Url>http://internet.contoso.com/Contact</Url>
</AnonymousPage>
<PrivatePage>
<Url>http://intranet.contoso.com/PartnerMaterials</Url>
<Username>contoso\administrator</Username>
<Password>pass@word1</Password>
</PrivatePage>
</Pages>
As you can see there are two kinds of nodes under Pages-node; AnonymousPage and PrivatePage. These nodes are considered as tables in web test configuration. AnonymousPage-table has three rows and PrivatePage-table has one row.
Node names are pretty self-explanatory. URLs point to either pages that have anonymous access enabled or pages using Windows Authentication. Now that you have two tables of URLs, you can create two data binded requests to the web performance test and assign each to use one of the tables. Each request will request URLs defined in the chosen table.
PrivatePage-node has also Username- and Password-nodes defined. These nodes are used to tell the web test what credentials it should use for the requests to the given URLs.
Step-By-Step: Adding URL Data Source To A Web Test
Here is an step-by-step example of adding data source of authenticated URLs to use with the web test. This example uses the XML-data from the above chapter. You can add similar data source for anonymous URLs following the same steps. Only difference is the table you choose in the step 4. Of course you might want to create a seperate web tests for anonymous and authenticated users and add the apporiate data sources to each of them for flexibility. More of the benefits of this later...
| 1. | From web test designer, click Add Data Source from the toolbar.
|
| 2. | Give data source a suitable name (e.g. URLs) and select XML File. Click Next.
|
| 3. | You don't have to select the table in this view. This view is only for preview. Click Next.
|
| 4. | In this view you can select what table you want to use as a data source. Select PrivatePage so we can make authenticated requests. Click Finish when your done.
|
| 5. | After clicking through the wizard, you can see the added data source in the web test designer.
|


You are all done adding data source to the web test!
Step-By-Step: Adding Data Source Binded Request To Web Test
Let's continue making the use of the data source we added in the previous chapter. Now we will add a request to the web test and bind it's URL-property to our data source. This will make your web test do a request to each of the URLs in the data source. You can edit your data source-file and add or remove URLs as much as you want and the binded request in the web test will update automatically.
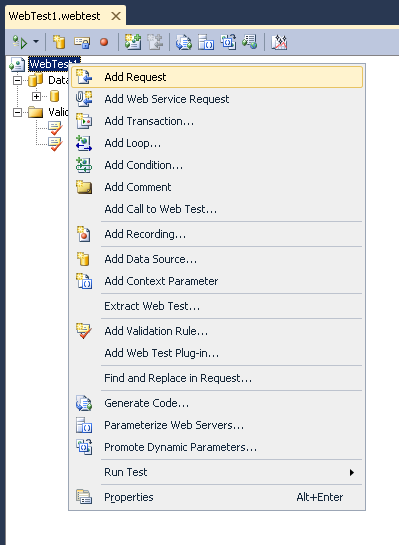
| 1. | Right-click the root node of the web test hierachy in the web test designer and click Add Request.
|
| 2. | New node http://localhost should appear in the web test designer. Select that and take a look at the Properties-window. Click the dropdown for the URL-property and you will a selector for data sources in your web test. Expand the hierachy and select the Url-column. If your data source is different from mine, select the field that contains URLs that you want to bind to the request.
|
| 3. | That's it! Next we will bind user credentials from the data source to the web test. |

Step-By-Step: Binding User Credentials To Web Test
| 1. | Click Set Credentials-button on the tool bar in the web test designer. 
|
| 2. | Click Bind...-button for Name- and Password-values and select columns containing credentials information for the requests. 
|
| 3. | Click OK. 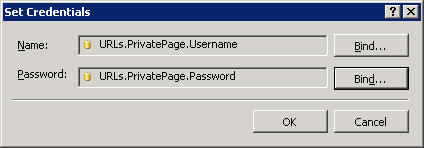
|
| 4. | If you take a look at the web test Properties-window, you can see the selected credentials bindings there.  |
Now your user credentials are binded to your data source and the request made from the web test will use credential information from the data source if they are defined.
Adding Proxy Binding for Web Test Requests
You can bind web test's Proxy-property to your data source as well. My example data source doesn't have any proxy information but you can easily add it there if needed. To bind the Proxy-property, just select your data source from the web test Properties-window.
Conclusion
Hope you enjoyed this article. In the future articles I'll talk about how to configure test mixes and performance counters in load tests.