Note
Access to this page requires authorization. You can try signing in or changing directories.
Access to this page requires authorization. You can try changing directories.
 Internet Explorer 8 (IE8) shipped with a new feature for web users called Web Slices. You can learn more about web slices here. Essentially it lets you add enhanced links to your favorite bar that allow you to preview snippets of content from websites that you frequently visit without having to open up the page. It’s really useful to do little tasks like check on your web based Inbox, check the weather in cities you live or visit, traffic status, stock tickers, headlines, sports, the list goes on and on and you can check the IE add-on gallery for more examples of useful web slices and for inspiration. [UPDATE: if you’re into sports then check out web slices by Buzztap that showcases a whole bunch to keep you up to date, also see the blog post by Jon Box]
A web slice is content on a web page which a user can subscribe to. The content is then available from a button in the Internet Explorer 8 Favorite's toolbar. When the content is updated, the button glows orange to alert the user that there is new content. When the user clicks the button, they see a drop down window with the updated content of the web slice.
To enable Web Slices on your PHP web site. We have created a project, Web Slices and Accelerators for PHP that lets you get started quickly and the source is available on Codeplex too. The solution contains HTML and PHP samples to create web slices in Wordpress, Wikimedia and Facebook,, all popular php blogging, content and social sites that you may want to have your code interoperate with to get started. Download the package and unzip the file to a directory on your machine.
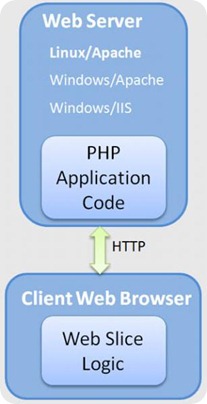
The code is based on HTML and XML and can be easily integrated into any other web site, framework or platform you may be working with. The markup is displayed in a client web browser and IE8 will discover and update content when it parses the code. Any web server can be used including IIS or Apache on  Linux/Windows.
There are three things to mark content as a web slice. You will need specific CSS class names to start with; first, a div marked with a class equal to ‘hslice’; second, the div must have a unique id; third, a child element marked with a class equal to ‘entry-title’.
The HTML tags you use to structure your web slice are immaterial, the important thing is to specify the right CSS class names. We can create a PHP function to output this HTML structure. The function will accept a unique name for the web slice, a title and a string representing the content.
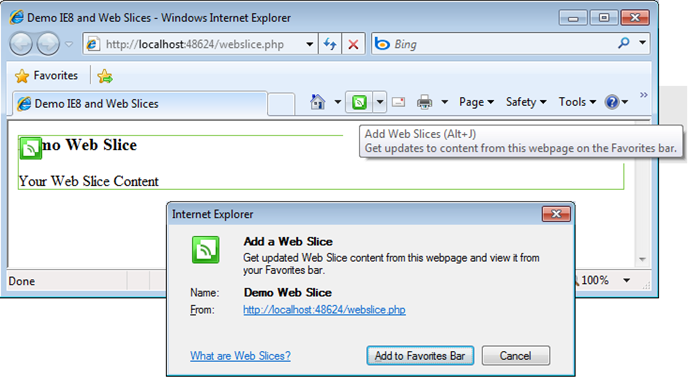
The code will render in your browser and when you hover over it, you will notice a green box around the content as well as a green button shows up next to your Home page button as illustrated below. You will only need to click on any of these buttons to get the dialog box that add this content to your favorites bar.
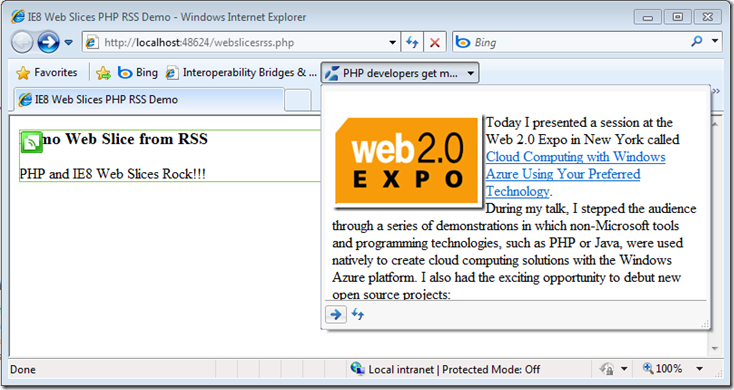
Another handy feature that web slices have is a built in reader which can display the first item of an RSS feed. The HTML is almost identitcal but instead of specifying an element with a class equal to 'entry-content', you create an anchor tag pointed to the content source. Note that you must specify an attribute rel='feedurl' and pointthe link to the URL of the RSS feed you choose to use.
We can modify our above PHP function to accept another parameter which specifies the feed URL too. Note that this example also includes a parameter for content, which is displayed on the page advertising the web slice. The content from the feed, however, will be the actual content to which a user subscribes to.
The following web slice was created using the above code with our Interoperability Blog RSS feed showing the first item on the list when this post was written.
You may already have content and or feeds on your website that could get a little spotlight today! It will also handy for your website users by using Internet Explorer 8 Web Slices. We hope that you take a look at the sample and please share your feedback!
Happy Coding!
Jas Sandhu
Technical Evangelist, Interop Vendor Alliance Manager, Interoperability Strategy Team
Twitter@jassand, FriendFeed@jassand
Comments
Anonymous
December 08, 2009
The comment has been removedAnonymous
December 08, 2009
The comment has been removedAnonymous
December 16, 2009
WOW! That was easy. 4 lines of code and it works......Anonymous
January 01, 2010
Created a Wordpress Plugin a while ago. check it out if you like. SaschaAnonymous
April 15, 2010
The comment has been removed


