Reseller Storefront
Over the past several weeks I have received numerous questions from various partners regarding the reseller storefront. This project is a web application that acts as a storefront for Microsoft partners and enables them to sell Microsoft offers to their customers. It can be deployed directory from Partner Center or using the Azure Resource Manager (ARM) templates available with the source code. With this post I will be covering how to deploy the reseller storefront using the available ARM templates.
Prerequisites
Before attempting to deploy the storefront it is recommended that you gather all of the prerequisite values. The following values will be required in order to deploy the project
| Value | Description |
| websiteName | Name assigned to the website in Azure (e.g. cspstorefront.azurewebsites.net) |
| webPortalClientId | Identifier for the Azure AD application utilized for authentication |
| webPortalClientSecret | Key for the web portal Azure AD application |
| webPortalAadTenantId | Tenant identifier where the web portal Azure AD application is provisioned |
| partnerCenterApplicationId | Identifier for the Azure AD application used to access the Partner Center API |
| partnerCenterApplicationSecret | Key for the Azure AD application used to access the Partner Center API |
| partnerCenterAadTenantId | Tenant identifier where the Partner Center Azure AD application is provisioned |
The following sections will walk you through how to obtain the appropriate values for the above parameters
Website Name
The websiteName parameter will be part of the URL assigned to the instance of App Services created in Azure as part of the deployment. If you specify cspstorefront for this parameter then you will access the storefront using https://cspstorefront.azurewebsites.net. This value must be unique, if you specify a value that is already taken then the deployment will fail. In order to correct the failure specify a different value for the parameter and try again.
Web Portal Azure AD Application
Perform the following to create the required Azure AD application
- Browse to the Azure Management portal, https://portal.azure.com, and login using credentials that have global admin privileges
- Open the Azure AD management experience and then click on App registrations –> Add
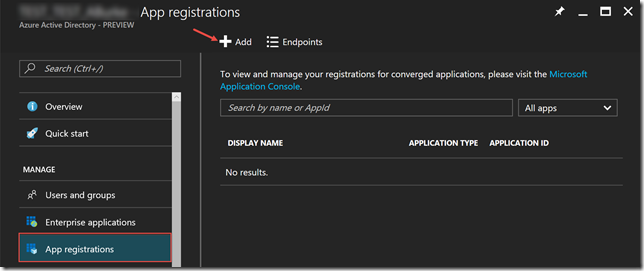
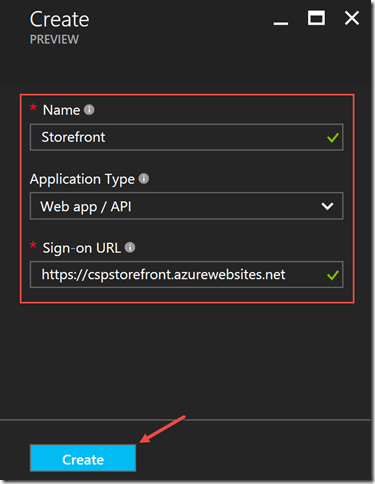
- Complete the new application wizard. The value for the Sign-on URL should match the value you would like to use for the websiteName parameter
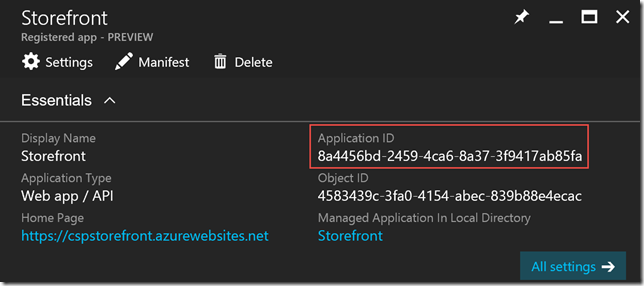
- Document the Application ID value it will be the webPortalClientId
- Click Required permissions, then click Windows Azure Active Directory (Microsoft.Azure.Active.Directory) , and add the Access the directory as the signed-in user permission
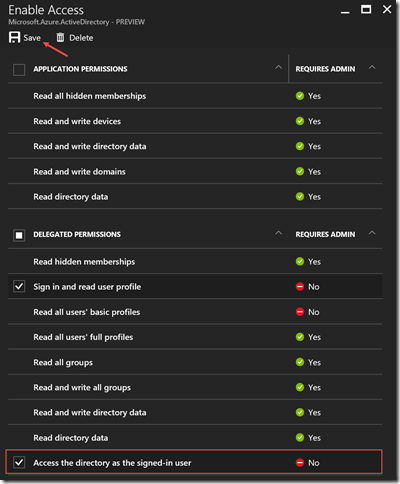
- Click on Keys, specify a description, select an appropriate expiration and then click Save

- Document the key value, that is displayed after you click Save. This value will be the webPortalClientSecret
Partner Center Azure AD Application
Perform the following to create the Azure AD configured to access the Partner Center API
- Browse to Partner Center, https://partnercenter.microsoft.com, and login using credentials that have admin agent and global admin privileges
- Click on the following Dashboard –> Account Settings –> App Management
- Click Add new web app to create the application

- Document the following values
[](https://msdntnarchive.blob.core.windows.net/media/2016/12/PC02.png)Field Values App ID partnerCenterApplicationId Account ID webPortalAadTenatId and partnerCenterAadTenantId Key partnerCenterApplicationSecret
Deploying using Visual Studio
A deployment project has been included with the source code for the reseller storefront. Before deploying the project you will need an Azure storage account. If you do not already have one you will need to provision a new one before proceeding. To deploy the storefront open the CustomerPortal solution, using Visual Studio, and perform the following
- Right click on the CustomerPortal solution in the Solution Explorer and then click Restore NuGet Packages
- Right click on the CustomerPortal.Deployment project then click on Deploy –> New…
- Complete the Deploy to Resource Group wizard and then click Ok
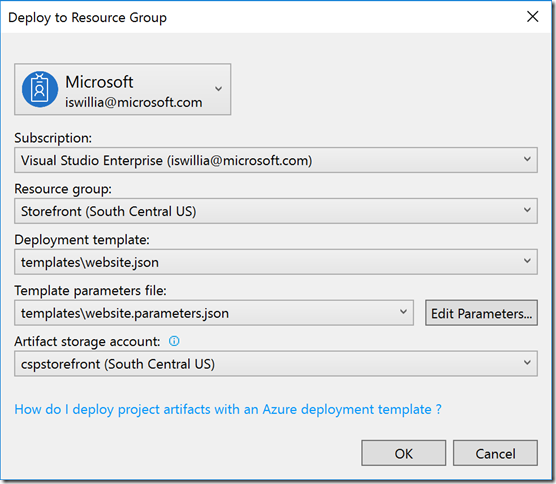
- Modify the parameters accordingly in the Edit Parameters wizard and then click Save
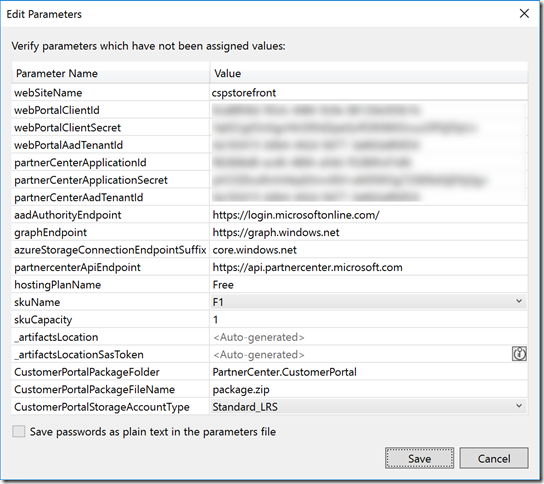
- Review the data in the Output window to confirm the storefront was successfully deployed. Please note this could take a couple of minutes.
Configuring the Storefront
Now the storefront has been deployed it must be configured. Perform the following in order to configure everything
- Browse to the website (e.g. https://websiteName.azurewebsites.net) and login using credentials that belong to the CSP partner that have global admin privileges
- Complete each of the configuration steps for the storefront to be functional. The storefront will display a message stating it is under construction until all three configuration tasks have been completed
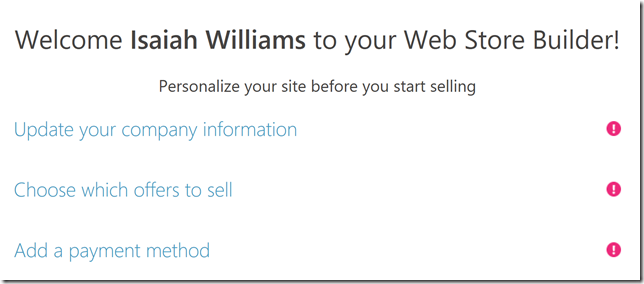
Once the storefront configuration has been completed you will be ready to start transacting!
Comments
- Anonymous
February 05, 2017
The comment has been removed- Anonymous
February 17, 2017
Hi Pawel, You can open a support ticket through Partner Center to get help troubleshooting this issue. Based on the error message I believe that you are trying to provision a customer in a region where you are not authorized. With the Cloud Solution Provider program you will have separate reseller tenants for each region that you are authorized to sell into. If you need help with getting authorized in an additional region I would recommend that you reach out to your account manager.- Anonymous
February 22, 2017
The comment has been removed- Anonymous
April 05, 2017
Pawel. Can you please post an issue for this on the GitHub site. I can follow it up. https://github.com/PartnerCenterSamples/Reseller-Web-Application/issues
- Anonymous
- Anonymous
- Anonymous
- Anonymous
February 17, 2017
Can this be used with the Sandbox Environment- Anonymous
February 17, 2017
Hi Monterey, Yes, you can utilize the Reseller Storefront with an integration sandbox. Please note that the integration sandbox will only allow you to have twenty five customers at once. I would recommend that you develop a process to delete customers from the integration sandbox as well to avoid any issues. If you need an example of how to do this I would recommend that you check out https://github.com/Microsoft/Partner-Center-Explorer.If you need additional details regarding the limitations of the integration sandbox you can find those details at https://msdn.microsoft.com/en-us/library/partnercenter/dn974940.aspx
- Anonymous
- Anonymous
June 16, 2017
The comment has been removed - Anonymous
July 03, 2017
Hi Isaiah,Thank you for the useful information.Please can you guide us regarding:1. Adding another language Resource.resx2. Editing the template (a) customizing the template (b) making it work RTLEven general guidelines will be very useful so we uderstand where to start and how to proceed.We are currently building a custom portal in Umbraco and we would like to have this nicely integrated. Many thanks,Lloyd- Anonymous
July 19, 2017
Hi Lloyd, The team utilized the Resx Manager plugin, https://marketplace.visualstudio.com/items?itemName=TomEnglert.ResXManager, and the Translator API, https://www.microsoft.com/en-us/translator/translatorapi.aspx, in order to automate the addition of new resource files. I will try to find some time next week to put together a post on this. Please let me know if you have any other questions.
- Anonymous
- Anonymous
July 19, 2017
Hi Isaiah,Where do we find the webPortalAadTenantId ?Thanks,Lloyd- Anonymous
July 19, 2017
Hi Lloyd, The webPortalAadTenantId is the Azure AD tenant identifier where you create the Azure AD application for the web portal. You can find this information in the Azure Management Portal or using the Azure AD PowerShell module. When you connect using the Connect-AzureAD cmdlet, https://docs.microsoft.com/en-us/powershell/module/azuread/connect-azuread?view=azureadps-2.0, it will output the TenatId value that you need. Please let me know if you have any other questions.
- Anonymous
- Anonymous
July 27, 2017
Hi Isaiah,Went back to basics on this project (i.e. without trying to add ResX for Hebrew) and I got stuck here:11:24:05 - The following parameter values will be used for this operation:11:24:05 - webSiteName: mspcsandbox11:24:05 - webPortalClientId: .... etc.11:24:05 - Build started.11:24:05 - Project "CustomerPortal.Deployment.deployproj" (StageArtifacts target(s)):11:24:05 - Project "CustomerPortal.Deployment.deployproj" (ContentFilesProjectOutputGroup target(s)):11:24:05 - Done building project "CustomerPortal.Deployment.deployproj".11:24:05 - Project "PartnerCenter.CustomerPortal.csproj" (Build;Package target(s)):.... etc. (didn't have issues here)11:24:27 - Code Analysis Complete -- 0 error(s), 0 warning(s)11:24:27 - The "StyleCopTask" task could not be loaded from the assembly C:\Users\Lloyd\Source\Workspaces\mspcsandbox\Reseller-Web-Application-Israel\packages\Visual-StyleCop.MSBuild.4.7.59.0\build..\tools\StyleCop.dll. Could not load file or assembly 'Microsoft.Build.Utilities.v3.5, Version=3.5.0.0, Culture=neutral, PublicKeyToken=b03f5f7f11d50a3a' or one of its dependencies. The system cannot find the file specified. Confirm that the declaration is correct, that the assembly and all its dependencies are available, and that the task contains a public class that implements Microsoft.Build.Framework.ITask.11:24:27 - Done building project "PartnerCenter.CustomerPortal.csproj" -- FAILED.11:24:27 - Done building project "CustomerPortal.Deployment.deployproj" -- FAILED.11:24:27 - Build FAILED.From what I see there was just the one error. I tried several times, using new clones to make sure it was not a mistake I made but i received this same error regarding "StyleCopTask" each time.Thanks,Lloyd- Anonymous
July 27, 2017
The comment has been removed- Anonymous
July 28, 2017
Hi Lloyd! It is hard to say for sure what caused the issue. I have seen that error before when deploying Azure resources from Visual Studio. That issue was caused by an out dated version of the Azure SDK. Would you mind sharing what version of Visual Studio you are using? Also, I wanted to let you know that I have submitted a pull request that includes Hebrew language. Hopefully the team responsible for the repository will approve it in the near future. If you are curious what I did you can check out https://github.com/PartnerCenterSamples/Reseller-Web-Application/pull/44- Anonymous
July 30, 2017
The comment has been removed- Anonymous
July 31, 2017
Hi Isaiah,The build works fine and error free.I did a PC auto deployment and then cross referenced the details from the deployment summary - interesting to see that Parter Center AAD tenant ID on the auto deployment is the domain i.e. mspcsandbox.onmicrosoft.comAnyway, every thing seems fine now except that it doesn't deploy and I get the message "Object reference not set to an instance of an object".I also tried to deploy your new solution with Hebrew and got similarily stuck with no deployment and the same message. Thanks again for this!That's my update.Cheers,LloydThanks, - Anonymous
August 11, 2017
Hi Isaiah,I haven't managed to get passed this issue:Every thing seems fine now except that it doesn’t deploy (tried Hebrew version as well and encountered exact same problem) and I get the message “Object reference not set to an instance of an object” at the end of the attempt with no errors and no deployment is made.Any help with this will be very appreciated.Thanks,Lloyd
- Anonymous
- Anonymous
- Anonymous
- Anonymous
- Anonymous
January 31, 2018
Hi Isaiah,Please give some more info about the ''webPortalClientId" - where to find it and if setup is required.Thanks,Lloyd- Anonymous
February 13, 2018
Hi Lloyd, The webPortalClient is the identifier for the application you created in Azure AD. See step 4 under the Web Portal Azure AD Application section for a screenshot of where this value is located.
- Anonymous
- Anonymous
February 21, 2018
Hello Isaiah, Nice job on creating this! it’s very helpful. The only functionality were missing is the customer can only add licenses to their "Customer managed subscriptions". We need to also have the customer via self-service add or remove any of their "Partner managed subscriptions" licenses. Is that possible?- Anonymous
February 27, 2018
Hi Donavan, Unfortunately this functionality is not possible without modifying the code. There are a handful of ways you can achive the desired outcome. I would recommend that you examine the following files if you would like to modify the codePartnerCenter.CustomerPortal/Scripts/WebPortal/Core/SessionManager.js PartnerCenter.CustomerPortal/Controllers/CustomerAccountController.cs PartnerCenter.CustomerPortal/Scripts/Plugins/CustomerAccountPresenter.js PartnerCenter.CustomerPortal/Views/Shared/CustomerAccount.cshtml As you will see the fetchCustomerSubscriptionDetails JavaScript function makes a call to the API, to obtain a list of customer and partner managed subscriptions. The GetManagedSubscriptions function in the CustomerAccountController class fetches the subscriptions and then divides them. With a bit of tweaking you can easily make it where a customer could make both.- Anonymous
February 28, 2018
Thank you Isaiah! We are a CSP Direct Partner - I there is a Yammer Group for this Web StoreFront that you could send me a join? Please send it to dlane@innovia.com Thanks!
- Anonymous
- Anonymous
- Anonymous
February 25, 2018
Hi Isaiah,Thanks for your efforts to build this solution to CSP partners.Does the portal work with Paypal Business Express Checkout or does it have to be through a Paypal Webpayment pro account?Any plans for a Stripe payment gateway?Many thanksMohamedMicrosoft MVP- Anonymous
February 27, 2018
Hi Mohamed,Currently the portal only works with a PayPal Pro account. You can read more about the requirements here. I am not aware of any immediate plans for us to add new payment gateways. With that said, it is possible for you to design and impalement a different payment gateway. Hopefully in the near future I will be able to write a post, covering how to impelement a custom payment gateway for the storefront.
- Anonymous
- Anonymous
March 25, 2018
Hi Isaiah,Thank you for a great guide!I succeded in deploying the application, but when I log on to the application, I am not seeing the configuration step screen but instead I get:Your Organization NameOne or more errors occurred.Home page, Sign outI do have global admin rights and 2-factor authentication activated- Anonymous
March 26, 2018
Hi Axel, Thank you for reaching out. It would appear that you have encountered an authentication failure. There are a number of reasons that this could have happened. To troubleshoot this issue I would recommend that you update the AutenticationFailed section of the UseOpenIdConnectAuthentication configuration found in the Startup.Auth.cs file. Currently, the error message shown is from the top exception, which will return "one or more errors occurred" message when you have a task that has failed. To get the real exception you would want code similar to the followingAuthenticationFailed = (context) =>{ // redirect to the error page string errorMessage = (context.Exception.InnerException == null) ? context.Exception.Message : context.Exception.InnerException.Message; context.OwinContext.Response.Redirect($"/Home/Error?errorMessage={errorMessage}"); context.HandleResponse(); return Task.FromResult(0);}After you make this update, the portal must be updated. You can redeploy the code to update the portal. This update will not resolve the underlying cause of your error. However, it will enable you to get the true error message. Based on my experience this error message is typically caused by a missing API permission or the reply URI is not set correctly.- Anonymous
March 26, 2018
The comment has been removed- Anonymous
March 30, 2018
Hi Axel, I believe that you are referring to the Pre-approved customer feature. This functionality enables you to pick select customers that can bypass the payment gateway when purchasing new services. You can find the configuration by authentication using your partner credentials and clicking the down arrow at the top, to launch the tile based navigation. Then you will need to click on the Pre-approved customer tile to load the feature I am talking about. Hopefully this helps!
- Anonymous
- Anonymous
- Anonymous
- Anonymous
March 27, 2018
Hi Isaiah,I'm not sure you are the right one to ask, but here goes.I have the application up and running with PayPal. I have also configured a few customers for self-service.The issue is, that when customers try to log on to the application with their own tenants GA accounts, they get "AADSTS70001: Application with identifier was not found in the directory "I can't find anything in the MS guide or your guide on how to convince customer tenants to recognize the application in the CSP tenant. Do you have any suggestions?- Anonymous
March 30, 2018
Hi Axel, Did you configuration the Azure AD application, you are using for the web portal, to be multi-tenant? You can verify this by performing the followinngLogin to https://portal.azure.com using your partner admin credentials Click Azure Active Directory, by default this will be on the favorites toolbar on the leftClick App registrations Change the filter from My apps to All apps if necessary Click the application you created for the web portalClick SettingsClick Properties found in the Settings bladeMake sure that the Multi-tenanted option is configured to Yes. If it is not then click Yes and be sure to save the changes.Doing this should correct the error you are receiving.
- Anonymous
- Anonymous
April 20, 2018
The comment has been removed- Anonymous
April 26, 2018
Hi Micheal,Thank you for sharing this information with me. I will do some testing to see if I can identify the root cause for this error.
- Anonymous
- Anonymous
April 21, 2018
The comment has been removed- Anonymous
April 26, 2018
Hi Leo, Can you double check the configuration values for partnerCenter.applicationId, partnerCenter.applicationSecret, and partnerCenter.AadTenantId? These values should match what you have in Partner Center under the app management page.
- Anonymous
- Anonymous
May 12, 2018
make sure your web portal app has multi-tenant enabled. this is missing from the instructions and cost me whole bunch of time. - Anonymous
May 14, 2018
The comment has been removed- Anonymous
May 18, 2018
The comment has been removed- Anonymous
May 18, 2018
Thanks for the reply! You can ignore my subsequent post (for some reason, I couldn't see my first post or your reply until I posted the second time).
- Anonymous
- Anonymous
- Anonymous
May 18, 2018
The comment has been removed
