Note
Access to this page requires authorization. You can try signing in or changing directories.
Access to this page requires authorization. You can try changing directories.
If you have tried building an ASPNET 5 project using VSO hosted build agents you've probably soon discovered that you need to do a bit more than simply creating a build definition - since there are dependencies that are not present on the hosted build agents. Obviously you can setup your own VM with the dependencies and manage it yourself, or there is a good article on setting up an ASPNET 5 project and deploying to Azure Web Apps here: https://msdn.microsoft.com/Library/vs/alm/Build/azure/deploy-aspnet5. However, if you are relatively new to ASPNET 5 continue reading here as I walk you step by step through setting up a VSO build definition and explain a few things that are going on along the way. Here, we're going to setup a ASPNET 5 project using the coreclr framework so that it's ready to deploy anywhere. If you are new to .NET Core, I recommend you read this article to get familiar with some of the concepts: https://docs.asp.net/en/latest/conceptual-overview/dotnetcore.html. So now let's get involved.
First up, create a new ASP Web Project:

Select the ASPNET 5 (Preview) goodness:
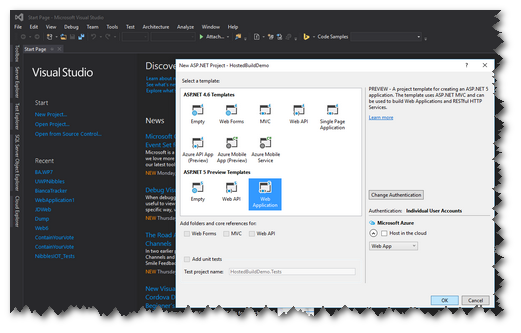
We want to target .NET Core, select the web projects properties (this sets the global.json - see later) and set as:

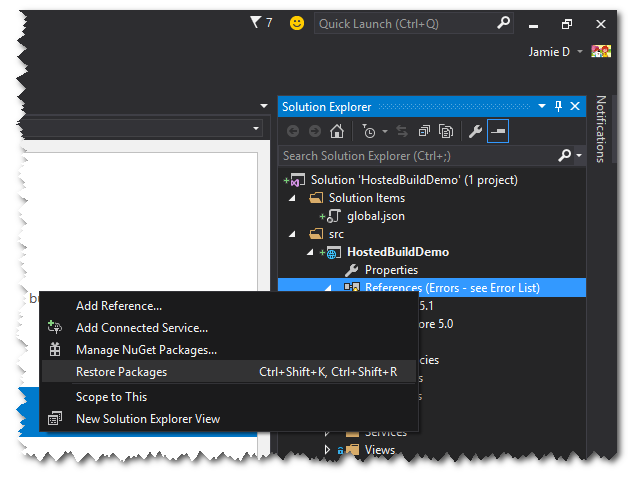
Fix up the project references, by restoring the packages:
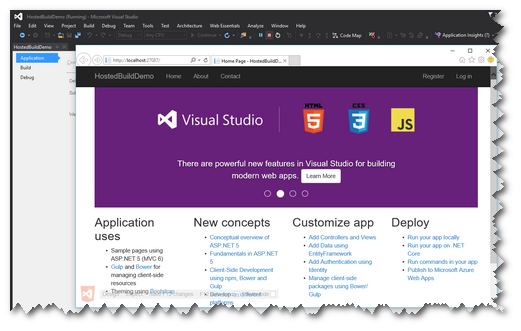
Build and run the project locally to check everything is ok:
We are now ready to submit this up to VSO and take advantage of their hosted build agents. However, we will not be using the Visual Studio build definition template, we will use a simple PowerShell script instead and that's for a good reason. Since with ASPNET 5 we don't actually need to use msbuild to compile our project, we will use the Microsoft .NET Development Utility (dnu) to build and package our project instead. Therefore we need to create the script that does this and add it into our source repository.
Create a empty PowerShell file called PublishTask.ps1 at the solution level:

Within this script add the following (see attached files) and commit to your repo:

Let's just explain what's going on in here. The script is largely based on the documented script here: https://msdn.microsoft.com/Library/vs/alm/Build/azure/deploy-aspnet5. This version takes 3 parameters as inputs, these will be passed in from the VSO build definition and makes the script able to handle different file paths and build configurations (Debug/Release etc.). The script bootstraps the configuration of the .NET Version Manager ready so that we can configure it using the relevant version of the runtime for our compilation. Next up the script looks into the project's global.json file to determine which version of the DNX runtime and architecture flavour to setup. The global.json file got changed in the background when we edited the web project's properties - so the PowerShell script will set some local variables dependant on the versions detected from this file. Next up, the script will install the discovered runtimes (dnvm install...), then set that runtime as the active version (dnvm use..). The script then mines all of the project.json items performing a dnu restore on each. This will look at all of the dependencies of your application and automatically download them. After this we execute dnu publish to package your application into a self-contained directory that can be launched, comprising everything it needs to run. For more information on dnu see: https://github.com/aspnet/Home/wiki/DNX-utility.
After you've committed the file to your repository you are ready to create a new build definition. Move over to VSO and create a new build definition, selecting the empty template.

Now add a new PowerShell build task to execute our PowerShell script.

Point the newly added PowerShell Task to our PublishTask.ps1 script in the repo:

Configure the PowerShell Task with our parameters that the PublishTask.ps1 is expecting;
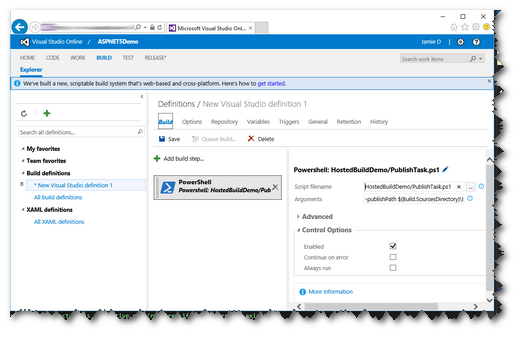
The arguments are:
-publishPath $(Build.SourcesDirectory)\HostedBuildDemo\src\HostedBuildDemo -publishOutputPath $(Build.SourcesDirectory)\HostedBuildDemo\artifacts\bin\$(BuildConfiguration)\Publish -buildConfiguration $(BuildConfiguration)
Replace the highlighted directory names with your project name. Here we are setting the paths for dnu to find the path to the project and the output location of the published files - be careful here as this is where we will look for the files at the end of a successful build to copy the outputs into a drop location later.
Configure the build trigger on the definition to do CI, then save your build definition, giving it a name and queue your first build. The build will fail because of some gulp npm warnings.

To fix this up we can edit the package.json file, changing the gulp Dependencies and devDependencies to match up (like below). For information on this see: https://docs.asp.net/en/latest/client-side/using-gulp.html 
Save and commit your changes to run a new build (assuming you've got CI enabled on your build definition).
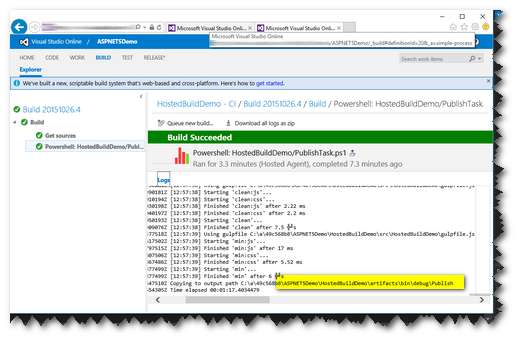
The build has succeeded :) However, the build outputs aren't copied anywhere that we can get them. So now we are going to add another VSO Build Task to copy the published outputs to a drop location we can access.

Select the location we expect to find out published outputs:

Change the arguments to be relevant to your project name eg:
Copy Root: HostedBuildDemo\artifacts\bin\debug\Publish
Contents:**\*
Queue a new build and check for success.

Select the Artifacts to check your published website is available:

You are done. Hopefully this will help anyone get to grips building ASPNET 5 projects with Visual Studio Online.
Comments
- Anonymous
December 28, 2015
The comment has been removed - Anonymous
December 28, 2015
I just noticed I had some npm warnings. Which may have been flagged as errors by powershell?1210 2015-12-29T01:05:46.0524383Z ##[error]npm WARN package.json ASP.NET@0.0.0 No description1211 2015-12-29T01:05:46.0524383Z ##[error]npm WARN package.json ASP.NET@0.0.0 No repository field.1212 2015-12-29T01:05:46.0534037Z ##[error]npm WARN package.json ASP.NET@0.0.0 No README data1213 2015-12-29T01:05:46.0534037Z ##[error]npm WARN package.json ASP.NET@0.0.0 No license field.1214 2015-12-29T01:05:46.0544037Z ##[error]npm WARN deprecated lodash@1.0.2: lodash@<2.0.0 is no longer maintained. Upgrade to lodash@^3.0.0- Anonymous
January 04, 2016
Check your package.json file - setting private = true eg:"name": "ASP.NET", "version": "0.0.0", "private": true, "devDependencies": { "gulp": "^3.9.0", "gulp-concat": "2.5.2", "gulp-cssmin": "0.1.7", "gulp-uglify": "1.2.0", "rimraf": "2.2.8" }
- Anonymous
- Anonymous
March 16, 2016
Very useful article. Some notes: (I had problems)1. The powershell build step refers to a variable called $(BuildConfiguration) which evaluates to 'debug'. The 'Publish Build Artifacts' build step should be using the same variable for the copy root e.g. HostedBuildDemo\artifacts\bin$(BuildConfiguration)\Publish is more accurate. This is to allow switching from debug to release without complications,2. The 'Publish Build Artifacts' task you are using has changed, so the one to use now is 'Copy and Publish Build Artifacts'.3. I was getting a different error when the powershell was executed:"npm WARN deprecated graceful-fs@2.0.3: graceful-fs version 3 and before will fail on newer node releases. Please update to graceful-fs@^4.0.0 as soon as possible."This warning was causing my build to fail as all outputs are logged to stdout and powershell doesn't like it. So the work-around I used was to change the prepublish task in the project.json file so that npm install is executed with the log level set to ignore warnings: "prepublish": [ "npm install --loglevel=error", "bower install", "gulp clean", "gulp min" ]One could also simply tell the VSO build task to continue on error, but I want to know when real errors occur.