Photographic Mosaics in Windows Azure: A New Series
 During our last Windows Azure live event series, the Azure TechJam (get materials here), I structured a talk on using Windows Azure services – roles, storage, service bus – around an application I built to generate photographic mosaics in the cloud. It’s not an original idea by any means – check out for instance the Mosaic 23/25 site which likewise leveraged Windows Azure and Mosaicer 2.0 (in VB6!) which provided a starting point for the client UI. Disclaimers aside, the application has really provided me (and continues to provide) a great learning vehicle in how it pulls together many of the Windows Azure platform offerings into something a more substantial than “Hello World.”
Since that live event, I’ve been continually adding capabilities to the application, and although it’s still a work in progress, it’s in a reasonable state now for you to get it up and running to aid your own understanding of Windows Azure. So with this post, I’m kicking off a new blog series to do a deeper dive of the application architecture and hopefully spark a discussion around patterns and practices you may want to consider in your own cloud applications. I definitely invite and welcome your comments throughout this series, and together I’m hoping we can improve the existing implementation.
To start things off, take a look at the following screencast which shows the client application at work.
The client application along with the Windows Azure cloud application and a utility application are all available for download, and the package includes a document with further instructions on the set up. The following steps though should get you up and running – e-mail me if you run into an issue or have questions on the setup - of course it all works great on my machine!
Windows Azure Account Requirements
While you can exercise most of the application features in the local development fabric on your own machine, at some point you’ll want to see this all live in Windows Azure. The application uses three roles (they can be small or extra-small), so you can use the Windows Azure trial (use promo code: DPEA01) to prop the application up in the cloud free of charge. If you are using other subscription offers, do be aware of the pricing for the various services so you do not incur unexpected charges.
You will need to setup the following three services in Windows Azure – be sure to select the same sub-region for all three!
- Windows Azure Storage account
- Windows Azure Hosted Service
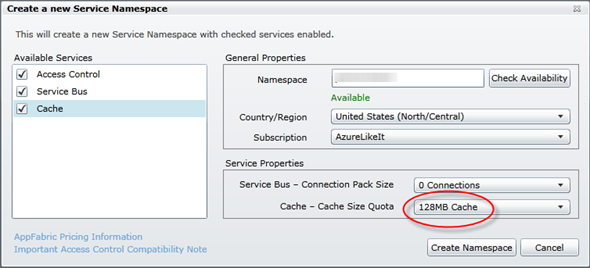
- Windows Azure AppFabric namespace (select all three services and a cache size of 128 MB)

Storage Requirements
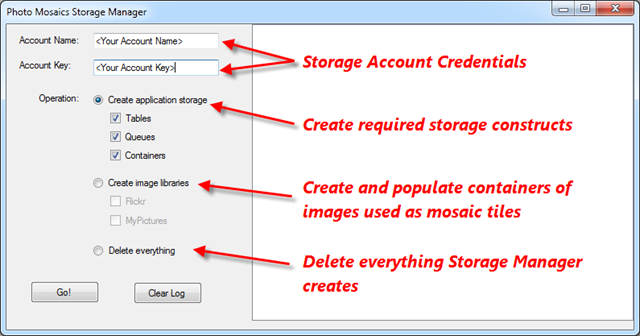
Once you set up your storage account, you’ll need to create a number of queues, tables, and blob containers for use by the application. The Storage Manager solution in the download is a Windows Forms application which creates these assets for you, given a WIndows Azure storage account name and key. You can run the application from within Visual Studio:

N.B.: Due to licensing, the Flickr functionality (i.e., populate a blob container with Flickr images) requires that you download the FlickrNet.dll and add a reference to it within the Storage Manager application. Without the reference, the Storage Manager application will not compile. You will also need to register for an API key and supply that API key in the app.config for the solution.
<userSettings>
<StorageManager.Properties.Settings>
<setting name="AccountName" serializeAs="String">
<value>[Azure Storage Account]</value>
</setting>
<setting name="AccountKey" serializeAs="String">
<value>[Storage Account Key]</value>
</setting>
<setting name="FlickrAPIKey" serializeAs="String">
<value>[Optional Flickr API Key]</value>
</setting>
</StorageManager.Properties.Settings>
</userSettings>
Cloud Application Configuration
Once you’ve created all of the required storage constructs, add the configuration values for the three Windows Azure Roles within the cloud application. Below is the entire ServiceDefinition.cscfg file, with highlighting to indicate the modifications needed..
1: <?xml version="1.0" encoding="utf-8"?>
   2: <ServiceConfiguration serviceName="AzureService"
          xmlns="https://schemas.microsoft.com/ServiceHosting/2008/10/ServiceConfiguration"
          osFamily="1" osVersion="*">
3: <Role name="AzureJobController">
4: <Instances count="1" />
5: <ConfigurationSettings>
6: <Setting name="ApplicationStorageConnectionString"
value="DefaultEndpointsProtocol=https;AccountName={Acct. Name};AccountKey={Acct. Key}"/>
7: <Setting name="Microsoft.WindowsAzure.Plugins.Diagnostics.ConnectionString"
value="DefaultEndpointsProtocol=https;AccountName={Acct. Name};AccountKey={Acct. Key}"/>
8: </ConfigurationSettings>
9: </Role>
10: <Role name="AzureImageProcessor">
11: <Instances count="1" />
12: <ConfigurationSettings>
13: <Setting name="ApplicationStorageConnectionString"
value="DefaultEndpointsProtocol=https;AccountName={Acct. Name};AccountKey={Acct. Key}"/>
14: <Setting name="Microsoft.WindowsAzure.Plugins.Diagnostics.ConnectionString"
value="DefaultEndpointsProtocol=https;AccountName={Acct. Name};AccountKey={Acct. Key}"/>
15: <Setting name="EnableAppFabricCache" value="false" />
16: </ConfigurationSettings>
17: </Role>
18: <Role name="AzureClientInterface">
19: <Instances count="1" />
20: <ConfigurationSettings>
21: <Setting name="ApplicationStorageConnectionString"
value="DefaultEndpointsProtocol=https;AccountName={Acct. Name};AccountKey={Acct. Key}"/>
22: <Setting name="Microsoft.WindowsAzure.Plugins.Diagnostics.ConnectionString"
value="DefaultEndpointsProtocol=https;AccountName={Acct. Name};AccountKey={Acct. Key}"/>
23: <Setting name="AppFabricNamespace" value="{Namespace}"/>
24: <Setting name="ServiceBusIssuer" value="owner" />
25: <Setting name="ServiceBusSecret" value="{Default Key}" />
26: <Setting name="UserStorageAccountName" value="{Account Name}" />
27: <Setting name="UserStorageAccountKey" value="{Account Key}" />
28: </ConfigurationSettings>
29: </Role>
30: </ServiceConfiguration>
- Lines 6, 7, 13, 14, 21, and 22: provide the Storage Account Name and Key for your Windows Azure Storage account
- Line 23: provide the name of the App Fabric endpoint you created
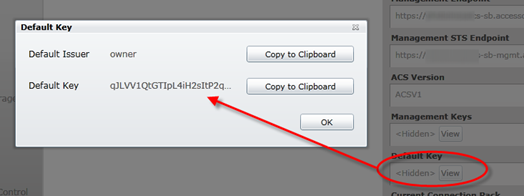
- Line 25: provide the Default Key for the Service Bus

- Line 26: provide the name of your Windows Azure Storage Account (this can be a different storage account than in Line 6, but for now using the same account is fine)
- Line 27: provide the account key for the storage account used in Line 26
If you want to experiment with Windows Azure AppFabric Caching, you’ll also need to modify the app.config file of the AzureImageProcessor Worker Role to include the endpoint and Authentication token for the Caching service. (Note, we’ll look at caching in detail a bit later in the series, at which point I may modify this configuration).
1: <dataCacheClients>
2: <dataCacheClient name="default">
3: <hosts>
4: <host name="{Service Bus NameSpace}.cache.windows.net" cachePort="22233" />
5: </hosts>
6: <securityProperties mode="Message">
7: <messageSecurity
8: authorizationInfo="{Authentication token}" >
9: </messageSecurity>
10: </securityProperties>
11:
12: <tracing sinkType="DiagnosticSink" traceLevel="Verbose"/>
13: </dataCacheClient>
14: </dataCacheClients>
Client Application Configuration
You’ve seen the client application in action already. The only configuration step needed here is to supply the endpoints for the WCF services hosted in WIndows Azure. You can modify these directly within the app.config file:
<client>
<endpoint address="https://127.0.0.1:81/StorageBroker.svc"
binding="basicHttpBinding"
contract="AzureStorageBroker.IStorageBroker"
/>
<endpoint address="https://127.0.0.1:81/JobBroker.svc"
binding="basicHttpBinding"
contract="AzureJobBroker.IJobBroker"
bindingConfiguration="JobBroker_BindingConfig"
/>
</client>
If you run the client application as a non-administrative user, an informational message will result indicating that the notification functionality is not available. This occurs because you do not have the permission to create an HTTP namespace for the self-hosted Service Bus service on your local machine; you can do so grant this permission via netsh in an elevated command prompt, or simply run the application as an administrator (which is fine for testing, but not advised for an application deployed to end-users)
Need Help?
Hopefully this blog post will get you up and running. If not, check out the README file that comes with the download; it’s a bit more explanatory. And finally don’t hesitate to forward your questions to me via this blog post. It’s quite possible I’ve overlooked some details or nuances of the setup!
