How to squash your VHDs
One of my machines is set up with a small virtual BizTalk environment - a domain controller, an SQL server and a BizTalk server - running under Virtual PC. Works like a dream - I love drag-and-drop to the virtual machine (Virtual Server, are you listening?) - but the hard disk is only 37GB. I say "only" but it was fine a few years ago before the use of virtual machines really kicked off. Now, with three virtual machines running, I'm starting to find they won't save state - instead I have to close them down so no extra state file is created.
Looking around, I found that Compaction is the key. There are a number of Knowledgebase articles and Blog posts detailing the steps:
- (KB 888760) How to prepare a Virtual Server 2005 virtual hard disk file to send to Microsoft Product Support Services
- (KB 833138) A virtual hard disk file is larger than the used disk space that the guest operating system reports
- (Blog) Tips of the Day on .NET - How to compact my virtual disk?
- (Blog) Shared Points for SharePoint... - How to compact a Virtual PC image
What I've done below is compile a list of the best approaches from these articles. Don't forget Step 0...
Step 0 - Backup the VHD
- No, really. Copy the VHD to another disk or machine.
Step 1 - Clean up disk space within the virtual machine
- Disable hibernation
- In Windows XP, open Power Options in Control Panel, select the Hibernate tab and clear the checkbox for enabling hibernation.
- In Windows Vista, run "powercfg -h off" from an Administrator's command prompt.
- Disable the pagefile
- Open System in Control Panel, select the Advanced tab, click the Settings button for Performance, select the Advanced tab, click the Change button and choose "No paging file".
- Disable prefetching
- Disabling Prefetch (EnablePrefetcher=0)
- Disable System Restore
- Empty Windows Update folder
- %ProgramFiles%\WindowsUpdate
- Empty the Drivers Cache folder
- %windir%\Driver Cache\i386
- Empty the Service Packs folder
- %windir%\ServicePackFiles
Delete all patch/service pack installation filesThis is everything from the %windir% folder beginning with $NtServicePack.. and $NtUninstall.. but NOT $hf_mig
- Run the Service Pack Clean-up tool (with SP2 for Windows Vista/2008)
- Delete files and folders inside %windir%\SoftwareDistribution\Download (and only Download)
- Delete all *.LOG files
- run "Del *.log /s" from a command prompt after changing directory to the root of the drive.
- Minimise the DLLCache
- Description of Windows XP and Windows Server 2003 System File Checker (Sfc.exe)
- run "sfc.exe /cachesize=1", reboot and then run "sfc.exe /purgecache"
- Run "Disk Cleanup"
- Click the button on the General tab of the properties page for the drive in Windows Explorer
- Choose all options; this will purge the Temp folder, Temporary Internet files and the Wastebasket, amongst others.
- If running SQL Server...
- Reduce SQL logs
- Remove unwanted SQL database
Step 2 - Defragment the virtual disk within the virtual machine
Step 3 - Run the PreCompact Tool within the virtual machine
- Capture the PreCompact tool ISO-image
- %ProgramFiles%\Microsoft Virtual PC\Virtual Machine Additions\Virtual Disk Precompactor.iso
- Run the PreCompact tool.
- This can take anywhere from 5 mins upwards to complete. Time for a coffee break.
- Shut down the virtual machine.

From the Virtual PC 2004 SP 1 readme file:
SP1 includes Virtual Disk Precompactor, a utility that is designed to "zero out"—that is, overwrite with zeros—any available blank space on a virtual hard disk.
We recommend that you use Virtual Disk Precompactor before you compact a dynamically expanding virtual hard disk. Using Virtual Disk Precompactor should result in a smaller compacted virtual hard disk. After you install SP1, Virtual Disk Precompactor.iso is located in the folder: \Program Files\Microsoft Virtual PC\Virtual Machine Additions\.
To use Virtual Disk Precompactor, you must first capture Virtual Disk Precompactor.iso. To do so, use the standard procedure for capturing .iso files. For more information about this procedure, see "To capture or release a CD or DVD" in the Virtual PC Help.
After you capture Virtual Disk Precompactor.iso, you can run Virtual Disk Precompactor by going to the CD drive of the virtual machine. To view Help for Virtual Disk Precompactor, type precompact -help. To run Virtual Disk Precompactor, type precompact.
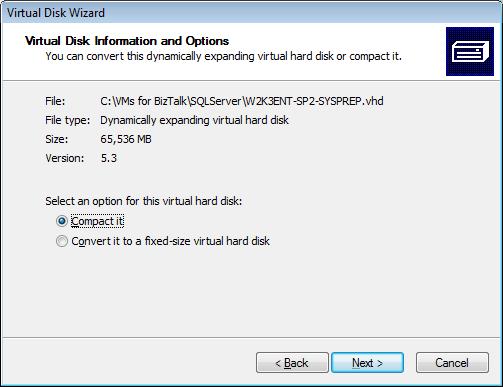
Step 4 - Compact the VHD
- Run the Virtual Disk Wizard from the VPC console
Select "Edit an existing disk", locate the VHD file you want and select "Compact it"
If you have the disk space, don't replace the existing file justb in case something goes wrong. You do already have a backup but you don't want to have to go through the cleanup process again.
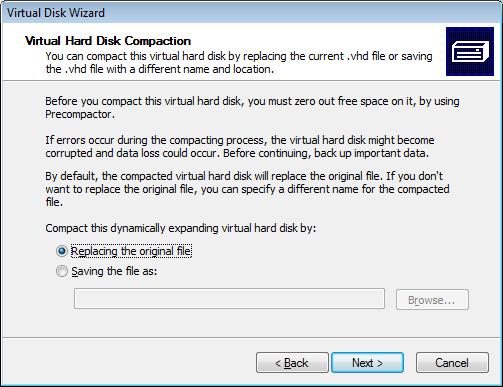
Wait for several minutes until the process is finished and the file size is reduced.
- Start the virtual machine.