Note
Access to this page requires authorization. You can try signing in or changing directories.
Access to this page requires authorization. You can try changing directories.
This post will show how I used DNN (formerly DotNetNuke) to build a highly customized, responsive web site in just over 1 day.
My Requirements
The first requirement was not to become the sole person working on this web site. I am happy to do stuff like modify branding, do some light coding, and help with some of the content, but I expect other volunteers to help as well. I wanted to make sure that non-technical people could create content, including uploading pictures and doing some light HTML formatting.
The second requirement was to do this for as cheaply as possible while still enabling non-technical people to be productive. I know there are a bunch of opportunities for free web sites out there, but I wanted to control the style and format of the site as much as possible without being constrained.
Choosing an Implementation
The implementation revolves around ease of use for non-technical people. I almost opted for a bunch of raw HTML pages but decided that would achieve the exact opposite result, I would end up being the only person maintaining all this raw HTML goo by hand. Similarly, I wanted to just build a lightning-fast web site using ASP.NET MVC, but also recognized that would positively ensure that I did all the work. No, I needed a content management system (CMS) with features that lend themselves to non-developers, hopefully even people with no real HTML experience.
I have an extensive SharePoint background, and I’ll admit that it was my first choice. I started building a site using the public web site template for O365, and then stopped because I realized it was going to be a lot more effort to do the branding than I was willing. I then looked at various CMS implementations. To evaluate, I created a free Azure Web Site by creating an application from the gallery and was able to quickly get started with various CMS implementations such as Umbraco, WordPress, Orchard, and DNN (formerly DotNetNuke). I built test sites, I evaluated how much work it was to learn from scratch, and I played around with various CMS systems over a weekend. I created WordPress sites (great for blogging), created a sample site with Orchard (fantastic and easy to brand), and poked around Umbraco (beautiful default theme). I’m not giving a review of all the CMS systems that I looked at, it wouldn’t be fair since I only looked at each for maybe 30 minutes. That was kind of the point: if I couldn’t learn it within 15 minutes without watching training videos or tracking down someone’s blog, it didn’t meet the bar.
I ultimately chose DNN because it has what I feel is the simplest paradigm, it definitely meets my 15 minute sniff test, is easy for non-technical users to understand, and does not require a developer background. Further, it has a huge installation base and a ton of add-on modules if I need them. Even better, should I decide to start hacking together modules for it, I can because it is written in .NET.
Doing It On the Cheap
I have an MSDN subscription, and one of the benefits of being an MSDN subscriber is that you get an Azure subscription with monthly credits. That means my small web site can be hosted in my MSDN subscription just by taking advantage of the Azure benefit. Each Azure subscription comes with 10 free Azure Web Sites, which worked awesome during development. However, I also needed to use a custom domain, meaning I had to step up to the next tier. This is a very small web site, and looking at the Azure price calculator (https://azure.microsoft.com/en-us/pricing/details/web-sites/) I can do this for roughly $56 US per month using a small standard size web site, but remembering that I have $150 US credit per month, my personal cost is still zero!
What’s also interesting to note is how the pricing scales. Take a look at Jon Galloway’s post on moving https://weblogs.asp.net to Azure web sites for around $524.00 US per month. This was pretty shocking to me, that you can run a site of that size that cheaply.
The Build Out
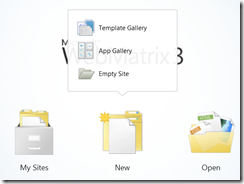
Creating a web site is ridiculous easy. One way to do this is to go to the Azure management portal and choose New / Compute / Web Site / From Gallery. However, I am going to use Web Matrix (a free download) to show what a great tool it is for working with Azure Web Sites. On the main screen, click New / App Gallery.
The next page allows you to filter on the type of site you would like to create and shows the various implementations to choose from. I choose DNN and give the site a name “Hebron Football Booster Club”.
Next, Next, Accept, Next, OK, and you are finished.
A web page pops up asking you for more information to create the site.
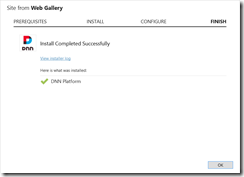
Installation takes about a minute, and you can then visit the web site.
The theme looks great, and we’ll see in a minute that it’s pretty easy to apply your own branding.
Branding the Site
One of the primary requirements for this site is that it has to be easy for non-developers to use and maintain. That said, there were a few “developer” things I needed to do for branding. The site uses a default skin named “Gravity”. I want to modify that skin, but keep the original. Easy enough, in Web Matrix we go to /Portals/_default/Containers and create a new folder “Hebron” (name doesn’t matter, just use a name that makes sense). Copy the contents of the /Portals/_default/Containers/Gravity folder into /Portals/_default/Containers/Hebron. Now go to /Portals/_default/Skins and create a new folder “Hebron”. Copy the contents of /Portals/_default/Skins/Gravity to /Portals/_default/Skins/Hebron.
I go to Home.ascx in the /Skins/Hebron folder, and remove the controls that I don’t need. I ended up deleting the entire DIV id=”usercontrols”.
Save locally.
Deploy to Azure Web Sites
The web site is only running on localhost right now, let’s show how ridiculous easy it is to push our site to a new Azure Web Site. At the top left of the ribbon in Web Matrix there is a Publish button. Click that.
The next screen lets you use an existing Azure Web Site, or create a new one. We’ll create a new one.
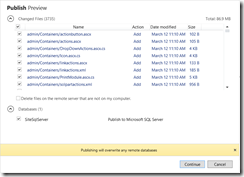
Continue, Continue, Continue, and then you’ll see a preview of the files that will be uploaded to your Azure Web Site and the database file that is uploaded to Azure SQL as well.
After a few minutes, the publishing is complete and you’ll be able to visit your site online.
This is really cool because you can make changes locally, check them into source control (source control is integrated with Web Matrix), and then push the changed files to your web site.
Notice the Register, Login, and Search controls are still there. That’s because we haven’t told DNN about our new skin yet. Log into the site as administrator, and you’ll see an Edit Page button at the top right of the page. Hover over it, and you’ll see a Page Appearance menu item. Click that.
Scroll down and you will see where you can change the skin on a per-page basis.
I changed both of those to <None Specified> to use the skin for the entire site. Click Update Page at the bottom of the screen to apply the changes.
Now go to Admin / Site Settings in the menu at the top of your screen. Expand the appearance section, and you can provide a site logo, favicon.ico, and change the skin and container to use your newly uploaded assets.
Once we save changes, we can see all the changes… the login/register link is gone, our site logo is there, and the favicon.ico is there.
What about the menu bar? We’d like to make some changes to that. For instance, hit F12 in Internet Explorer to show the development tools. Click the “select element” control.
We can see that the styles are coming from bootstrap.min.css and skin.css.
What’s nice is that all of your stylesheet rules are contained in skin.css, so you can keep making modifications there to override settings from bootstrap.min.css. If we go to Web Matrix and edit the skin.css file, we can make edits locally, test them, check them into source control, and publish to the Azure Web Site. Here is what my finished version looks like.
Another way to apply stylesheet rules is to go into Admin / Site Settings / Stylesheet Editor and edit the styles in the browser.
Editing Content
There’s a nice image carousel that comes with the default theme, I want to keep that but change the images. Go to Tools / Upload File in the DNN menu.
I then upload 4 images to the Images folder.
Now go to the Home page and Click Edit Page / Edit This Page. Once the page is in edit mode, you can hover over each of the modules in the page to edit content or provide additional settings. I edit the content and simply change the image carousel to use my images instead of the stock ones.
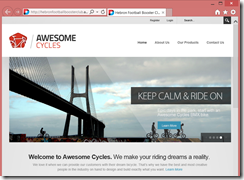
I also edit the HTML for the text below the image carousel. The end result.
Here’s what’s really cool, the skin we edited uses Bootstrap and provides a responsive UI. Reduce the width of the page to see this in action, letting you see what it would look like on a phone. Just by using the responsive design we now have a web site that is enabled for desktop, tablet, or phone.
If you aren’t yet familiar with Bootstrap, it’s the thing that makes this so easy. By using an existing template that already had Bootstrap, I can now enable a great experience for end users on different devices without having to code a separate site for each form factor.
Adding Pages and Navigation
Adding pages is really easy. Just go to the DNN menu and add a page.
Just give the page a name, title, and URL.
You can also specify a parent page. This will make the page appear in a drop-down menu.
Once the page is created, you can add Modules to the page. For instance, choose the HTML module and add it to the ContentPane section.
After editing its contents, I can do something like add an HTML table that shows the team’s schedule.
Next to the Edit Content pencil, there’s a gear icon to change settings for the newly added module, such as changing the module’s title to Schedule.
Want to see something cool? Go to a different page and choose Modules / Add Existing Module. Change the drop-down to the page you just worked with, and the list of modules appears. Then tell it the area of the page you want to add the module to.
I added it to the home page. It’s that easy to reuse content across pages. Even better, I can now go to the previous page and delete it, and it’s still on the home page, and available to use in other pages.
Still not convinced? Wait… there’s more. What if I want a module on every single page? For instance, there’s a nice footer area that I want to appear on every single page.
Just put the page in edit mode, click the gear icon next to the module, and choose Display Module On All Pages.
Now every page gets the module in the same location. Very, very nicely done. You can learn more about DNN and its capabilities by watching free training videos at the DNN Video Library.
Summary
This wasn’t a plug for DNN, but rather my shock at how easy it was to build a public web site using a free CMS in Azure. I was stunned at how easy it was to do basic things such as favicon.ico, branding, and creating my own skin. I was really surprised at how cool the modules functionality is, making it so easy to reuse content across pages. The rest of the day was spent tinkering with content and colors, I didn’t have a site designer so I was making things up as I went along. The site is still a rough draft, but you can see for yourself what it looks like at https://hebronfootball.azurewebsites.net.
For More Information
weblogs.asp.net Now Running On Orchard and Azure Web Sites
Comments
- Anonymous
January 02, 2015
Thanks for the very help full article on Azure and DNN setup. I found your blog while searching the internet for Azure and DNN.


