Visual Studio Release Management, DSC, and Azure VMs
This post will show how to use Visual Studio Release Management with Windows PowerShell Desired State Configuration (DSC) to configure multiple deployment environments and deploy an application.
If you just want to see the big payoff, scroll all the way down to the section “The Big Payoff”.
Background
I am presenting a series of workshops to our top GSI partners around the world and part of the workshop involves a case study on DevOps. A company (name’s not important here, call them Fabrikam or Contoso) has suffered quality issues trying to deploy solutions into multiple environments. They can get solutions to work in the development environment, but have trouble in the staging and production environments. The developers and IT staff have both made manual changes to each environment, so they are not exactly sure of the dependencies for the application and how to ensure that each environment has those dependencies available. They have an existing investment in Team Foundation Server, we need to propose a solution. The attendees have approximately 30 minutes to come up with an answer. This post is going to detail the configuration and provide a demo at the end of exactly why this is so cool.
The environments we will release code to look like the following.
There is a complete walkthrough and scripts for creating this environment in my previous post, Creating Dev and Test Environments with Windows PowerShell.
For each environment, we will make sure that each server has IIS installed, ASP.NET 4.5 installed, the default web site is stopped, we’ll create a new web site, deploy our code to the new site, and finally open port 8080 on the firewall. Rather than write lots of PowerShell to do all of this, we’ll use Desired State Configuration (DSC).
Again, if you just want to see what Release Management does and where’s the big payoff, scroll all the way down to the section “The Big Payoff”.
Release Management and Visual Studio Online
While I do find some twisted pleasure of installing server software and configuring permissions, I’d rather not set up TFS and Release Management Server just for this. If you want to go that way, you can, the steps are documented online at Install Release Management. I much prefer to use Visual Studio Online for all of my projects now, and it includes Release Management as part of the service. You only need to install the Release Management Client for Team Foundation Server 2013.
Check In Source
Open Visual Studio 2013 and created a new web application project.
I choose a new MVC project that does not perform authentication, and I uncheck the “Host in the cloud” option.
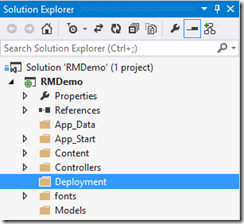
Next, I add a folder called Deployment. Our project will include details about deploying the solution.
Add a file in that folder named “Configuration.psd1”.
Replace the contents of that file.
Configuration.psd1
- @{
- AllNodes = @(
- @{
- NodeName = $env:COMPUTERNAME;
- }
- );
- }
Now add a second file to the folder named “InstallWebApp.ps1”. This is the PowerShell DSC file that our Release Management template will use. It describes the dependencies that the application requires, including ensuring that IIS is installed, ASP.NET 4.5 is installed, the default web site is stopped, and a new web site is created that uses the contents of our application to serve up the site. We also enable port 8080 in the Windows Firewall. We could go one step further and change the port binding for the web site to use port 8080, but let’s leave it as-is for now.
InstallWebApp.ps1
configuration Fabrikam_POC
{
# Import the module that defines custom resources
Import-DscResource -Module xWebAdministration
Import-DscResource -Module xNetworking
# Dynamically find the applicable nodes from configuration data
Node $AllNodes.NodeName
{
# Install the IIS role
WindowsFeature IIS
{
Ensure = "Present"
Name = "Web-Server"
}
# Install the ASP .NET 4.5 role
WindowsFeature AspNet45
{
Ensure = "Present"
Name = "Web-Asp-Net45"
}
# Stop an existing website
xWebsite DefaultSite
{
Ensure = "Present"
Name = "Default Web Site"
State = "Stopped"
PhysicalPath = "C:\Inetpub\wwwroot"
DependsOn = "[WindowsFeature]IIS"
}
# Copy the website content
File WebContent
{
Ensure = "Present"
SourcePath= "$applicationPath\_PublishedWebSites\RMDemo"
DestinationPath = "C:\inetpub\fabrikam"
Recurse = $true
Type = "Directory"
DependsOn = "[WindowsFeature]AspNet45"
}
# Create a new website
xWebsite Fabrikam
{
Ensure = "Present"
Name= "Fabrikam POC"
State = "Started"
PhysicalPath = "C:\inetpub\fabrikam"
DependsOn = "[File]WebContent"
}
xFirewall Firewall8080
{
Name = "Allow 8080"
DisplayName = "Allow 8080"
DisplayGroup= "Fabrikam POC Group"
Ensure = "Present"
Access = "Allow"
State = "Enabled"
Profile= ("Any")
Direction = "InBound"
RemotePort= ("8080", "8080")
LocalPort= ("8080", "8080")
Protocol = "TCP"
Description = "Allow 8080 for Fabrikam POC App"
}
}
}
Fabrikam_POC -ConfigurationData $applicationPath\Deployment\Configuration.psd1
Two bits of weirdness to explain here. The first is line 35. When the web site is built and the output is copied to the Drop folder, the web site will be in a folder _PublishedWebsites. You can see this in Visual Studio Online by inspecting the output.
The second is the ConfigurationData node. Admittedly, I copied bits and pieces of scripts trying to get this to work, and that was an artifact I couldn’t seem to get around. There may be a simpler way, please leave comments if you see opportunities to improve this.
Our InstallWebApp.ps1 script imports two modules, xNetworking and xWebAdministration, neither of which will exist on the server. We have to deploy those as artifacts to the servers as well. Create a new folder named Modules as a child of Deployment.
Go download the DSC Resource Kit (All Modules). In File Explorer, select the xNetworking and xWebAdministration folders and drag them to the Modules folder. The resulting structure looks like this.
Now that we have copied the required dependencies, the next step is to create a PowerShell script to deploy them. I create a file “InstallModules.ps1” that will use DSC to ensure the modules are deployed.
InstallModules.ps1
- configuration InstallModules
- {
- Node $env:COMPUTERNAME
- {
- # Copy the Modules
- File ModuleContent
- {
- Ensure= "Present"
- SourcePath= "$applicationPath\Deployment\Modules"
- DestinationPath = "$env:ProgramFiles\WindowsPowershell\Modules"
- Recurse= $true
- Type= "Directory"
- }
- }
- }
- InstallModules
You’ll see when we later configure the workflow for the release template that we need a workflow activity that ensures the modules are deployed before we call the InstallWebApp.ps1 script. This is because the InstallWebApp.ps1 depends on the modules being present.
!!!IMPORTANT STEP HERE!!!
The way that this solution works is that Release Management will take the build output and release it to the specific environment. We have to make sure that all of the files we just added are included in the build output, they won’t be by default. For every file that is a descendant of the Deployment folder, go to the properties of that file and choose Copy Always. You can multi-select files to make this easier.
The last step is to check the code in. Right-click the solution and choose Add solution to source control. You are prompted for Git or Team Foundation Version Control. I prefer Git, but the choice has no bearing on the rest of this post.
Since I chose Git, my source is checked into a local repository. I now need to push it to Visual Studio Online. Go to VisualStudio.com and create an account if you haven’t already (there’s a free trial, and if you have MSDN you have access already through subscriber benefits). Create a new project.
Once the project is created, we are assured our team will absolutely love this.
Go to the code section, and you will see a URL for the repository.
Go back to Visual Studio. Right-click the solution and choose Commit. Provide a commit message and then click the Commit button.
After you click Commit, you can now click Sync in the resulting dialog to push changes to the server.
You can now provide the URL for the remote repository to push our changes to the server.
Click publish, then go back to Visual Studio Online to see that the code was committed!
Go back to Visual Studio. We need to define a new build. Under the team project for your Visual Studio Online project (you may have to connect to the team project first), go to Builds and then choose New Build Definition.
Give the new build a name, and choose Enabled for queue processing.
For the Trigger, I choose Continuous Integration. This comes in really handy as you are troubleshooting the PowerShell deployment scripts, as you make changes to them you will need to kick off a build so that the files are available for Release Management to deploy. For example, I forgot the Copy Always step from above (that’s critical to making this work), so I just had to make a change and then check in the source again, automatically kicking off a new build.
For the Build Defaults tab, I chose to use the Hosted Build Controller. I could create my own build controller, but I love that Visual Studio Online provides that for me, too.
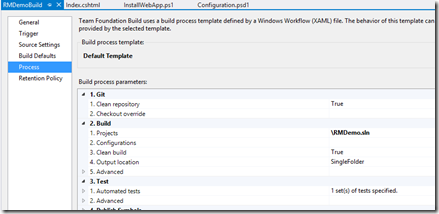
Finally, on the Process tab, choose the project or just provide the relative path of the .sln file.
Before continuing, test your build definition by queuing a new build.
Open the Release Management Client
Go to the Release Management client. You are prompted to connect.
There is some initial configuration for pick lists that is required to identify the stage type and the technology type.
We also need to connect to Azure in order to connect those stage types to environments. Go to the Administration / Manage Azure tab. You are prompted for the subscription ID, the management certificate key, and a storage account name.
This seems like a good assignment for a summer intern to add some value… create a prompt that connects to Azure and lets you pick this stuff instead of having to read my self-indulgently long blog post to find this needle in a haystack. However, there’s a straightforward workaround that, if you are working with Azure, you should know how to do this anyway.
Go to PowerShell and run the following command (requires the Azure PowerShell SDK is installed, available from https://azure.microsoft.com/en-us/downloads/).
You are prompted to save the file.
That file has the subscription ID (red arrow) and management certificate key (blue arrow).
Use the name of a storage account in your Azure subscription.
The management certificate is needed in order to connect to the deployment environment and do things like start the environment and stop it. The storage account is used as the Drop folder for the build output. If you open up the blob container “releasemanagement”, you will see the contents of the Drop folder for each Build that is released. Notice the Deployment folder that contains all of the PowerShell DSC stuff we were working with previously, and the _PublishedWebsites folder that contains the web site.
Define the Environments
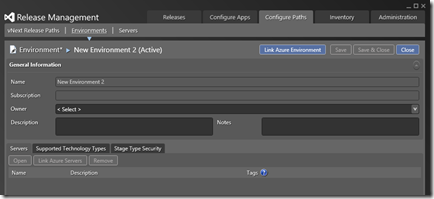
Now go to the Configure Paths tab and create a new Azure vNext environment. Click the button to Link Azure Environment.
Choose the subscription, and then choose a cloud service that you will deploy to and choose Link.
Click the Link Azure Servers button to link the VMs we previously created (see the post Creating Dev and Test Environments with Windows PowerShell).
You’ll now have defined the DEV environment that is linked to those Azure virtual machines.
Do the same thing, creating an environment for STAGE and PROD, linking to the appropriate servers.
Now that we have the environments, we need to create a release path.
Create a Release Path
Go to Configure Paths / vNext Release Paths. Click the New button.
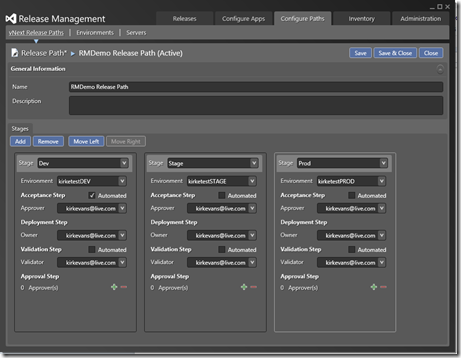
Add stages. For each stage, choose the environment. For the Dev environment, I enabled the Automated checkbox for the acceptance step. This means that we can automatically release to the Dev environment upon a successful build.
Define Components
On the Configure Apps / Components tab, add a new component. This allows us to associate the component to deploy from the build drop location. I chose “Build with application”, and I entered a “\” to access the root of the build drop.
Create a Release Template
Go to Configure Apps / vNext Release Templates and choose the New button. Provide a name, and choose the release path that we created previously. We can also choose if this release template will be triggered upon a build. We will select that. Click the Edit button to choose a team project and a build definition.
In the Toolbox, right-click Components and choose Add.
We can then choose the component that we created previously, “Web Site Files”. Click the Link button.
In the workflow designer, add the “Start Environment” action and four “Deploy Using PS/DSC” actions. Choose the server name, provide the username and password, and select the component that we just added. The PSScriptPath for the first action points to the InstallModules.ps1 script that we added to the build output, this will ensure that the xWebAdministration and xNetworking modules are present. The second action will install the web application files. We have deployment 4 actions: server1:modules, server1:webapp, server2:modules, server2:webapp. Fully admitting there might be (OK, there probably is) a better way to accomplish this, but this is how I got it to work.
An important note, else the release will fail: Change the SkipCACheck to true for each deploy action, for each stage (dev, test, and prod).
The Big Payoff
It’s time to see the fruits of our labor! Go to the project and make a change. For instance, edit Index.cshtml.
Index.cshtml
- @{
- ViewBag.Title = "Home Page";
- }
- <div class="jumbotron">
- <h1>Success!</h1>
- <p class="lead">Our demo worked.</p>
- <p>If you are seeing this, the demo gods favored me today!</p>
- </div>
Save the change and commit, then push the change to your Visual Studio Online repository. We enabled our build definition to automatically build upon check-in, and we enabled our release path to automatically deploy to the Dev environment upon build. After we push our changes, we see that a build has automatically been queued.
Once the build is complete, go to the Release Management client and go to the Releases / Releases tab. Our new release was automatically initiated.
Double click on the release to view progress.
Should something go wrong, you’ll receive an email.
Side note: You end up getting a deluge of emails from this thing, and I hate emails. Maybe I am missing it, but I expected to see some tighter integration with TFS work item tracking right here, let me submit work items directly from the RM client (or even automatically). Seems legit, the validation stage should be a work item tracking assignment to testers, once the work item is closed a request to move to the next stage is created. A failed release becomes a defect. Again, maybe that’s in there somewhere, but I’m not finding it.
If you want to kick off a release manually (for instance, you forgot a parameter in one of the deployment actions like I just did and need to edit the release template), you can go to Configure Apps / vNext Release Templates, select your template, and choose New Release. Choose the target stage (most likely Dev) and choose a build.
I wrote in a previous blog, Configure a Point-to-Site VPN Connection to an Azure VNet, I showed how you could establish a VPN to an Azure virtual network. To test, I connected to the VPN and then opened a browser on my local machine.
In case you are not as in awe of this as I am, let’s recap everything that was done.
- Used the PowerShell script from the post Creating Dev and Test Environments with Windows PowerShell to create 3 environments, each environment having 2 servers in an availability set and part of a virtual network.
- Used Visual Studio to check in source code to Visual Studio Online.
- Used Visual Studio Online hosted build controller to automatically build our project. I could have added a few tests as part of the build just to really show off.
- Used Release Management to automatically release our project to multiple environments.
- Used PowerShell DSC to ensure critical dependencies were available on the target machines, including IIS, ASP.NET 4.5, stopping the default web site, and adding a new web site. We also pushed our code to the new web site, and opened a firewall port 8080 just to show off.
That’s an impressive list… but even more impressive is that now we’ve verified everything is working in the Dev environment, I receive an email letting me know that I have a request to validate a release.
I open the Release Management client and can see my approval requests.
Once I approve, Release Management moves on to the next stage.
If I forget to turn on the servers before a check-in, no problem. Release Management will turn the environment on. If I make manual changes to the environment and accidentally remove a dependency, no problem. Release Management will ensure the dependency is there as part of the DSC script.
Of course, I have to show the final money shot… we successfully deployed to each environment, gated by approvals and validation throughout the release process.
Workflow-controlled releases to multiple environments in a predictable and consistent fashion without manual intervention. Less bugs, less time troubleshooting deployments.
For More Information
Install the Release Management Client for Team Foundation Server 2013
Creating Dev and Test Environments with Windows PowerShell
Configure a Point-to-Site VPN Connection to an Azure VNet
Comments
Anonymous
June 10, 2015
Fantastic article Kirk. A variation or update with Azure Resource Manager would be nice. VS RM and ARM =)Anonymous
June 11, 2015
Thanks a lot.Anonymous
June 15, 2015
Great stuff supplemented with detail steps in an excellent series of posts. However,there is missing info which would be nice if added e.g. no ref. to InstallModule.ps1 in this article etc ;) Well worth a read. Thanks Kirk.Anonymous
June 16, 2015
Thanks for the catch, @Sam! Updated the article with the contents of InstallModule.ps1. Please let me know if you notice any other missing parts.Anonymous
August 12, 2015
Kirk - great article. My company is interested in making the move to Azure, and this was very helpful. One question we had though. This seems to be very focused toward creating Azure environments using Azure VMs and targeting your builds toward those VMs. We currently use a managed services firm with their own VMWare infrastructure. One of the benefits of moving to Azure for us is using Web Apps with SQL Azure and forgoing the need to manage VMs altogether. In doing this, a key advantage would be the ability to spin-up Test instances as needed, and then destroying them once they were used. Would this be possible using a similar approach? What about the approach above would need to change under the PaaS model?Anonymous
August 31, 2015
@Mark - this post was very much VM-focused, but it is completely possible to customize the build process to enable the scenario you describe. Visual Studio Online uses a customizable build process where you can configure the build template and change its behavior. You could customize the process to create a SQL database. The more typical model is to have an environment staged prior to deploying your code to it, in which case it is fairly trivial to create a website and Azure SQL Database. You can set up deployment to Azure from Visual Studio Online or even from GitHub (or other providers like DropBox). As an example, see azure.microsoft.com/.../web-sites-publish-source-control. In that example, both the web site and SQL database would pre-exist, you just push the code assets to the web site. For publishing the database project and schema changes, you can use a DACPAC. I haven't tried this with Release Management and Visual Studio Online, you will likely need to spend some time playing around with its capabilities. incyclesoftware.com/.../deploying-databases-release-management


