Step-by-Step: Scoping out the NEW DHCP Failover in Windows Server 2012 - 31 Days of Favorite Features ( Part 28 of 31 )
UPDATE: Prior to implementing DHCP Failover with Windows Server 2012, be sure to apply cumulative update KB2756872 as noted HERE.
- - - - - - - - - -
This article is Part 28 in a series of articles on the "Top 31 Favorite Features in Windows Server 2012" with my fellow IT Pro Technical Evangelists. Be sure to follow them on Twitter and check out their blogs this month for the other parts of this series:
- Kevin Remde - Read Kevin's Full of I.T. blog
- Brian Lewis - Read Brian's My Thoughts on IT blog
- Matt Hester - Read Matt Hester's WebLog
The Dynamic Host Configuration Protocol ( DHCP ) is a core network service in most IT shops for providing IP Address lease information to client devices, and potentially, to servers. In this article, we’ll look at the new DHCP Failover capability in Windows Server 2012 as a cost-effective option that can provide High Availability ( HA ) for this important service. DHCP Failover in Windows Server 2012 is based on the IETF draft for the DHCP Failover Protocol.
Is High Availability for DHCP NEW?
Traditionally, in Windows Server 2008 R2 and prior, there were a couple ways of providing High Availability ( HA ) for the DHCP Service via:
- Clustering - Configuring the DHCP role as a clustered resource in a Failover Cluster across two or more physical server nodes.
- Split Scope - Using a “Split-Scope” approach between two standalone DHCP servers – where each server serves the same DHCP scope, but each only has a portion of the IP Address range to be leased.
While each of these approaches can indeed provide forms of HA for DHCP, both have some challenges …
- Configuring a Failover Cluster involved shared storage and could be both an expensive proposition as well as pretty complex to implement when trying to solve the issue of DHCP HA alone. In addition, the shared storage used within a cluster could also present a single-point-of-failure if not carefully engineered.
- The “Split-Scope” approach commonly assigns a 50/50 or 70/30 distribution of IP Addresses between DHCP servers – this approach doesn’t provide continuous availability of the same IP Address assignments for client devices in the event of a server failure, and also doesn’t work well if you have DHCP scopes that are already heavily consumed.
How does Windows Server 2012 provide HA for DHCP?
In addition to the traditional clustering and split-scope option for HA outlined above, Windows Server 2012 also includes a new DHCP Failover capability. Using DHCP Failover, two Windows Server 2012 DHCP servers can be configured in either a Hot Standby ( Active / Passive ) or Load Balanced ( Active / Active ) failover relationship. Once a failover relationship is configured, the two servers continuously replicate lease information between them, allowing one server to service the entire DHCP scope with persistence of existing IP Address assignments in the event of a server failure.
NOTE: DHCP Failover in Windows Server 2012 supports IPv4 DHCP Scopes only. When using IPv6, most organizations use stateless IP autoconfiguration, where the DHCP servers don’t maintain individual IPv6 Address leases. In this case, setting up two standalone DHCP servers with identical DHCP options defined for each scope is sufficient for providing DHCP HA, and DHCP Failover is unnecessary.
How do I configure DHCP Failover in Windows Server 2012?
The steps for configuring DHCP Failover in Windows Server 2012 are very easy … The first two steps are the same as what you’re already familiar with in Windows Server 2008 R2 and prior. Here we go!
- Using Server Manager, Install the DHCP Server role on two new Windows Server 2012 servers in your domain. Authorize both DHCP Servers in Active Directory.
- Using the DHCP Management console, Configure and Activate a new DHCP Scope on one of your two DHCP servers.
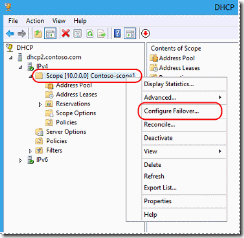
- Using the DHCP Management console, right-click on the newly activate DHCP Scope and select the Configure Failover… action.

- In the Configure Failover Wizard , click the Next button.
- In Specify the partner server to use for failover, type the FQDN of your second DHCP Server and click the Next button.
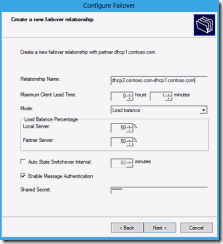
- In the Configure Failover dialog box, configure the following options:
- Relationship Name: Enter a descriptive name to describe this DHCP Failover relationship or accept the default value.
- Maximum Client Lead Time: Specifies the amount of time for which a DHCP lease may be renewed by either failover peer without contacting the other. It also specifies the amount of time that either DHCP server will wait in a “partner down” state before assuming control of the entire IP address range within the scope. ( default = 1 hour ).
- Mode: Select Load Balance ( default – Active / Active ) or Hot Standby ( Active / Passive )
- Load Balance Percentage: Specifies the percentage of the IP Address range to reserve for each server in the failover relationship. Each server will use their assigned range of addresses prior to assuming control over the entire IP Address range of a scope when the other server transitions into a “partner down” state and the Maximum Client Lead Time ( specified above ) passes.
- Auto State Switchover Interval: When selected, specifies the amount of time that elapses before a DHCP Server is automatically transitioned to a “partner down” state when network communication is interrupted to a DHCP Server. If this option is unchecked, an administrator must manually transition the status of a DHCP Server into a “partner down” state using the DHCP Management console or PowerShell. ( when checked, the default = 60 minutes )
- Enable Message Authentication: check this checkbox option to enable authentication of failover replication traffic between servers
- Shared Secret: Type a “Shared Secret” ( ie., a Password ) to be used to authenticate the failover connection between servers

- Click the Next button and then click the Finish button.
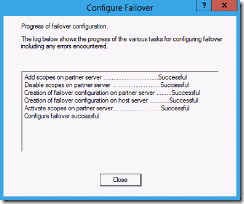
- Confirm that the failover configuration was successful, and then click the Close button.

How do I configure DHCP Failover in PowerShell?
To configure DHCP Failover using PowerShell 3.0 in Windows Server 2012, you can leverage the Add-DhcpServerV4Failover Cmdlet. To configure a Load Balanced failover relationship, use the command syntax below:
Add–DhcpServerv4Failover –PartnerServer <string> –Name <string> –ScopeId< IPAddress[]> [--LoadBalancePercent <uint>] [–MaxClientLeadTime <TimeSpan>] [- AutoStateTransition <Bool>] [–SafePeriod <TimeSpan>] [-SharedSecret <string>] [-Force]
Alternatively, to configure a Hot Standby failover relationship, use this command syntax:
Add–DhcpServerv4Failover –PartnerServer <string> –Name <string> –ScopeId <IPAddress[]> [-ReservePercent <uint>] [-ServerRole <string>] [– MaxClientLeadTime <TimeSpan>] [-AutoStateTransition <Bool>] [–SafePeriod< TimeSpan>] [-SharedSecret <string>] [-Force]
Do It: Configure DHCP Failover in your Lab!
Your turn! Follow these steps to configure DHCP Failover in your own lab environment …
- Download the Windows Server 2012 installation bits.
- Download the new Remote Server Administration Tools ( RSAT ) toolkit for Windows Server 2012 to get the new DHCP Management console tool.
- Build your Windows Server 2012 lab environment as a dual-boot lab using these steps.
- Configure DHCP Failover in Windows Server 2012 using these steps.
Are you planning to use DHCP Failover in your environment?
Are you planning to leverage DHCP Failover in Windows Server 2012 in your shop? Feel free to leave your feedback and tips below in the comments area to share your experiences!
HTH,
Keith