Lab 3: Working with Identity (Jan-June 2015 Azure Hybrid Cloud IT Camps)
This post contains Lab 3 of the 5 labs created for our current set of US DX IT Camps.
The complete set of labs are listed here:
- Lab 1 – Building the Foundation (Virtual Network, Storage, and Cloud Service)
- Lab 2 – Building Workloads (Creating your DC and SQL Servers)
- Lab 3 – Working with Identity (Sync your domain to Azure AD, setup and test Multi-Factor Authentication)
- Lab 4 – Building Application and SQL Workloads (Install the Web server. Configure your SQL Server database and connectivity from your Web Server)
- Lab 5 – Building Application Workloads (Install, configure, and a sample web application)
- Lab Appendix (Installing AD by running a script on DC01, and installing Azure PowerShell Cmdlets)
- Lab 6 (Optional) – A SUSE Linux VM in Azure (Build, connect to, and add Ubuntu Desktop to a SUSE Linux VM)
Lab 3: Working with Identity
Azure Active Directory is a service that provides identity and access management capabilities in the cloud. In much the same way that Active Directory is a service made available to customers through the Windows Server operating system for on-premises identity management, Azure Active Directory (Azure AD) is a service that is made available through Azure for cloud-based identity management. Azure AD can be used as a standalone cloud directory for your organization, but you can also integrate existing on-premises Active Directory with Azure AD. Some of the features of integration include directory sync, password sync and single sign-on, which further extend the reach of your existing on-premises identities into the cloud for an improved admin and end user experience.
Create a new Azure Active Directory environment
In this task, you will create a new Azure Active Directory tenant.
Perform the following tasks in the Azure management portal.
- In the Azure management portal, click ACTIVE DIRECTORY.
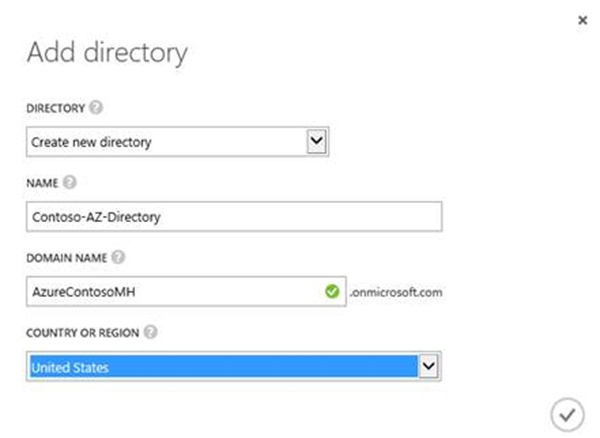
- Click NEW, click APP SERVICES, click ACTIVE DIRECTORY, click DIRECTORY, and then click CUSTOM CREATE.

- In NAME, type Contoso-AZ-Directory.
- In DOMAIN NAME, type AzureCONTOSO<ID> (where <ID> is your unique ID from the earlier labs).
- In COUNTRY OR REGION, select UNITED STATES, and then click the Complete icon.
- If you are not in the United States, select it anyway to ensure the consistency of the lab steps.
Create an Azure Active Directory Administrator account
In this task, you will create a user account to serve as the administrator of your Azure Active Directory service.
Perform the following tasks in the Azure management portal.
- In the Azure management portal, click ACTIVE DIRECTORY, and then click Contoso-AZ-Directory.
- Under Contoso-AZ-Directory, click USERS, located on the top menu.
- In the bottom bar, click ADD USER.
- In USER NAME, type AADAdmin, and then click the Next arrow.

- In FIRST NAME, type AAD, and then in Last Name, type Admin.
- In DISPLAY NAME, type AADAdmin.
- In ROLE, select Global Administrator.
- In ALTERNATE EMAIL ADDRESS, type any valid e-mail address you have access to, and then click the Next arrow.

- Under Get temporary password, click create.

- MAKE NOTE of this password as you will need it later.
- Click the Complete icon.
- Note the USER NAME value of the user; you will need this later.
- The USERNAME value will be based on the account you used to manage Microsoft Azure.
Set a password for your admin account
In this task, you will perform an initial logon to set the password for the admin account.
Perform the following tasks on your localworkstation:
- Close out of all web browser sessions. Using Internet Explorer, navigate to manage.windowsazure.com.
- Log in as AADAdmin using the Unique <ID> and password you noted previously. i.e. AADAdmin@AzureContoso<ID>.onmicrosoft.com
- You will need to use the username value you noted earlier.
- You may need to sign out first.
- When prompted, change the password to Passw0rd! and then click Update password and sign in.
- You will see a message “No subscriptions found.” This is expected. The user is not permitted to manage subscription level details.
Configure and test the AADSync Service
In this task, you will configure Windows Server 2012 R2 and create a new user to test your synchronization when you enable DirSync, and then perform an initial sync to populate your Azure Active Directory service with copies of your local user accounts.
To connect to DC01using RDP:
- Close all web browsing sessions then reopen Internet Explorer and navigate to https://Manage.WindowsAzure.com.
- Log in with your Microsoft account used in the previous labs, not the new AD administrator account from the previous section.
- On the left menu of the Azure management portal, click VIRTUAL MACHINES.
- Next to DC01, click the DC01 computer name to open the Virtual Machine Quick Start or Dashboard.
- Click the DASHBOARD tab.
- On the bar at the bottom, click CONNECT, and then click Open.
- Click Connect.
- When prompted, log on as sysadmin (or sysadmin@contosoazure.com) using Passw0rd! as the password.
- Click yes.
You are now logged on to your virtual machine.
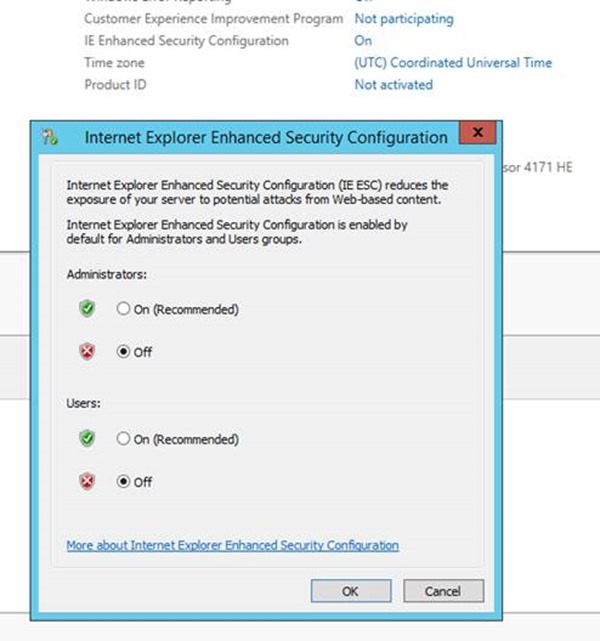
- Open Server Manager and click Local Server on the left hand navigation pain.
- Click on IE Enhanced Security Configuration and click on.
- In the Security Configuration screen, click off for both administrators and users. This is just for testing in this lab.
- Click OK.
- In Server Manager click tools and select Active Directory Users and Computers
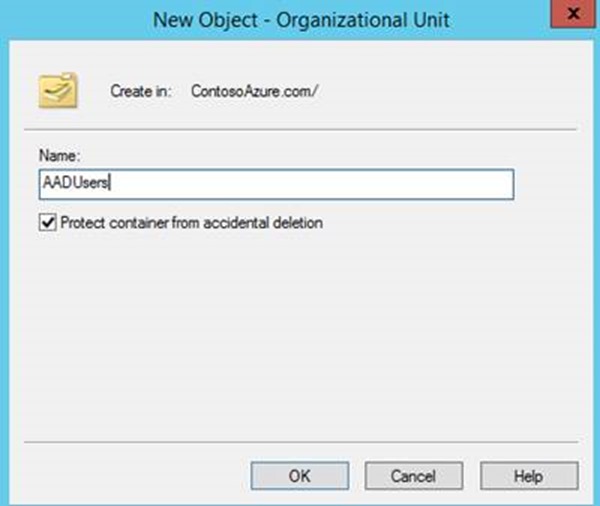
- Right click on ContosAzure.com and select New -> Organizational Unit
- In the name type AADUsers and click OK
- Right click on AADUsers and select New User
- In name user your unique <ID> from earlier followed by sync for the logon name for example MHSync. Click Next

- On the password screen enter a password, Passw0rd! and check the box Password never expires. Click Next.
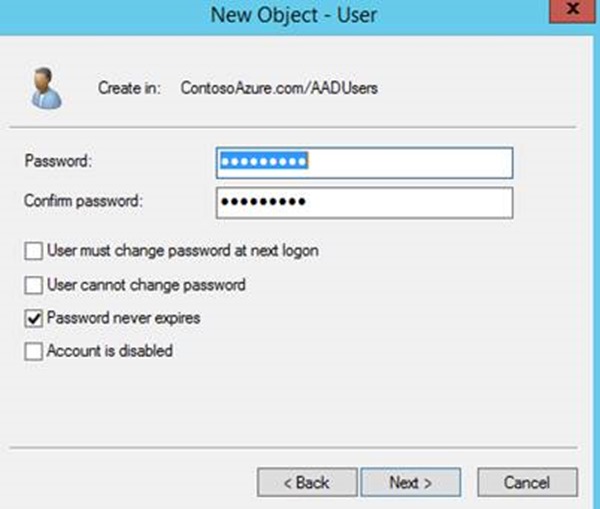
- Review the new user and click Finish.
- Still on DC01: Using Internet Explorer, navigate to https:// Azure.Microsoft.com
- Log in as your subscription user, not the user you just created
- In the Azure management portal, scroll to and click on ACTIVE DIRECTORY.
- Click Contoso-AZ-Directory, and then click the Directory Integration tab.
- Next to DIRECTORY SYNC, click Activated.
- Click Save, and then click Yes
- Wait for the job to complete before proceeding.
Using Server Manager – Add Feature .Net Framework 3.5 and 4.5
NOTE: .Net Framework may take about 5 minutes or longer to install.Open Internet Explorer and go to https://aka.ms/azureadsync to download the Microsoft Azure Active Directory Sync Services
Click download
Save the tool to your desktop.
On the desktop, right click on the MicrosoftAzureADConnectionTool and select Run As Administrator. This will launch the installation.
Check the I agree to the terms and click Install
-
NOTE: dirSync may take about 10 minutes or longer to install.
In User name, type AADAdmin@AzureContoso<ID>.onmicrosoft.com, replacing <ID> with the unique ID for your domain name.
In Password, type Passw0rd! and then click Next.
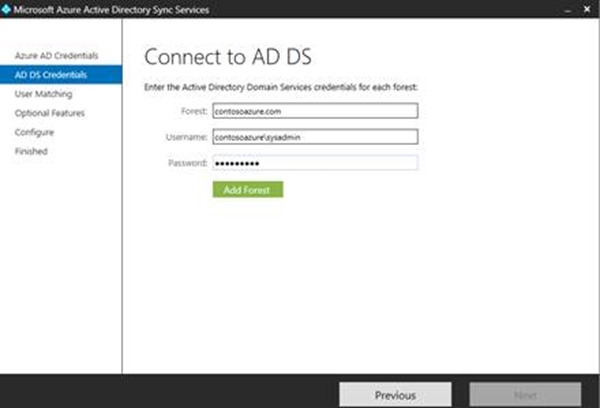
In the Forest type in ContosoAzure.com
In User name, type contosoazure\sysadmin.
In Password, type Passw0rd! and then click Add Forest
Click Next.
On User Matching, leave the defaults and click Next
On optional features select Password synchronization and click Next
On the Configure screen review the options and click Configure.
When configuration has completed review the screen, verify Synchronize now is selected and then click Finish.
Switch to your Azure management portal, and then click ACTIVE DIRECTORY.
Click the Domain that synchronized, and then click the Users tab and look for the user you created earlier. You should eventually see the user you created in Active Directory on DC01 now having been synchronized to your Azure Active Directory.
Implementing Multi-Factor Authentication
Multi-factor or two-factor authentication is a method of authentication that requires the use of more than one verification method and adds a critical second layer of security to user sign-ins and transactions. It works by requiring any two or more of the following verification methods:
- Something you know (typically a password)
- Something you have (a trusted device that is not easily duplicated, like a phone)
- Something you are (biometrics)
The security of multi-factor authentication lies in its layered approach. Compromising multiple authentication factors presents a significant challenge for attackers. Even if an attacker manages to learn the user's password, it is useless without also having possession of the trusted device. Conversely, if the user happens to lose the device, the finder of that device won't be able to use it unless he or she also knows the user's password. Azure Multi-Factor Authentication is the multi-factor authentication service that requires users to also verify sign-ins using a mobile app, phone call or text message. It is available to use with Azure Active Directory, to secure on-premise resources with the Azure Multi-Factor Authentication Server, and with custom applications and directories using the SDK.
In this task, you will configure Multi-Factor Authentication (MFA) with Microsoft Azure. To complete this module fully, you need to have a phone which can send and receive text messages or calls. You will configure this lab to use your phone as a second authentication factor this is done via replying to a system-generated text or voice message.
We will start by enabling the MFA service:
- Using Internet Explorer on your local workstation, navigate to manage.windowsazure.com.
- Log on using your tenant account.
- In the Azure portal, on the column, scroll down and click ACTIVE DIRECTORY.
- Click MULTI-FACTOR AUTH PROVIDERS, and then click CREATE A NEW MULTI-FACTOR AUTHENTICATION PROVIDER.
- In NAME, type Contoso-MFA, ensure the correct subscription is selected (If you have multiple subscriptions tied to your live ID).
- For directory select Contoso-AZ-Directory and then click CREATE.
Testing Multi-Factor Authentication
In this task, you will test multi-factor authentication. Ensure you have the phone readily available as you will have a limited time to receive and reply to the text message generated by Microsoft Azure.
Perform this task on your local machine.
- In the Microsoft Azure active directory portal click directory and click Contoso-AZ-Directory.
- On the top bar click the Configure tab
- Under the multi-factor authentication section click Manage Service Settings

- If prompted enter your tenant credentials
- In multi-factor authentication click the users tab on the top navigation bar.
- Select the user you created earlier on DC01 and click Enable under quick steps

- On the information screen, review the message and click enable multi-factor auth.
- Click Close
- Completely close Internet Explorer (all tabs), re-open IE, and navigate to https://aka.ms/MFASetup Note: If you are signed in, sign out to continue
- On the Sign in screen, type in the username and password you created earlier and click sign in.
- Since this is the first time the user has logged in you will need to configure MFA, click Set it up now
- Fill in your contact information (phone number of your mobile phone), select the Call me radio button, and click Contact me

- Answer your phone when it rings, and listen to the instructions. Press # to finish the authentication process. On the Additional security verification click Done.
- Your sign-in process will continue and you will be called again. Answer your call and type # to finish the logon process.
