Note
Access to this page requires authorization. You can try signing in or changing directories.
Access to this page requires authorization. You can try changing directories.
ASP.NET Web API is a new feature release with the .NET Framework 4.5. It allows a single Web service to communicate with multiple clients in various formats such as XML, JSON and OData. Although many protocols exist for communicating data on the Internet, HTTP seems to be dominating due to its ease of use and wide acceptance.
ASP.NET Web API allows developers to expose data and services to the Web directly over HTTP. This approach offers developers the ability to fully harness the richness of HTTP as an application layer protocol to communicate with a broad set of clients, including browsers, mobile devices, desktop applications, or backend services. The architecture is designed to support applications built with REST, but it does not force new applications to use a REST-style architecture.
This article does not intend to be a full blown walkthrough or tutorial for developing Web API services using .NET Framework 4.5 but rather demonstrates the use of a simple implementation of inbuilt dependency injection (DI) [also known as Inversion of Control (IOC)] mechanism. Microsoft Patterns and Practices team have developed their own DI framework called Unity that is the more suitable candidate in elaborated scenarios. Latest version of Enterprise Library that includes Unity framework can be found on Codeplex. Here is the link: https://entlib.codeplex.com/releases/view/64243. It's highly recommended to read the accompanying developers guide to get a thorough understanding of the DI even if you're looking to use a different DI framework!
I’m using Visual Studio 2012 Update 2 though Visual Studio 2012 or Visual Studio 2012 Express, Visual Studio 2010 (with ASP.NET Web API extension installed) should work well. Some familiarity with MVC architecture is assumed but is not a requirement for understanding the code.
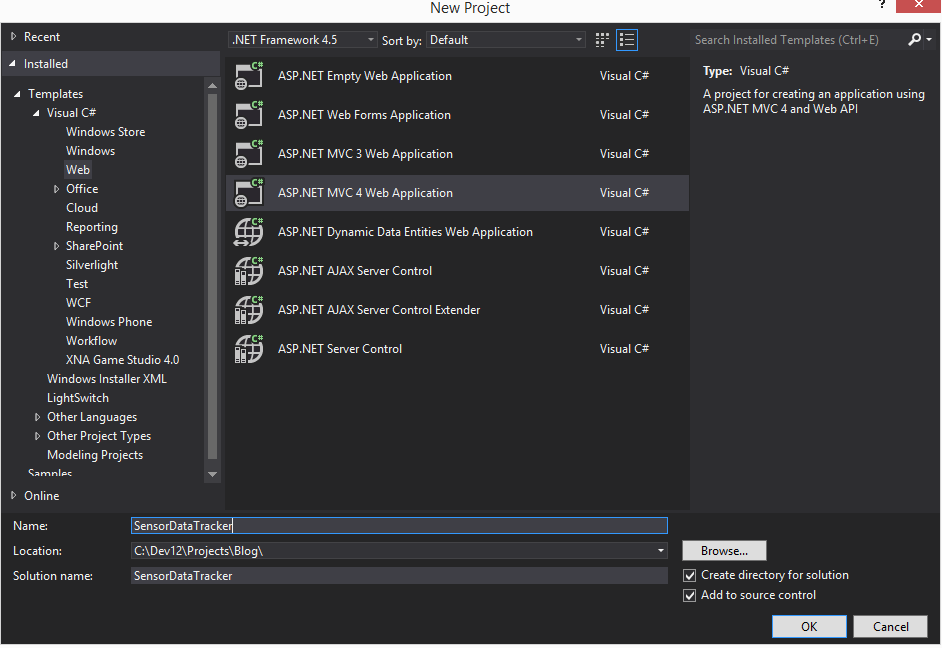
The first step to creating a Web API service is to fire up the IDE and create a new project of type ASP.NET MVC 4 Web Application:
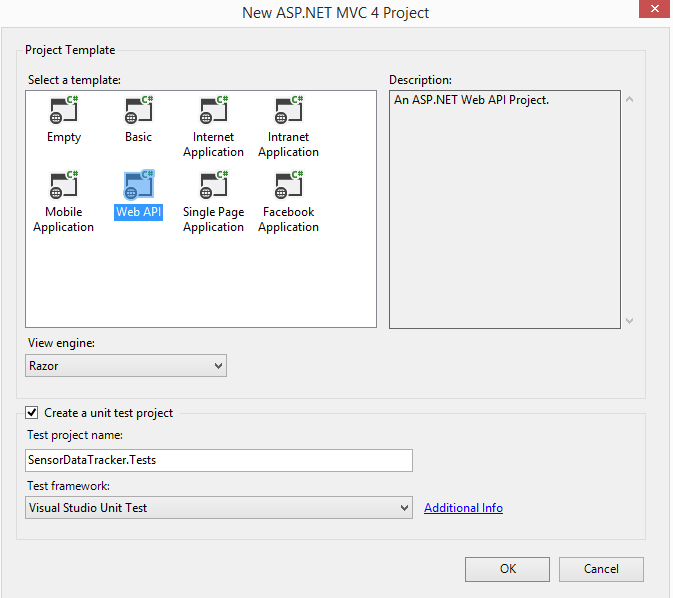
In the next dialog, choose Web API as the template and leave rest of the options as they are.
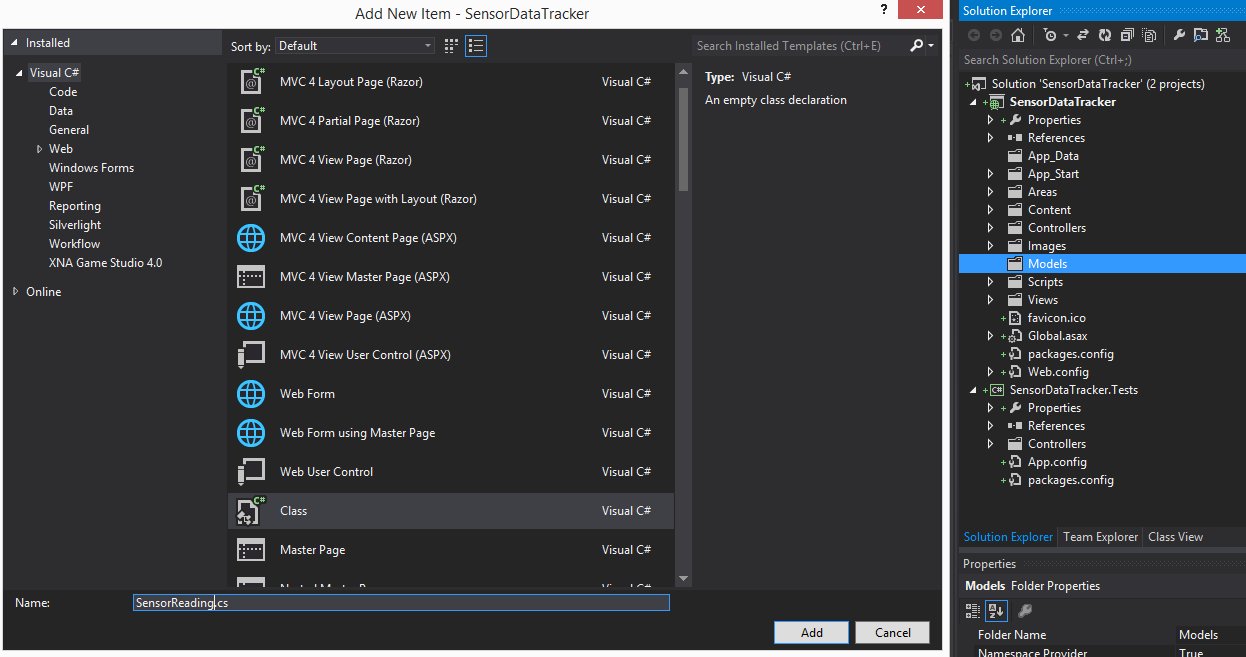
Click on OK button and a new Web API project based on MVC 4 is generated for you. Since the intent of this tutorial is to exhibit simple inbuilt DI mechanism in Web API MVC 4, we'll not go into the details of the architecture or MVC in general. We'll start by adding a couple of model classes to represent a fictional sensor reading and a results page displaying all the readings for a user. Right click on Models folder and add a new class named SensorReading as shown:
Replace the code in SensorReading.cs with the following code:
namespace SensorDataTracker.Models
{
using System;
public class SensorReading
{
public int Id { get; set; }
public DateTime CreateDate { get; set; }
}
}
As it’s trivial to figure out, we’re creating a class to represent a sensor reading:
- Id – Actual numeric reading
- CreateDate – Date and time when the reading was taken
Similarly create another model class and name it ResultPage. Replace the code in ResultPage.cs with the following code:
namespace SensorDataTracker.Models
{
using System.Collections.Generic;
public class ResultPage<T>
{
public int TotalCount { get; set; }
public int PageNumber { get; set; }
public IEnumerable<T> Results { get; set; }
}
}
Similarly we’re creating a generic collection holder ResultPage class that has:
- TotalCount – Total number of sensor readings.
- PageNumber – Current page number
- Results – Generic collection of objects that may be used to store any object.
Now we'll implement a mechanism for fake persistence of the readings using an in memory store that simply stores the readings for the duration of the session in a memory collection, though a real implementation shall have a backend database to persist and retrieve the values at will.
Add a new folder to the project and call it Store.
Under folder Store, add an interface named ISensorReadingStore. Replace the code in ISensorReadingStore.cs with the following code:
namespace SensorDataTracker.Store
{
using SensorDataTracker.CommonLogic.Models;
public interface ISensorReadingStore
{
void Save(SensorReading reading);
ResultPage<SensorReading> Get();
ResultPage<SensorReading> Get(int pageNumber);
}
}
Again under folder Store, add a new class named SensorReadingStore. Replace the code in SensorReadingStore.cs with the following code:
namespace SensorDataTracker.Store
{
using SensorDataTracker.Models;
using System.Collections.Generic;
using System.Linq;
public class SensorReadingStore : ISensorReadingStore
{
private readonly IList<SensorReading> _internalStore = new List<SensorReading>();
public const int PageSize = 5;
public void Save(SensorReading reading)
{
_internalStore.Add(new SensorReading { Id = reading.Id, CreateDate = reading.CreateDate });
}
public ResultPage<SensorReading> Get()
{
return this.Get(1);
}
public ResultPage<SensorReading> Get(int pageNumber)
{
var skipCount = (pageNumber - 1) * PageSize;
return new ResultPage<SensorReading>
{
TotalCount = _internalStore.Count(),
PageNumber = pageNumber,
Results = _internalStore.Skip(skipCount).Take(PageSize)
};
}
}
}
Notice how we’re using an interface to represent our store. In order to plug-in DI, we need to design our application with loose coupling and no hard dependencies in place since the DI framework accesses the system via interfaces. This is also very handy approach for unit testing since fake representations of the underlying store may be created with a very few lines of code and tests are executed against the latter as opposed to running the test against say a store that hosts SQL database!
Next step is to create the Web API controller that handles all the requests from user interface and simultaneously interact with our store to retrieve and save values. Locate the Controllers folder and delete the default API controller ValuesController.cs file since we’re plugging in our own.
[Note: You may have to delete the corresponding Unit Test controller if you chose to create the unit test project initially, otherwise you’ll see compile errors.]
Right click on Controllers folder and select Add-->Controller. Make sure that the dialog looks like as below:

Replace the code in SensorReadingController.cs with the following code:
namespace SensorDataTracker.Controllers
{
using SensorDataTracker.Models;
using SensorDataTracker.Store;
using System.Net;
using System.Web.Http;
public class SensorReadingController : ApiController
{
private readonly ISensorReadingStore _store;
public SensorReadingController(ISensorReadingStore store)
{
_store = store;
}
public void Post(SensorReading reading)
{
if(reading==null) throw new HttpResponseException(HttpStatusCode.BadRequest);
_store.Save(reading);
}
public ResultPage<SensorReading> Get()
{
return Get(1);
}
public ResultPage<SensorReading> Get(int pageNumber)
{
return _store.Get(pageNumber);
}
}
}
As you can see, we’ve methods mapping to GET and POST requests with one overload of GET that takes a page number as a parameter. Notice the constructor of SensorReadingController class that takes an interface as a parameter – classic paradigm of DI implementation. This way the controller doesn’t need to be dependent on a specific implementation of store and DI framework may inject the dependency at runtime.
Okay…so now since we’ve the initial wiring setup, it’s time to plug-in the implementation of the build in DI framework. Right click on App_Start folder and add a new class ResolveController.cs and insert the following code:
using System;
using System.Collections.Generic;

using System.Web.Http.Dependencies;

using SensorDataTracker.Controllers;

using SensorDataTracker.Store;
namespace SensorDataTracker.App_Start
{
public class ResolveController : IDependencyResolver
{
private static readonly ISensorReadingStore ReadingStore = new SensorReadingStore();
public object GetService(Type serviceType)
{
return serviceType == typeof(SensorReadingController) ? new SensorReadingController(ReadingStore) : null;
}
public IEnumerable<object> GetServices(Type serviceType)
{
return new List<object>();
}
public IDependencyScope BeginScope()
{
return this;
}
public void Dispose()
{
}
}
}
Let’s quickly walkthrough the code before moving further. Here we’re creating a DI controller by implementing the inbuilt IDependencyResolver interface. You need to provide implementation of service finder methods GetService and GetServices both accepting a type as parameter. Since we’re creating a simple implementation of DI framework, we may ignore the GetServices method for the time being and simply return a collection of objects which is the recommended approach. In our over-simplistic model, we’re leaving Dispose method empty since we’re not holding onto an expensive resource that needs to be released. For BeginScope, since in this case we don’t have a concept of a scope or resource release, we may simply return this object!
Crux of the implementation is GetService method. Since we’re dealing with only one implementation of controller, we’re checking the type of the passed in controller and if it’s of type SensorReadingController we’re creating a new instance of controller and passing it the default implementation of ISensorReadingStore and that’s it!
Next step is to let the framework know about the dependency resolver we’re using and we’re going to do this in WebApiConfig.cs file that contains the HTTP route mapping table.
Expand the App_Start folder and open WebApiConfig.cs file. Replace the existing code with the following:
using System;
using System.Collections.Generic;

using System.Linq;

using System.Web.Http;

using SensorDataTracker.App_Start;
namespace SensorDataTracker
{
public static class WebApiConfig
{
public static void Register(HttpConfiguration config)
{
config.Routes.MapHttpRoute(
name: "DefaultApi",
routeTemplate: "api/{controller}/{id}",
defaults: new { id = RouteParameter.Optional }
);
// Uncomment the following line of code to enable query support for actions with an IQueryable or IQueryable<T> return type.
// To avoid processing unexpected or malicious queries, use the validation settings on QueryableAttribute to validate incoming queries.
// For more information, visit https://go.microsoft.com/fwlink/?LinkId=279712.
//config.EnableQuerySupport();
// To disable tracing in your application, please comment out or remove the following line of code
// For more information, refer to: https://www.asp.net/web-api
config.EnableSystemDiagnosticsTracing();
config.DependencyResolver = new ResolveController();
}
}
}
Notice the highlighted statement where we’re telling the Web API infrastructure which DI implementation to use. Rest of the code remains unchanged.
So now we’ve completed all the steps that are required to provide a simple implementation of inbuilt DI framework in a Web API service. Now you may build and run the service in the IIS Express host that comes with the IDE. If you set a breakpoint in GetService method and invoke the service from web browser such as below:
https://<host>:<protocol>/api/SensorReading
You should hit the breakpoint in GetService method which proves that our DI implementation is working as expected! On completion of the call, you should get a JSON string or HTML based on the default accept-header of the browser you’re working with.
And that’s it for now! In the next series of articles, I’ll demonstrate how to write a WPF client, a Windows Phone 8 client, Windows Store client and unit testing strategies to go along this approach.
NOTE: The application shown in this example is part of the code that I wrote for Continuous Delivery Release Pipeline with TFS project (by Microsoft Patterns and Practices team).
Next in Series –>Writing BDD style unit tests to verify the MVC based Web API
Comments
Anonymous
August 09, 2013
I wish the code block font was smaller. This one can be read with some effort.Anonymous
September 01, 2013
@Umut Hold Ctrl and scroll your mouse wheelAnonymous
October 16, 2013
Agrees with umut.. It will be more fun when a magnifier is required,Anonymous
December 22, 2013
Excellent article! Thank you. If you need a solution for your problem no one pay attention to font size.Anonymous
July 01, 2014
I disagree, everyone here will be affected by the font size, that's user experience, that's why stackoverflow.com is more popular now.Anonymous
July 20, 2014
Yes true fount should be readable specially for coding part..Anonymous
July 23, 2014
Thank you for feedback folks! Please accept my apologies for the hard-to-read font. It took me a little bit of struggle with the toolset, but I've fixed the font issues. Your feedback and comments are much appreciated!Anonymous
November 12, 2014
Hi Kirpa Singh, Thank you for the interesting article and religiously followed the steps mentioned here but I get the following error while try to build "The type or namespace name 'ISensorReadingStore' could not be found (are you missing a using directive or an assembly reference?)" Could you please help me to fix this error?Anonymous
January 16, 2015
Hey Venkatesh, Excellent catch! Looks like I forgot to include the code for ISensorReadingStore. I'll update the page shortly. Apologies for the inconvenience and thanks for pointing this out!Anonymous
January 16, 2015
Hi Venkatesh, Just updated the code to correct the omission. Please include the missing interface (ISensorReadingStore) and let me know if you find any other issues. Thanks!Anonymous
April 30, 2015
What if I have another api controller say, WeatherReadingController with IWeatherReadingStore? How do I inject different dependency for different controllers?Anonymous
May 07, 2015
What if I have another api controller say, WeatherReadingController with IWeatherReadingStore? How do I inject different dependency for different controllers? Please Answer to this question...